25
Installation, Operation & Maintenance Manual
OXYvisor Optical Oxygen Analyzer
4�3 Weight
4.4 Tools
4.5 Mounng the Analyzer
When appropriate, use sunshade and/or enclosures, heated sample lines or other means
necessary to avoid extreme temperature dierences between the sample tubing and gas
sample.
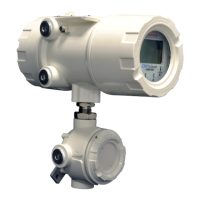
The front compartment contains the display and electronics boards. It is secured via the 2 mm
Hex Lock and is not meant to be opened in the eld at any time.
The approximate weight of the analyzer is 13.7 lb (6.2 kg).
Suggested tools to complete the installation are listed below:
• M8 or Small crescent Wrench (Used for 2” pipe mount bracket installation)
• Large athead Screwdriver (Used to mount analyzer to mounting bracket)
• Small athead Screwdriver (used for wiring)
• 36mm Open End or large adjustable wrench (Used to adjust jam nut between analyzer and junction box)
• 2 mm Hex Key or driver to lock the rear compartment
• Loctite 577, P/N: B8008-1014 (Only if J-Box needs re-orientation, see Section 6.4.2)
Factors to consider when mounting the analyzer:
• Analyzer/Pipe Mount Orientation: The analyzer and pipe mount kit can be mated/arranged to mount to either a
vertical (Fig. 6) or horizontal pipe (Fig 7). See Fig. 6 and F.
• Outside Mounting: Avoid direct sunlight. Use a sunshade.
• Sensor Length: Consider the distance from the analyzer to the sensor installation into the process. This may
be quite short if a sample panel is used. If the sensor is mounted directly into the process then consider a
mounting point that is close to the sensor, but avoids excess heat or cold from the process.
• Sample Conditioning Panel (SCP): An accurate temperature measurement is required for an accurate oxygen
measurement. The SCP temperature sensor has been specially selected and thermally isolated from
the sample tubing, in order to accurately measure the sample gas temperature and not the sample tube
temperature. Avoid situations where the sample gas temperature may be considerably dierent than the
sample tubing near the temperature and oxygen sensors.
• Conduit / Cable Routing: Consider possible interference with the conduit / cable routing and the mounting
bracket before installation is nalized.
If the front compartment is opened, follow the instructions for tightening and securing the Rear
(Wiring) Compartment lid. Section 6.4.2
Section 4
Installation