68
Installation, Operation and Maintenance Manual
OXYvisor Optical Oxygen Analyzer
This section covers removal and installation of eld removable or replaceable items.
6.4 Service
The Rear (Wiring) Compartment lid can be removed by:
1. Using a tool (2 mm Hex), unlock the Rear (Wiring) Compartment 2 mm Hex Lock.
2. Turn the Rear (Wiring) Compartment lid by rotating counter-clockwise
The Rear (Wiring) Compartment lid can be installed and secured by:
1. Turn the Rear (Wiring) Compartment lid by rotating clockwise
2. Ensure lid threads completely, compresses o-ring and no gap exist between lid and main enclosure.
3. Secure the lid with by tightening the 2 mm Hex Lock with tool.
It is important to be careful when screw on or undo a cover. Thread surface should be free
of any grains, pellets and other impurity, which cause seizing, and thread could be damaged.
Never screw on the cover forcefully !
It is important to be careful when screwing on or undoing the Junction Box Thread surface
should be free of any grains, pellets and other impurity, which cause seizing, and thread could
be damaged. Never screw on the cover forcefully !
There is a danger of explosion when carrying out repairs and maintenance on the device in a
hazardous area. Isolate the device from power and ensure the atmosphere is explosion-free
(hot work permit) before opening the analyzer.
6.4.1 - Removing and Replacing Rear (Wiring) Compartment Lid
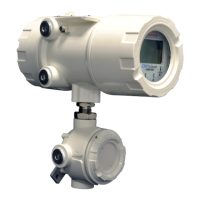
6.4.2 - Removing / Replacing Juncon Box
The Junction Box is tted and located at the bottom of the analyzer with a front-forward orientation as shown in
Figure 4. The orientation is locked into position via a Jam Nut and the 3/4” NPT threads (mating to Fiber Optic
Bushing) are sealed with a thread-sealant. In most cases it will not be necessary to re-orientate the Junction
Box, however if it is required follow the instructions in this section.
Removing the Junction Box:
1. Loosen the Jam Nut
2. Unthread the Junction Box from the Fiber Optic Bushing.
The Junction Box has been tted and secured at the factory. These removal and installation instructions
related to the Junction Box are only necessary if the installation required the Junction Box to be re-
orientated (turned).