TD 92599EN
1 September 2011/ Ver. B
User Manual
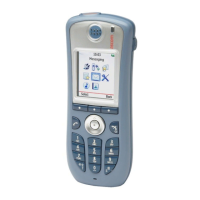
Ascom i62 VoWiFi Handset
45
entry” icon , which means that they are not editable. The contacts will only include work
number.
It is also possible to access a central phonebook
1
, see 6.2.7 Dial a Name from the Central
Phonebook on page 33, or 9.2.5 Central Phonebook on page 46.
9.2.1 Call Contact
1 Enter the menu by pressing “Menu”.
2 Select “Contacts” in the menu.
3 Select “Call contact”.
4 Select contact from the list, or enter name or number in the search field.
5 Press “Call”.
It is also possible to edit the contact and to send a message by selecting “View” > “More”.
Note: It is not possible to edit a contact indicated by a “Locked entry” icon in front of the
name.
9.2.2 Add Contact
Add New Contact
1 Enter the menu by pressing “Menu”.
2 Select “Contacts” in the menu.
3 Select “Add contact”.
4 Select “New”.
5 Select “Add”.
6 Enter a name, see 3.1.1 Alphanumeric Keys on page 16.
7Press “OK”.
8 Select “Work Number”, “Mobile number”, or “Other number”.
9 Press “Add”.
10 Enter number. It is possible to add a pause “P” in phone numbers by pressing the
Space key 5 times.
11 Press “OK”.
12 If desired, a specific ring signal can be chosen for this contact by selecting “Ring
signal”.
Add from Call List
1Press “Menu”.
2 Select “Contacts” in the menu.
3 Select “Add contact”.
4 Select “From call list”.
5 Select number in the list.
6 Press “Add”.
7 Select “Work Number”, “Mobile number”, or “Other number”.
1. This function is system dependent.
 Loading...