Brookeld Engineering Labs., Inc. Page 84 Manual No. M13-167
Unpacking
Checkcarefullytoseethatallthecomponentsarereceivedwithnoconcealeddamage.
1 Base,GV-1201,with2LevelingScrews,GV-1203,packedinacardboardcarton
1 UprightRodwithattachedClampAssemblyintheinstrumentcase
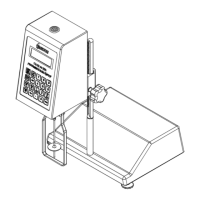
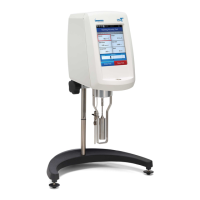
Assembly (Refer to Figures H-1 or H-2)
1. Removethebaseassemblyfromthecarton.
2. Removethescrewandwasherfromtheuprightrod.Placetherodandclampassemblyinto
theholeinthetopofthebase.
Note: The “Front” designation on the clamp assembly should face toward you.
3. Rotatetherod/clampassemblyslightlyuntiltheslotonthebottomoftherodintersectsthe
pinlocatedinthebase.
4. Whileholdingtherodandbasetogether,inserttheslottedscrewandwasherasshownand
tightensecurely.
5. Adjustthetensionscrewsothattheclampassemblyisnotlooseontheuprightrod.
Viscometer Mounting
InserttheViscometermountingrodintothehole(withthecut-awayslot)intheclampassembly.
Adjusttheinstrumentleveluntilthebubbleiscenteredfromrighttoleftandtightentheclamp
knob(clockwise).Usethelevelingscrewsto“ne”adjusttheviscometerlevel.
Note: IftheDigitalViscometercannotbeleveled,checktoinsurethattherodisinstalled
withthegearrackfacingforward.
Caution: Do not tighten the clamp knob unless the viscometer mounting rod
is inserted in the clamp assembly.
Caution: Do not use the DV2T Viscometer with any laboratory stand that
does not utilize the GV-1201 base. This large base is necessary for
stability of the DV2T Viscometer during use. Earlier versions of the
BrookeldLaboratoryStand includingtheModelAandModelS
should not be used with the DV2T.
Operation
RotatetheUP/DOWNknobtoraiseorlowertheviscometer.AdjustthetensionscrewiftheUP/
DOWNmovementoftheviscometerheadisnotacceptable,i.e.tooeasyortoodifcult.