CHAPTER 4 DISASSEMBLY AND RE-ASSEMBLY
4-23
3.8 Rear Cover R & L / Side Cover R & L
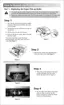
(1) Remove the two shoulder screws to remove the rear cover R and rear cover L from the
printer.
Fig. 4-38
(2) Remove the three shoulder screws at the side and the back of the side cover R.
(3) Hold slightly up the back side of the side cover R while releasing the hook and remove the
side cover R from the printer while pulling outward, taking care not to break the cover.
(4) Remove the shoulder screw to remove the side cover L from the printer by releasing the
hook at the bottom of the cover.
!
CAUTION:
Use caution not to bend the hooks of the interface when handling the side cover R.
Rear cover R
Printer
Shoulder screws
Rear cover L
Side cover R
Side cover L
Shoulder screws (hook)
Shoulder screw
 Loading...