CHAPTER 4 DISASSEMBLY AND RE-ASSEMBLY
4-28
3.11 Laser Unit
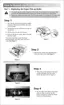
(1) Loosen the cup S tite 3x6 screw to release the fan relay PCB ASSY and the harness on
the fan relay PCB ASSY from the main unit.
Fig. 4-46
(2) Remove the three cup S M3x16 Taptite screws.
(3) Push the P harness cover to the right to release it from the hook and remove the P
harness cover.
(4) Disconnect the LD harness and the polygon motor connector.
(5) Taking care not to touch the lens and mirror, remove the laser unit.
Fig. 4-47
Taptite, cup S M3x16
LD harness
Laser unit
Polygon motor
connector
(hook)
P harness cover
Polygon motor connector
Screw, cup S tite 3x6
Fan relay PCB ASSY
Main unit
 Loading...