12
Infant Flow SiPAP sensor calibration
Two-point oxygen sensor calibration
Two-point oxygen sensor calibration should be performed
before initially using the Infant Flow SiPAP driver and with
each circuit change. To avoid unwanted alarms, occlude the
prongs or mask and set the low pressure flowmeter to
9 LPM prior to turning on the Infant Flow SiPAP driver on.
When the Infant Flow SiPAP driver is turned on, a power on
self-check automatically performs.
To perform two-point calibration:
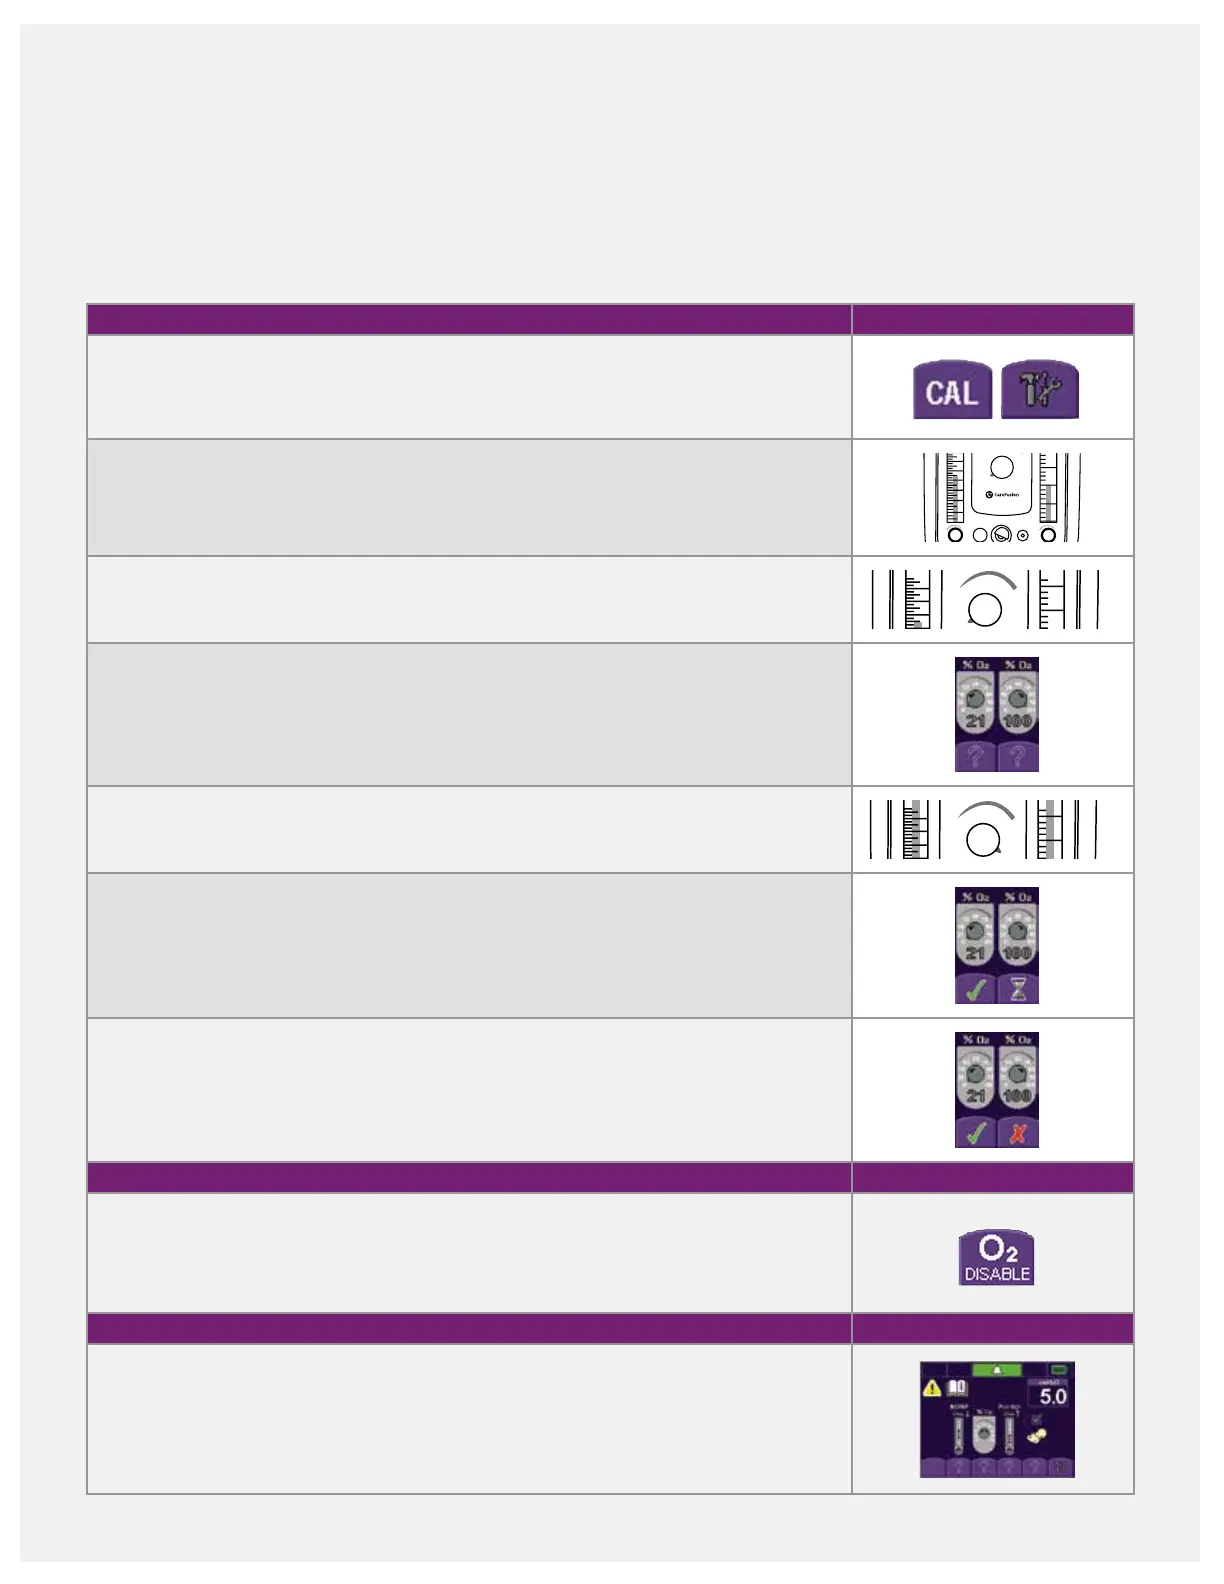
1. Press the CAL button to enter the calibration menu.
2. Set the pressure low flowmeter to 9 LPM and the pressure high flowmeter to 2 to
3 LPM. Note: The pressure high flowmeter must be set during set-up to enable the
manual breath button.
100
P
PROX
90
Infant Flow
SiPAP
Pres High
NCPAP/
Pres Low
XDCR
1
2
3
4
5
L/min
80
70
60
50
40
30
21
2
L/min
4
6
8
10
12
14
100
90
Infant Flow
SiPAP
Pres High
NCPAP/
Pres Low
XDCR
1
2
3
4
80
40
30
21
2
4
6
8
10
12
3. Adjust the oxygen control to 21%. Allow time for the reading in the oxygen display
window to stabilize.
100
P
PROX
90
Infant Flow
SiPAP
Pres High
NCPAP/
Pres Low
XDCR
1
2
3
4
5
L/min
80
70
60
50
40
30
21
2
L/min
4
6
8
10
12
14
100
90
Infant Flow
SiPAP
Pres High
NCPAP/
Pres Low
XDCR
1
2
3
4
5
80
70
60
50
40
30
21
10
12
14
4. Press the flashing question mark button located under the 21% icon. The question
mark changes to a static hourglass. When calibration is complete, a static green
check mark icon appears and the oxygen display window reads 21%.
5. Adjust the oxygen control to 100%. Allow time for the reading in the oxygen display
window to stabilize.
100
90
Infant Flow
SiPAP
Pres High
NCPAP/
Pres Low
XDCR
1
2
3
4
5
80
70
60
50
40
30
21
10
12
14
100
P
PROX
90
Infant Flow
SiPAP
Pres High
NCPAP/
Pres Low
XDCR
1
2
3
4
5
L/min
80
70
60
50
40
30
21
2
L/min
4
6
8
10
12
14
6. Press the flashing question mark button located under the 100% icon. The question
mark changes to a static hourglass icon. When calibration is complete, the hourglass
icon changes to a static checkmark. The oxygen display window
reads 100%.
7. If oxygen calibration fails, a red X displays on the button of the screen, the alarm
sounds and an Error code displays on the top-left corner. Turn the driver off and
then, back on. Repeat the calibration procedure.
Disable the oxygen sensor
The internal oxygen sensor may be disabled by pressing the O
2
disable button on the
calibration screen. This disables oxygen monitoring and the audible oxygen alarm. An
error code displays to indicate the oxygen monitor is inoperative. An external oxygen
monitor must be used whenever the oxygen sensor is disabled.
Leak test
While occluding the patient interface, set a flow of 9 LPM on the pressure low flowmeter.
A CPAP of 5 cmH
2
O ± 1 should display on the SiPAP screen. If pressure is not reached,
check the system for leaks. Release the occlusion, and the displayed pressure should be
≤ 2 cmH
2
O. Wait for 15 seconds, and a disconnect alarm should sound. If the pressure
does not fall, check the circuit for occlusions.



 To Next Page