EasyManuals Logo

Cessna 177 SERIES Service Manual

Cessna 177 SERIES
430 pages
To Next Page IconTo Next Page
To Previous Page IconTo Previous Page
Page #299 background imageLoading...
Page #299 background image
NOTE
16-94A.
"G"
SWITCH
OPERATIONAL
CHECK.
a.
Remove
emergency
locator
beacon
trans-
Transmitter
equipped
with
the
4
cell
battery
mitter
from
aircraft
in
accordance
with
paragraph
16-92.
pack
can
only
be
replaced
with
another
4
cell
b.
While
holding
transmitter
in
one
hand,
sharply
battery
pack.
strike
the
end
of
the
case
in
the
direction
of
activa-
tion,
indicated
on
the case
of
the
transmitter.
a.
After
the
transmitter
has
been removed
from
1.
Verify
that
the
G
switch
has
been
actuated.
the
aircraft
in
accordance
with paragraph
16-92,
c.
Reset
the
G
switch.
place
transmitter
switch
in
the
OFF
position.
d.
Reinstall
transmitter
in
aircraft
in
accordance
with
b.
Remove
the
nine
screws
attaching
the
cover to
paragraph
16-92.
the
case
and
then
remove
the
cover
to
gain
access
to
the
battery
pack.
NOTE
TRANSMIER
BATTERY
PACK
C589510-0202
205
Retain
the
rubber
O""
ring gasket,
rubber
\
Cell
Lithium)
washers
and
screws
for
reinstallation.
c.
Disconnect
the
battery
pack
electrical
connector
L
and
remove
battery
pack.
d.
Place
new
batter
pack
in
the
transmitter
with
four
batteries
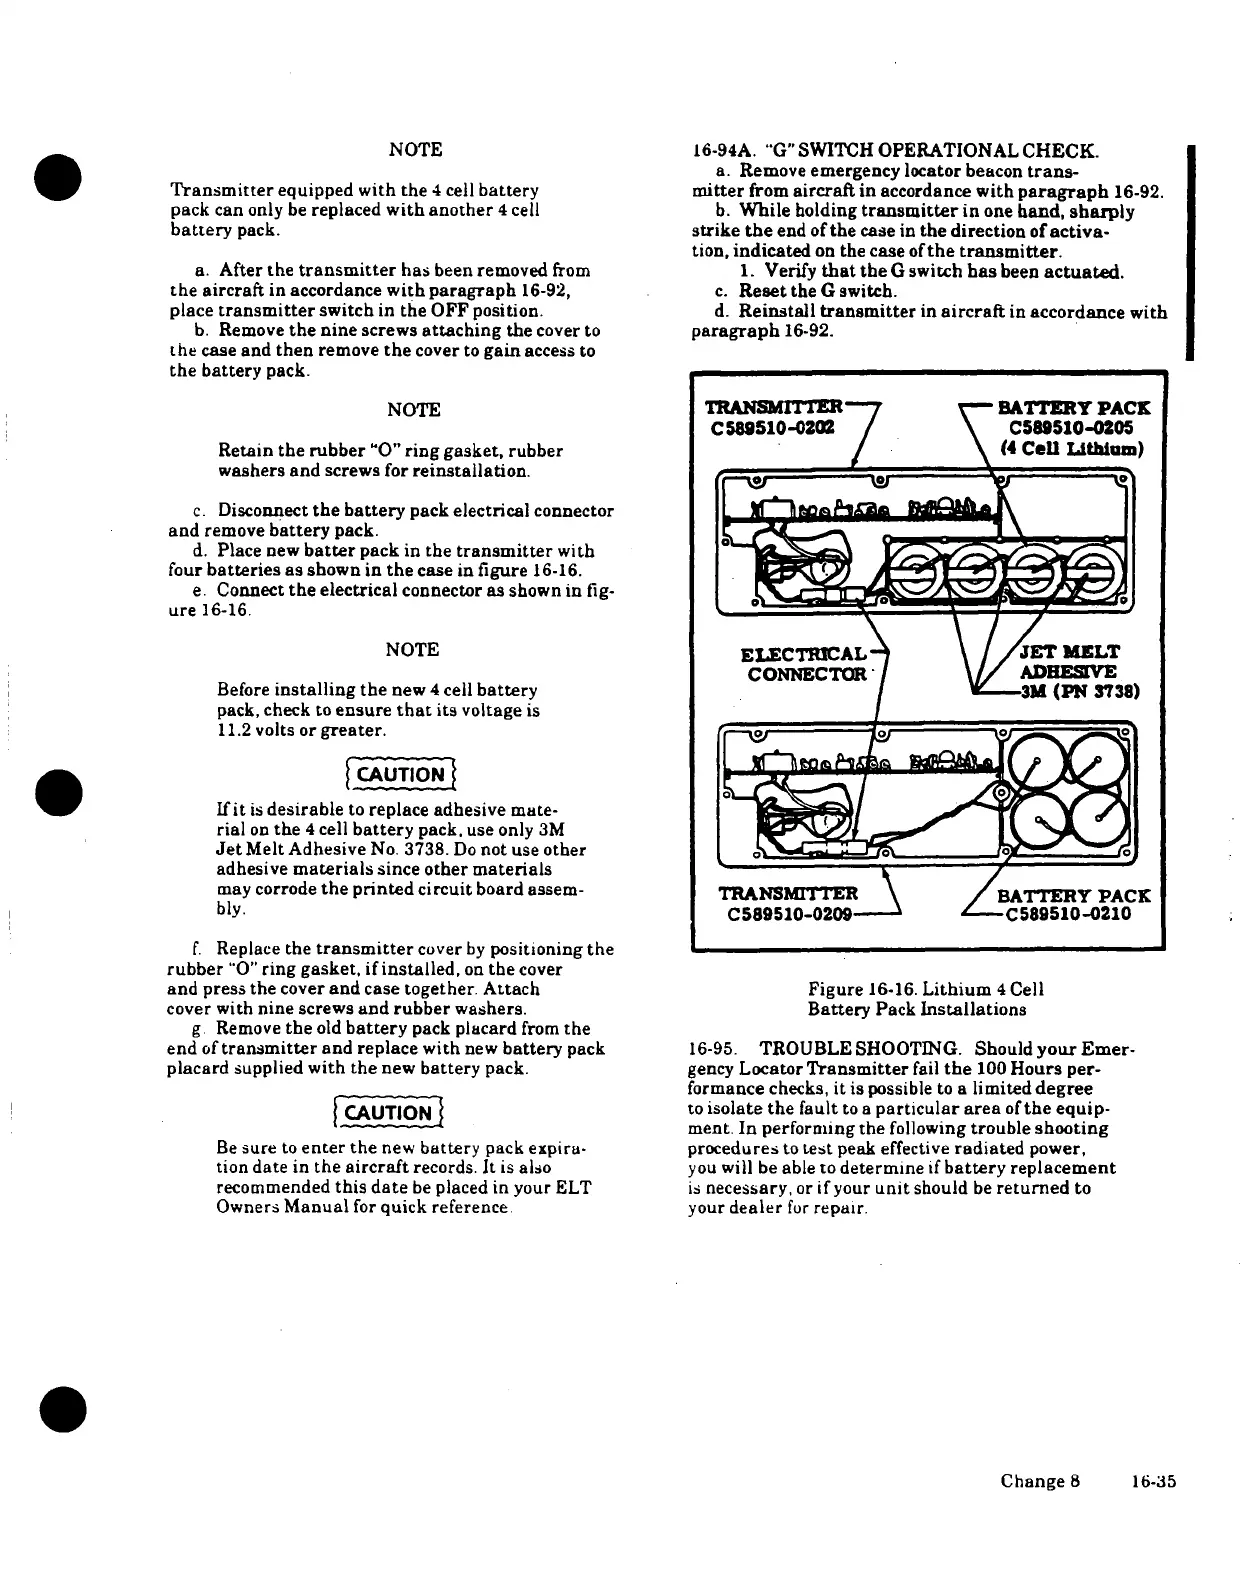
as shown
in
the
case
in
figure
16-16.
e.
Connect
the
electrical
connector
as
shown
in
fig-
ure
16-16.
NOTE
ELECTRICAL
\
/
ET
MLT
CONNECTOR I \'/
ADHES
Before
installing
the
new
4
cell
battery
3M
(PN
3738)
pack,
check
to
ensure
that
its
voltage
is
11.2
volts
or
greater.
CAUTION
If
it
is
desirable
to
replace
adhesive
mate-
rial
on
the
4
cell
battery
pack,
use
only
3M
Jet
Melt
Adhesive
No.
3738.
Do
not
use other
adhesive
materials
since
other
materials
may
corrode
the
printed
circuit
board
assem-
TRANSMITER
BATTERY
PACK
bly.
C589510-0209
C589510-0210
f.
Replace
the
transmitter
cover
by
positioning
the
rubber
"O"
ring
gasket,
if
installed,
on
the
cover
and press
the
cover
and
case
together.
Attach
Figure
16-16.
Lithium
4
Cell
cover
with
nine
screws
and
rubber
washers.
Battery
Pack
Installations
g
Remove
the
old
battery
pack
placard
from
the
end
of
transmitter
and
replace
with
new
battery
pack
16-95.
TROUBLE SHOOTING.
Should
your
Emer-
placard
supplied
with
the
new
battery
pack.
gency
Locator
Transmitter
fail
the
100
Hours
per-
formance
checks,
it
is
possible
to
a
limited
degree
CAUTION
I
to
isolate
the
fault
to
a
particular
area
of
the
equip-
ment.
In
performing
the
following
trouble
shooting
Be
sure
to
enter
the
new
battery
pack
expira-
procedures
to
test
peak
effective
radiated
power,
tion
date
in
the
aircraft
records.
It
is
also
you
will
be
able
to
determine
if
battery
replacement
recommended
this date
be
placed
in
your
ELT
is
necessary,
or
if
your
unit
should
be
returned
to
Owners
Manual
for
quick
reference.
your
dealer
for
repair.
Change
8 16-35

Table of Contents

Other manuals for Cessna 177 SERIES

Questions and Answers:

Question and Answer IconNeed help?

Do you have a question about the Cessna 177 SERIES and is the answer not in the manual?

Cessna 177 SERIES Specifications

General IconGeneral
ManufacturerCessna
Engine TypePiston
Wingspan35 ft 6 in (10.82 m)
Seating Capacity4
Number Built4, 295
EngineLycoming O-360
Horsepower180 hp
Maximum Takeoff Weight2, 500 lb (1, 134 kg)

Related product manuals