Do you have a question about the Cygnus MR400 and is the answer not in the manual?
Overview of the section's contents and other features.
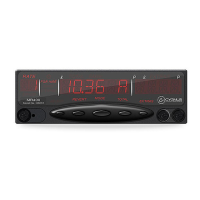
Instructions on how to connect and power up the taximeter.
Details about the MR400's internal rechargeable battery.
Describes meter states when the taxi is not for hire.
Explains the meter state when the taxi is available for hire.
Details the meter state for charging for time and/or distance.
Describes the meter state at the end of a journey.
Visual guide illustrating the basic operational modes.
Instructions for printing receipts and journey totals.
Guidance on accessing further features and menus.
Visual guide illustrating advanced operational features.
Explains the importance of tariff programming for meter functionality.
Details on how to find and utilize the tariff code.
Explains potential differences in meter behavior based on configuration.
Outlines the rules and format for creating PIN numbers.
Provides an overview of the pre-programmed PINs.
Details the PIN used to control meter usage by date.
Explains the PIN for access control and driver management.
Describes the PIN used for setting the meter's clock.
Allows setting custom PINs for disable and totals functions.
Details the procedure for entering a PIN number.
Explains the process for setting a new PIN.
Instructions on how to enter the Info Menu.
Guidance on moving through the Info Menu structure.
Process for logging driver activity on the taximeter.
Settings related to the meter's time and date.
Viewing and adjusting the meter's internal clock.
Displays the meter's current date.
Allows setting a date to disable the meter's functionality.
Customizing various aspects of the MR400's operation.
Adjusting the brightness level of the meter's display.
Enabling or disabling the meter's audible sounds.
Prevents battery drain by automatically timing out.
Setting custom PINs for Disable and Totals functions.
Details on setting User Disable and Totals PINs.
Configuring serial communication interface settings.
Setting the speed of the serial communication link.
Setting the parity for serial communication.
Setting for Mobile Data Terminal interface.
Accessing meter software and tariff details.
Displays the meter's unique serial number.
Displays the code for the current tariff.
Displays the code for the current receipt format.
Dealer contact details programmed into the meter.
Details on software version, build, and load dates.
Settings related to the vehicle's configuration.
Setting pulses per mile/km for accurate distance measurement.
Verifies the vehicle's pulse signal without removing seals.
Displays the vehicle's current speed.
Allows setting speed limit warnings.
Detects failures in the taxi sign lamps.
Illuminates the payment lamp when the vehicle is stationary.
Illuminates door handles in FOR HIRE mode.
Configures the meter's totals system.
Chooses between Basic and Log On totals systems.
Records vehicle usage data like money earned and distances.
Restricts access to functions using PIN numbers.
Description of the available totals system types.
Lists the data points recorded by the meter.
Explanation of resettable and permanent totals storage.
Instructions on how to view recorded totals data.
Viewing and printing individual journey records.
Procedure to clear the resettable totals.
Process for managing memory space for totals data.
Totals system that does not require a PIN for access.
Totals system requiring a PIN for meter access.
Functionality for adding multiple named extra charges.
Combining fare and extras to display a total.
Indicator showing when the meter is charging by time.
Visual feedback on progress through a fare increment.
Displays the tariff year upon entering FOR HIRE mode.
Allows recording received tips or gratuities.
Using alternative buttons for selecting the active rate.
Audible warning for low speed when in STOPPED mode.
Overriding date/time for rate selection.
Reference guide for understanding meter messages and abbreviations.
| Brand | Cygnus |
|---|---|
| Model | MR400 |
| Category | Measuring Instruments |
| Language | English |