65
11.3 Sequence Test
In the test menu sequence test, you can test the available programs step by step.
First, select the program you like to test. For this tab either onto the program number and
enter the number directly or select the program via the and buttons. The program
name appears on the display field.
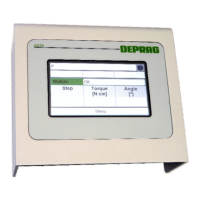
Hold the screwdriver to the screwing location and tab "start" to start the sequence test.
The first program step will be processed.
If a program step is ended, then the step, torque and angle as well as the result of this
level/this program step is displayed. In case of a fault, tab the error message and a help
text will be displayed.
tab "continue" to process further program steps.
Tab "stop" to abort the sequence test.
IMPORTANT
Only screwing samples are displayed as program steps in the sequence
test, commands are skipped. Please also be aware that the display of the
program step must therefor not always match the number in the screwing
program.
11.4 Interface
In the test menu interface input and outputs of the AST6 can be tested.
Testing the inputs:
After applying a signal at one input, the indication for the corresponding input lights up.
Testing the outputs:
The indication lights up by tapping on a switch and the corresponding output is activated.
Tapping on the switch once again switches the corresponding output off once again
11.4.1 I/O Interface
All inputs and outputs as well as the voltages of the I/O interface may be checked in the
I/O interface menu.
11.4.2 Fieldbus
All inputs and outputs as well as the communication flags of the fieldbus interface may be
checked in the fieldbus menu.
The fieldbus menu can only be opened if a fieldbus module has been installed.