6.3
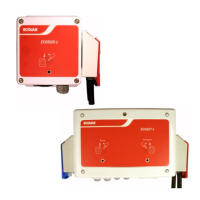
Assembly of the control unit (switch cabinet) DryExxEco
®
Advanced-ETH
The control DryExx
®
Eco Advanced-ETH is supplied from the factory ready for connection.
W
all mounting is the intended installation mode, or alternatively onto a standard console.
The components should ideally be set up in the area of the filling plant. In this process, it
should be noted that the units are easily accessible and the max. permissible ambient
conditions are observed. In the event of installation on a stand console, ensure that this is
securely anchored to the floor.
The dimensions of the DryExxEco
®
Advanced-ETH are given here:
Ä
Chapter 14.4.2 „DryExxEco
®
Advanced-ETH“ on page 91
The following points should be noted during assembly:
– The accessibility to the control unit must be ensured at all times.
– The location must be as dry and frost-protected as possible.
– Mount the switch cabinet so that the control panel is at head height
(approx. 1.5 m height).
– The required supply lines (power, signal cables, dosing medium, water
,
etc.) must be present at the mounting site.
– The switch cabinet must be installed horizontally and securely.
The procedure should be selected as follows:
1. Choose a suitable mounting location (wall, etc.).
2. Ensure that all necessary supply lines are present.
3. Measure the mounting points on the switch cabinet and transfer to the mounting site.
4. Make the holes, or during welding fit the welding studs included in the delivery to the
intended surface.
5. The switch cabinet should be mounted using the fastening elements provided.
6. Check the alignment, adjust if necessary.
7. Carry out connection work.
Assembly
Assembly of the control unit (switch cabinet) DryExxEco® Advanced-ETH
37 Rev. 02-09.2017

 Loading...