5520A
Operators Manual
4-62
4-60. Testing the Meter
You can use the error mode feature of the calibrator to test the meter. To verify that all
ranges of all functions are within specifications, proceed as follows:
1. Turn on the calibrator and allow it to warm up.
WWarning
Ensure that the calibrator is in standby mode before making
any connection between the calibrator and tester. Dangerous
voltages may be present on the leads and connectors.
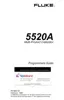
2. Verify that the calibrator is in standby and connect the DMM as shown in
Figure 4-18.
HI
LO
TRIG
GUARD
TC
20A
NORMAL AUX
SCOPE
OUT
V, , ,
RTD
A, -SENSE,
AUX V
20V PK MAX
20V PK MAX
5520A
CALIBRATOR
87
TRUE RMS MULTIMETER
MIN MAX
RANGE HOLD
H
REL Hz
mA
A
A
µ
mV
V
V
OFF
PEAK MIN MAX
A
COM
V
mA A
nn046f.eps
Figure 4-18. Cable Connections for Testing an 80 Series General Functions
3. Test the dc voltage function as follows:
a. Turn on the DMM and set its function switch to L.
b. Set the warmed up calibrator to 3.5 V dc. Press O.
c. Use the output adjustment controls to adjust the calibrator output for a reading
of +3.5000 on the DMM display.
d. Verify that the error shown on the control display is less than the specification
for the DMM in its Users Manual.
e. Check the DMM error at 35.0 V, -35.0 V, 350.0 V. Hint: use the X. Verify
the errors are within specification. When X causes the output to go over
33 V, the calibrator goes into standby. When this happens, press O to
operate.
f. Check the DMM error at 1000 V to verify it is within specification.
g. Set the output of the calibrator to 350 mV and press O. Verify the errors are
within specifications.

 Loading...