EasyManuals Logo

HPE ProLiant MicroServer Gen10 Plus User Manual

HPE ProLiant MicroServer Gen10 Plus
89 pages
To Next Page IconTo Next Page
To Previous Page IconTo Previous Page
Page #42 background imageLoading...
Page #42 background image
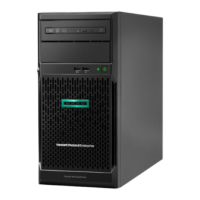
12. Slide the drive converter tray into the bay until it clicks into place.
13.
Install the front bezel.
14.
If removed, install the security padlock and/or the Kensington security lock.
For more information, see the lock documentation.
15.
Connect all peripheral cables to the server.
16.
Connect the power adapter to the server, and then secure the power adapter cord in the power cord clip.
17. Connect the power cord to the AC source.
18.
Power up the server.
19.
Determine the status of the server drives.
The installation is complete.
To configure arrays, see the HPE Smart Array SR Gen10 Configuration Guide at the Hewlett Packard Enterprise
website.
Memory options
The server has two DIMM slots supporting standard PC4-2666V UDIMM for a maximum memory capacity of 32 GB.
42
Hardware options installation

Table of Contents

Other manuals for HPE ProLiant MicroServer Gen10 Plus

Questions and Answers:

Question and Answer IconNeed help?

Do you have a question about the HPE ProLiant MicroServer Gen10 Plus and is the answer not in the manual?

HPE ProLiant MicroServer Gen10 Plus Specifications

General IconGeneral
Processor Cores4
Memory Slots2
Network2 x 1GbE ports
ProcessorIntel Xeon E-2224
Processor Base Frequency3.4 GHz
Storage4 LFF SATA HDD bays
Storage ControllerEmbedded SATA controller
Expansion Slots1 PCIe 3.0 x16 slot
Form FactorUltra-micro tower
Remote ManagementHPE iLO 5
Operating System SupportMicrosoft Windows Server, Red Hat Enterprise Linux, VMware ESXi
Dimensions22.97 x 24.5 x 24.5 cm (8.98 x 9.65 x 9.65 in)

Related product manuals