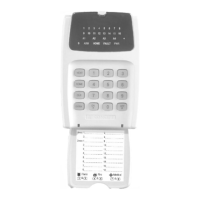
Section 1. Installation. CONCEPT IQ. Installation & Programming Manual.p2
Adding / Changing / Deleting Users. NEXT 20 See Section 11: Users
View history. NEXT 21
Press to view the Next Event. Press to view the Previous Event.
If the are no further events to be displayed, one long beep will sound.
History Event Types: Arm: <ARM> Lamp. Armed in Home Mode: <HOME> Lamp.
Dis-arm: <ARM> and <0> Lamp. Zone Input in alarm: <Zone 1> to <Zone 16> Lamp.
System Inputs in alarm: <0> Lamp.
Walk test mode. NEXT 22
Press to switch between Alarm Test Mode and Tamper Test Mode.
Any Zone Input in the Terminal’s Associated Area that goes into the Alarm (Un-sealed) or Tamper state will cause:
- The corresponding Zone Lamp to fast flash on an Alarm state in Alarm Test Mode.
- The corresponding Zone Lamp to slow flash on a Tamper state in Tamper Test Mode.
- The Siren to sound for 3 seconds.
- The Terminal beeper to emit a short beep.
Setting the Real-Time Clock. NEXT 23 See Section 4: Time Programming.
Auxiliary Control and Test mode. NEXT 24
Enter the Auxiliary Output number (1 or 2 digits);
then Press: to turn the Auxiliary ON OR: to turn the Auxiliary OFF..
When testing the Auxiliary, remember to return the Auxiliary to it’s original state before exiting Auxiliary Control Mode.
Fault Analysis mode. NEXT 25 See Section 7: System Inputs
System Inputs that are currently in Alarm will be indicated by Fast flashing on the relevant Zone Lamp. (See "System Input Mapping" in Section 7)
These Alarms cannot be acknowledged until the problem is rectified.
Acknowledge any previous Faults and Alarms.
Press . System Inputs that have been in Alarm but subsequently restored since the last Acknowledgement will be indicated by Slow flashing on the
relevant Zone Lamp. Note the datails of the Alarm/s displayed.
Press to Acknowledge and Clear any of the Faults or Alarms that are not currently in Alarm.
IMPORTANT NOTES: 1) Press to toggle between the “Current Alarms” & “Previous Alarms” displays.
2) Zone Self-test (Lamp 10) can only be cleared from “Zone Self Test Display” Mode (NEXT 26).
3) Door Alarm (Lamp 15) can only be cleared from “Acknowledge Door Alarms” Mode (NEXT 29).
Zone Self Test display. NEXT 26
The Zone 1 to Zone 16 Lamps will indicate any Zones that have failed the Zone Self Test so that appropriate action may be taken. e.g. A detector fault
may need to be rectified by the Installer. Press to acknowledge any Zone Self Test faults.
Edit Telephone numbers. NEXT 27 See section 10: Communications.
View Software Version number. NEXT 28
The 1st digit of the 4-digit Version number is displayed by the corresponding Zone Lamp flashing.
To display each of the remaining digits of the Version number press the key..
Acknowledge Door Alarms. NEXT 29
Door Alarms will be indicated by the relevant Zone Lamp 1 to 4. Note the datails of the Alarm/s displayed.
Press to Acknowledge any Door Alarms.
De-Isolate System Inputs. NEXT 90 De-Isolates any Isolated System Inputs.
Test Siren speaker and Strobe (Aux. 1). NEXT 91 Triggers Siren and Strobe (Aux 1) for 3 Seconds.
Battery Test. NEXT 92 Switches off the Battery charger for 5 seconds.
Test Transmission. (Test report) NEXT 93 Triggers Test report via selected Dialer format.
Day Alarm on / off. NEXT 94 Toggles Day Alarm Enabled/Disabled.
Reset Latching Auxiliaries. NEXT 96 Resets all latched Auxiliaries.
Answer Phone NEXT 97 Forces Control Module to answer incoming call.
Reset Smoke Detectors. NEXT 99 Triggers the “Smoke Detector Reset” Aux Event.
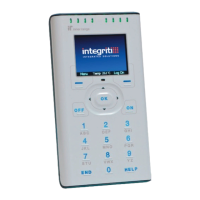
Installer and Master User Operations.