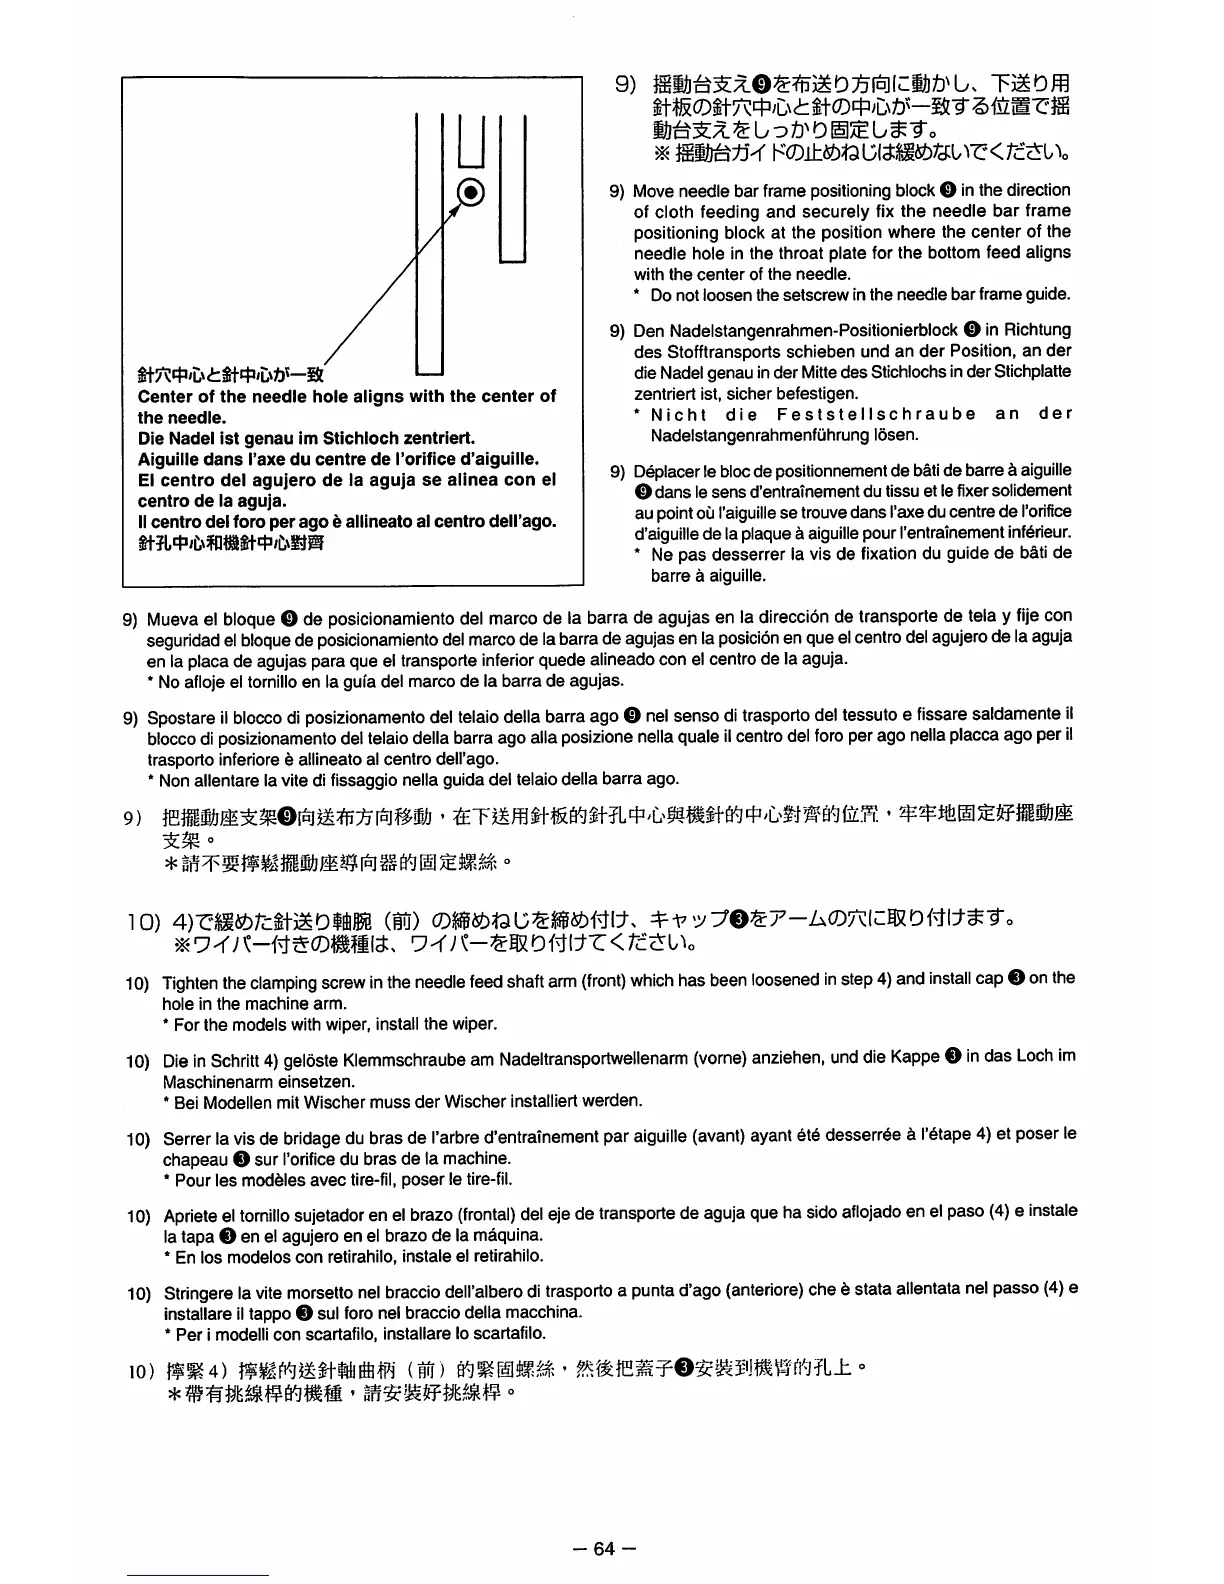
Center
of
the
needle
hole
aligns
with
the
center
of
the
needle.
Die Nadel 1st
genau
Im
Stichloch
zentrlert.
Aiguille
dans
I'axe du
centre
de
Torifice d'aiguille.
El
centro
del
agujero
de
la
aguja
se
alinea
con
el
centro
de
la
aguja.
II
centro
del
foro
per
ago
e allineato al
centro
dell'ago.
/
u
9)
m
9)
Move
needle bar frame
positioning
blockO inthe
direction
of cioth feeding
and
securely
fix
the
needle
bar
frame
positioning block at the position where the center of the
needle
hole in
the
throat plate for
the
bottom feed aligns
with
the
center
of
the
needle.
* Do not loosen the
setscrew
in
the
needle
bar
frame guide.
9) DenNadeistangenrahmen-Positionierblock 0 in
Richtung
des
Stofftransports schieben und an
der
Position, an
der
die Nadelgenau inder
Mitte
des
Stichlochs inder Stichplatte
zentriert ist, sicher befestigen.
*
Nicht
die
Feststellschraube
an
der
Nadelstangenrahmenfuhrung losen.
9) Deplacerle blocde positionnementde batide barre ^
aiguille
0
dans
le
sens
d'entrainement
du tissu et le fixer solidement
au pointou
I'aiguilie
se
trouvedans I'axeducentrede
roriflce
d'aiguille de laplaque h
aiguille
pourI'entrainement
inf6rieur.
* Ne
pas
desserrer la vis de fixation du guide
de
bati de
barre
a aiguiile.
9)
Mueva
el
bloque
0 de
posicionamiento
del
marco
de la
barra
de
agujas
en la
direccion
de
transporte
de telay
fije
con
seguridad
el
bloque
de
posicionamiento
del
marco
de la
barra
de
agujas
enla
posicion
enqueel
centro
del
agujero
de la
aguja
en la placa de agujas para que el transporte
inferior
quede alineadocon el centrode la aguja.
*No aflojeel
tornillo
en la guia del marco de la barra de agujas.
9)
Spostare
il
blocco
di
posizionamento
del
telaio
della
barra
ago0
nel
senso
di
trasporto
del
tessuto
e
fissare
saldamente
il
blocco
di
posizionamento
del
telaio
della
barra
ago
alia
posizione
nella
quale
il
centro
del
foro
perago
nella
placca
agoper
il
trasporto inferiore § allineato al centro dell'ago.
*Nonallentare la vite di fissaggio nella guida del telaio della barra ago.
ss
°
10)
4)r-iStorcit)iiDiaffi0 (Su)
10)
Tighten
the
claniping
screw
in
the
needle
feed
shaft
arm
(front)
which
has
been
loosened
in
step
4)
and
install
cap
O
on
the
hole
in
the
machine
arm.
* For the models with wiper, instali the wiper.
10)
Die
in
Schritt
4)
geloste
Kiemmschraube
am
Nadeltransportwellenarm
(vorne)
anziehen,
und
die
Kappe
0
in
das
Loch
im
Maschinenarm
einsetzen.
* Bei Modellen mit
Wischer
muss
der
Wischer
instaliiert
werden.
10)
Serrer
la
vis
de
bridage
du
bras
de
I'arbre
d'entrainement
par
aiguille
(avant)
ayant
6t6
desserr§e
a
I'etape
4)
et
poser
le
chapeau 0 sur
I'orifice
du bras de la machine.
* Pour
les
modules
avec
tire-fil,
poser
le tire-fil.
10)
Apriete
el
tornillo
sujetador
en
el
brazo
(frontal)
del
eje
de
transporte
de
aguja
que
ha
sido
aflojado
en
el
paso
(4)
e
instate
la tapa 0 en el agujero en el brazo de la maquina.
* En
los
modelos
con
retirahilo,
instate
el retirahilo.
10)
Stringere
la
vite
morsetto
nel
braccio
dell'albero
di
trasporto
a
punta
d'ago
(anteriore)
che6
stata
allentata
nel
passo
(4)
e
installare
il
tappo 0 sul
foro
nel bracciodella macchina.
*
Per
i modelli
con
scartafilo, installare lo scartafilo.
to)
»^4)
(iW)
WRiaSM;
• °
'
«n
-64-