AUTO
WHITE
SKIN
AREA
ACCU
FOCUS
TAKE
VTR
ZEBRA
AUDIO
LEVEL CH-1
OFF
5.
3.
HMSF
AUD LOCK
32k
CH 1
CH 2
48k
PB
AUTO OFF DEW
L iRFSERVO
SP
MENU
OVER
OVER
40 30 20 10 0
dB
1.
“DEW”
3.
“WIDE”
EJECT
6.
HOLD
SLAVE
WIDE
POWER
NG
GAIN
OUTPUT
W
HT.BAL
VTR
ON OFF
HM
L
S
A
V
E
S
T
B
Y
B
A
R
S
C
A
M
O
N
O
F
F
A
U
T
O
K
N
E
E
P
R
S
T
A
B
2. 4.
1.
Eject switch
8.
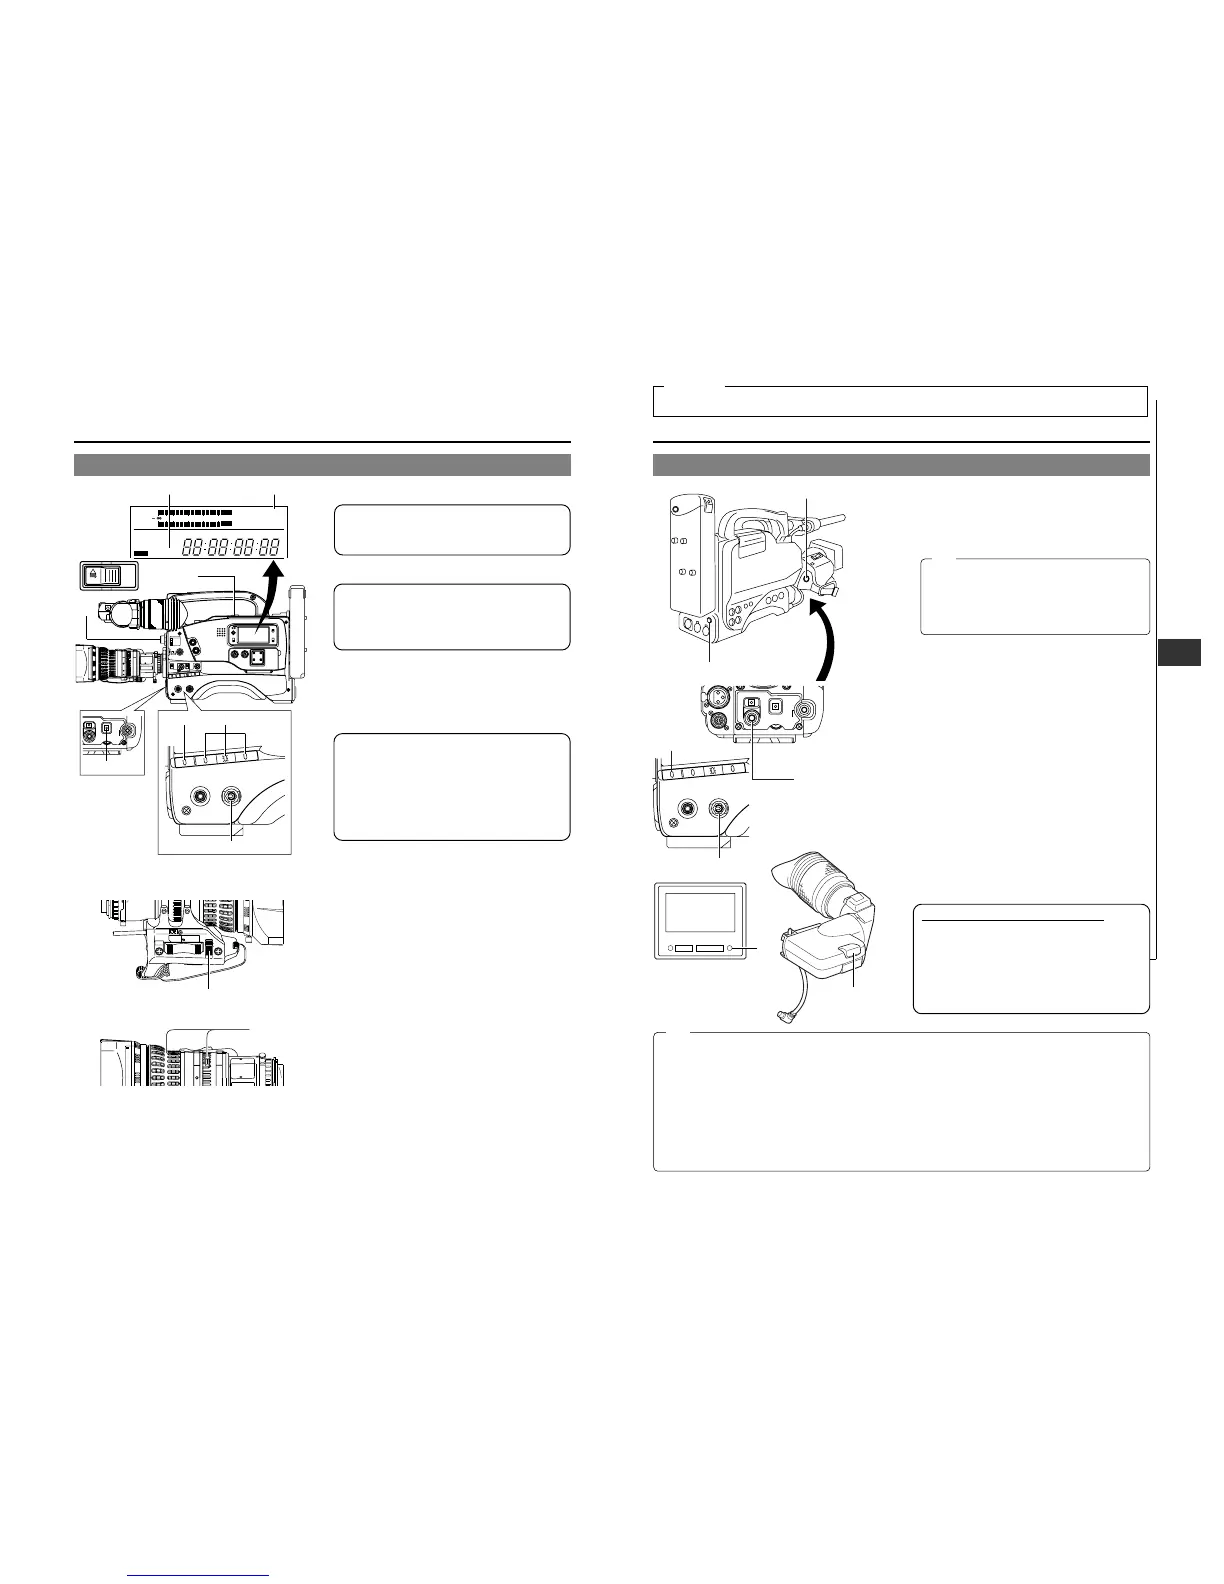
7-1 Basic Recording Operation (Cont'd)
8.
Press the VTR trigger button on the GY-DV700W or lens to
start recording.
Once recording has started, the BACK TALLY lamp on the
rear section of the unit and the tally lamp on the viewfinder
light red, and the REC indication in the viewfinder lights
green.
* The lightning conditions of the BACK TALLY lamp on
the rear section of the unit can be changed by setting
the VCR Setup Menu item No. 082 BACK TALLY MODE.
* The lamp in the viewfinder and on the front section will
blink from when the button is pressed and until recording
actually starts.
9.
To stop recording, press the VTR trigger button again. The
TALLY lamp and REC indicator lamp go out and the unit
enters the record-pause mode.
When the VTR trigger button is pressed, the unit enters the
record-pause mode after rewinding the tape for about 2
seconds (back-spacing).
10.
To restart recording:
Press the VTR trigger button on the GY-DV700W or lens.
11.
Ending recording:
Enter record-pause mode and perform the following
operations as required.
When it is required to unload the videocassette:
• Slide the EJECT switch.
When it is required to put the unit in save mode:
• Set the VTR switch to SAVE.
Drum rotation stops and the GY-DV700W enters the
tape protection/power-saving mode.
12.
When shooting is completely finished, eject the cassette
and set the POWER switch to “OFF”.
When the unit is not going to be used for a long period,
detach the battery pack.
About the QUICK REC START Mode
If the VTR trigger button is pressed immediately after the
videocassette is inserted, the mode becomes the QUICK
REC START mode that enables quick start of recording.
However, when shooting starts in the middle of the tape, a
blank space appears as the new scene will not be linked
smoothly with the previous image.
Also, the time code does not continue. (Some overlap may
also occur.)
REC
BATT
ALARM
8.
7-1 Basic Recording Operation
1.
Set the POWER switch to ON.
Power is supplied to the unit.
Check that the condensation indicator "DEW" does not
appear on the display. If it is lit, wait until the indicator goes
out.
2.
Set the VTR switch to the STBY position.
Even when the VTR switch is set to the "SAVE" position,
pressing the VTR trigger button will start recording.
However, in this case, it is necessary to wait a short time
until the recording actually starts.
For details on the SAVE mode, see page 52.
3.
Slide the EJECT switch to open the cassette cover.
• Ensure that the switch on the back of the videocassette
is set to REC and insert the cassette correctly.
When the cassette is inserted, the tape is loaded and
the unit enters the record-pause mode.
• Slowly close the cassette cover.
• Use a videocassette marked MiniDV.
• If the cassette cover is not closed, the GY-DV700W
will remain inoperative.
• Following loading of the cassette and when the POWER
switch is turned ON/OFF, the built-in head cleaner will
emit a sound while operating. This does not indicate a
malfunction.
• After the cassette cover is closed, it takes about 8
seconds before the unit is ready for recording.
When the recording mode is set to WIDE (16:9 picture), the
“WIDE” indicator is displayed in the counter display.
When set to NORMAL (4:3 picture), the indicator is off.
4.
Set the switches as required.
• GAIN : Sensitivity suitable for the subject
• OUTPUT : "CAM/AUTO KNEE ON"
• WHT-BAL : "A" or "B"
• Set the IRIS switch of the lens to "A".
5.
Select the FILTER according to the lighting condition.
Position 1 (3200K) : For shooting indoors or outdoors when
illumination is not sufficient
Position 2 (5600K + 1/8ND):
For shooting outdoors.
Position 3 (5600K) : For shooting outdoors.
Position 4 (5600K + 1/64ND):
For shooting outdoors under a clear
sky.
6.
Adjust the white balance.
☞ See "White Balance Adjustment" on page 45.
7.
Point the camera at the subject and determine the angle of
view and focus with the zoom lever and the focusing ring.
● The unit enters stop mode at tape-end automatically, and if kept longer than 3 minutes or 30 minutes in this mode, SAVE
mode is maintained. ☞ See “Menu No. 307: LONG PAUSE TIME” on page 69.
● If the VTR trigger button is pushed very quickly and repeatedly, or the POWER switch is moved immediately after being
pressed, the viewfinder REC indicator lamp may blink and the GY-DV700W may not enter the record mode. To remedy
this condition set the POWER switch to OFF and wait for 5 seconds or more before turning the power on again.
● A neat transition to the next recorded scene cannot be guaranteed if you end a recording by turning the POWER switch
or DC power supply OFF, or by removing the battery pack.
● Before recording a scene that is particularly important, perform test shooting to ensure that normal recording is possible.
● The power consumption can be reduced by setting the LIGHT switch on the display and TALLY lamp to OFF.
● The microphone may pick up the sound of the lens’ iris if the iris is changed abruptly or the iris is manually moved abruptly
during recording. If you find the noise annoying, please purchase an optional microphone in order to move the microphone
away from the lens or ensure that the iris is not changed abruptly during shooting.
Note:
Note:
(
A19x8.7BRRM-39
)
A19x8.7BW
1:1.8/8.7-165
FUJIN0N
MADE IN JAPAN
FUJI PHOTO OPTICAL CO.
,
LTD.
by
mm
or RET
QUICK Z
 Loading...