E-60
10. S.S.F. (Super Scene Finder) FUNCTION
E-61
10. S.S.F. (Super Scene Finder) FUNCTION
CUE Mode
1.
Set the S.S.F. mode as CUE mode.
Set the VCR Setup Menu item No. 398 S.S.F. MODE to
"CUE".
☞ See page 69.
• The CUE mode is indicated in the lower part of the Status
1 screen in the viewfinder.
MARK Mode
1.
Set the S.S.F. mode as MARK mode.
Set the VCR Setup Menu item No. 398 S.S.F. MODE to
"MARK".
☞ See page 69.
• The MARK mode is indicated in the lower part of the
Status 1 screen in the viewfinder.
AUTO
WHITE
SKIN
AREA
ACCU
FOCUS
TAKE
VTR
ZEBRA
AUDIO
LEVEL CH-1
ON
OFF
VF
2.
Press the VTR trigger button to start the recording.
3.
When you reach the point that you want to memorize as
the CUE point, press the TAKE button.
• The time code data of the point where the TAKE button is
pressed is stored in the unit's memory as CUE data.
The LOG button’s LED lights during memorization of the
CUE point and the “∗” mark is shown in the viewfinder.
Press the TAKE button each time you reach a point that
you want to memorize as CUE data.
4.
Stop the recording.
Press the VTR trigger button.
2.
Press the VTR trigger button to start the recording.
3.
When you reach the scene that you want to memorize, press
the TAKE button.
• The time code data of the point where the TAKE button is
pressed is stored in the unit's memory as the start point
of the scene.
4.
When you reach the scene that you want to memorize as
the ending point, press the TAKE button again.
• The time code data of the point where the TAKE button is
pressed is stored in the unit's memory as the ending point
of the scene.
• The LOG button’s LED lights during memorization of the
IN point and the “∗” mark is shown in the viewfinder.
The LOG button’s LED remains off during memorization
of the OUT point and the “∗” mark is not shown in the
viewfinder.
For each scene that you want to memorize, repeat steps
3.
and
4.
5.
Stop the recording.
Press the VTR trigger button.
10-2 How to Use the S.S.F. Function
ACCU - FOCUS
G
F
I
F5.6
STBY 4V21.<60
B
SD
CH1 ----+--
CH2 ----+--
M909
Number of
memorized
scenes
MARK mode
Number of memorized
scenes
* This indicator is not
indicating the number
of the CUE point.
CUE mode
Shooting started
with VTR trigger
REC start REC pause
Cut
IN
time code data
OUT
time code data
OUT
time code data
IN time
code data
TAKE button TAKE button TAKE button TAKE button
Scene 1 Scene 2
10-1 Explanation of the S.S.F. Function
During recording, the S.S.F. function records the time code data at the point of time of a desired recorded scene in the unit's
memory. Using the S.S.F. data stored in memory during after-processing of the recorded image allows efficient use of the tape.
The S.S.F. function comprises the two modes CUE and MARK. Select the mode using the VCR Setup Menu item No. 398 S.S.F.
MODE.
When the VCR Setup Menu item No. 398 SSF MODE is set to CUE MODE or MARK MODE, the time code generator’s running
method is internally set to the REGEN mode.
When shooting in either of the modes, the time code data is stored in the unit's memory when the TAKE button on the front section
is pressed.
The model ID data, reel number, the number of each scene, and the time code data of IN points, OUT points, and CUE points are
recorded as S.S.F. data.
CUE Mode:
When the TAKE button is pressed at the desired scene during shooting of a given cut, the time code data at that point is stored
as CUE data in the unit's memory. The time code data at the time when recording is started or stopped with the VTR TRIGGER
button are stored in the unit’s memory as scene data.
MARK MODE
During shooting of a given cut, press the TAKE button at beginning of a desired scene and then press the TAKE button again at
the ending of the scene.
The time code data at the point where the TAKE button is pressed first becomes the start point of the scene and time code data
at the point where the TAKE button is pressed the second time becomes the ending point, and both are stored in the unit's
memory.
Shooting started
with VTR trigger
REC start REC pause
Scene
CUE 1
time code data
5 sec
or more
5 sec
or more
CUE 2
time code data
CUE 3
time code data
TAKE button TAKE button TAKE button
IN
time code data
OUT
time code data
• The number of scenes that can be registered is 127, and up to 238 registered scene numbers can be stored in memory.
When either of these capacities is reached, the indication showing the number of registered scenes on the viewfinder screen
becomes “M: - - -”.
• Up to 253 CUE points can be stored in memory.
For each registered CUE point, the scene number decreases by two.
• When recording in the S.S.F. mode, the reel number (cassette number) for each cassette is recorded in the memory of the
GY-DV700W and on tape.
• When the videocassette is replaced, new S.S.F. data is generated. S.S.F. data for six videocassettes can be stored in the
internal memory.
Before recording the seventh cassette in the S.S.F. mode, be sure that necessary data has been transferred from the
memory to the non-linear editing controller or other component, or write data to the tape for each recording. ☞ See page 63.
• When recording is not performed in the S.S.F. mode, be sure to set the VCR SETUP MENU item No. 398 SSF MODE to OFF.
• Be sure to record S.S.F. data continuously on the same tape. It is not possible to rewind the tape for overwriting during the
recording.
If the tape is rewound in the middle of a recording, or after similar operation is performed, be sure to use the Scene End Cue
Up function in order to ensure that new data are recorded in continuation of the existing data.
☞ See “About the Scene End Cue Up Function” on page 63.
* In the S.S.F. mode, the STBY/SAVE switch does not activate the VTR save mode. (The save mode is activated by a long
pause.)
Note:
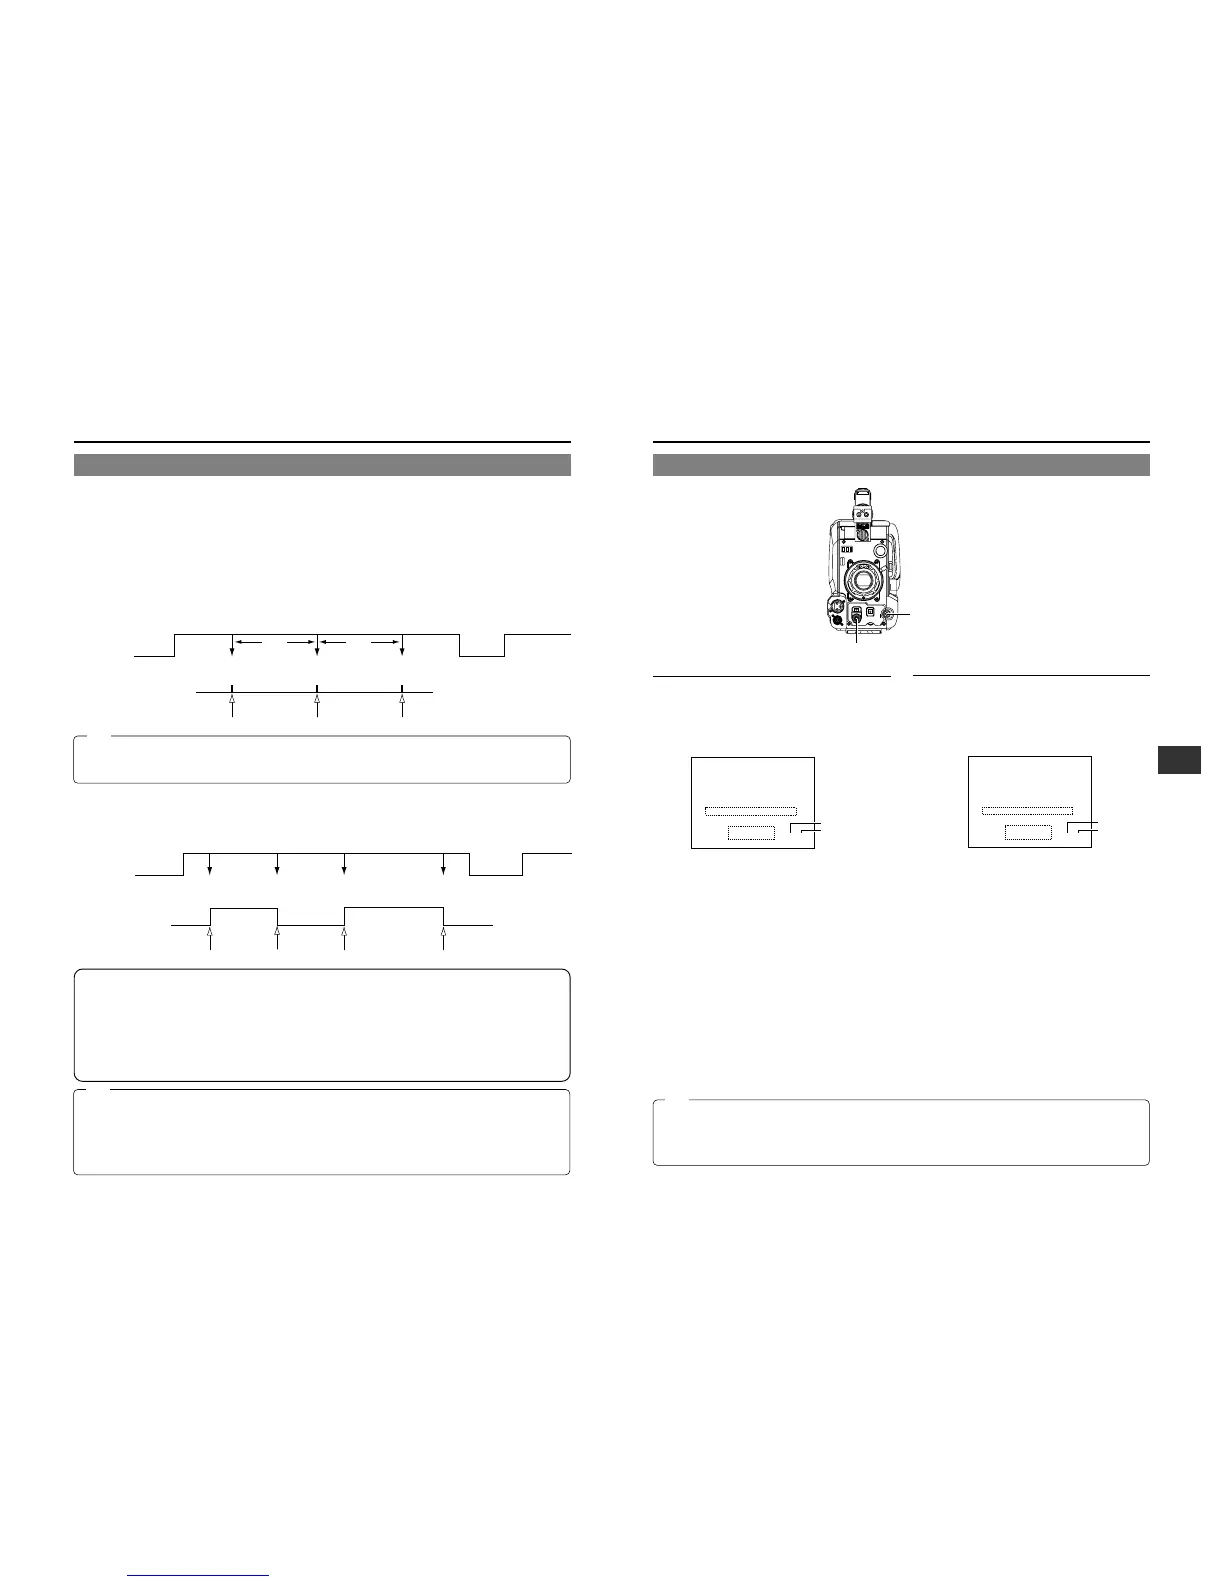
TAKE button
VTR trigger button
• Once a tape with recorded S.S.F. data is rewound but not ejected before playback or recording is performed on it again, the
previous S.S.F. data cannot be automatically erased when S.S.F. data are recorded (when you overwrite the previous image).
Therefore, the S.S.F. data of the overlapped sections will not correspond to the video image.
Furthermore, please note that the time code data may differ from the actual data if recording is started in the CUE mode in
this situation.
Note:
• Leave an interval of at least 5 seconds between memorization of CUE data.
If the TAKE button is pressed within 5 seconds from the previous point, the new point is not memorized.
• In the CUE mode, time code log data stored on the camera memory may differ from the actual time code recorded on tape
at the time of pressing the TAKE button. This difference may be within 3 frames and it is not a malfunction.
Note:
 Loading...