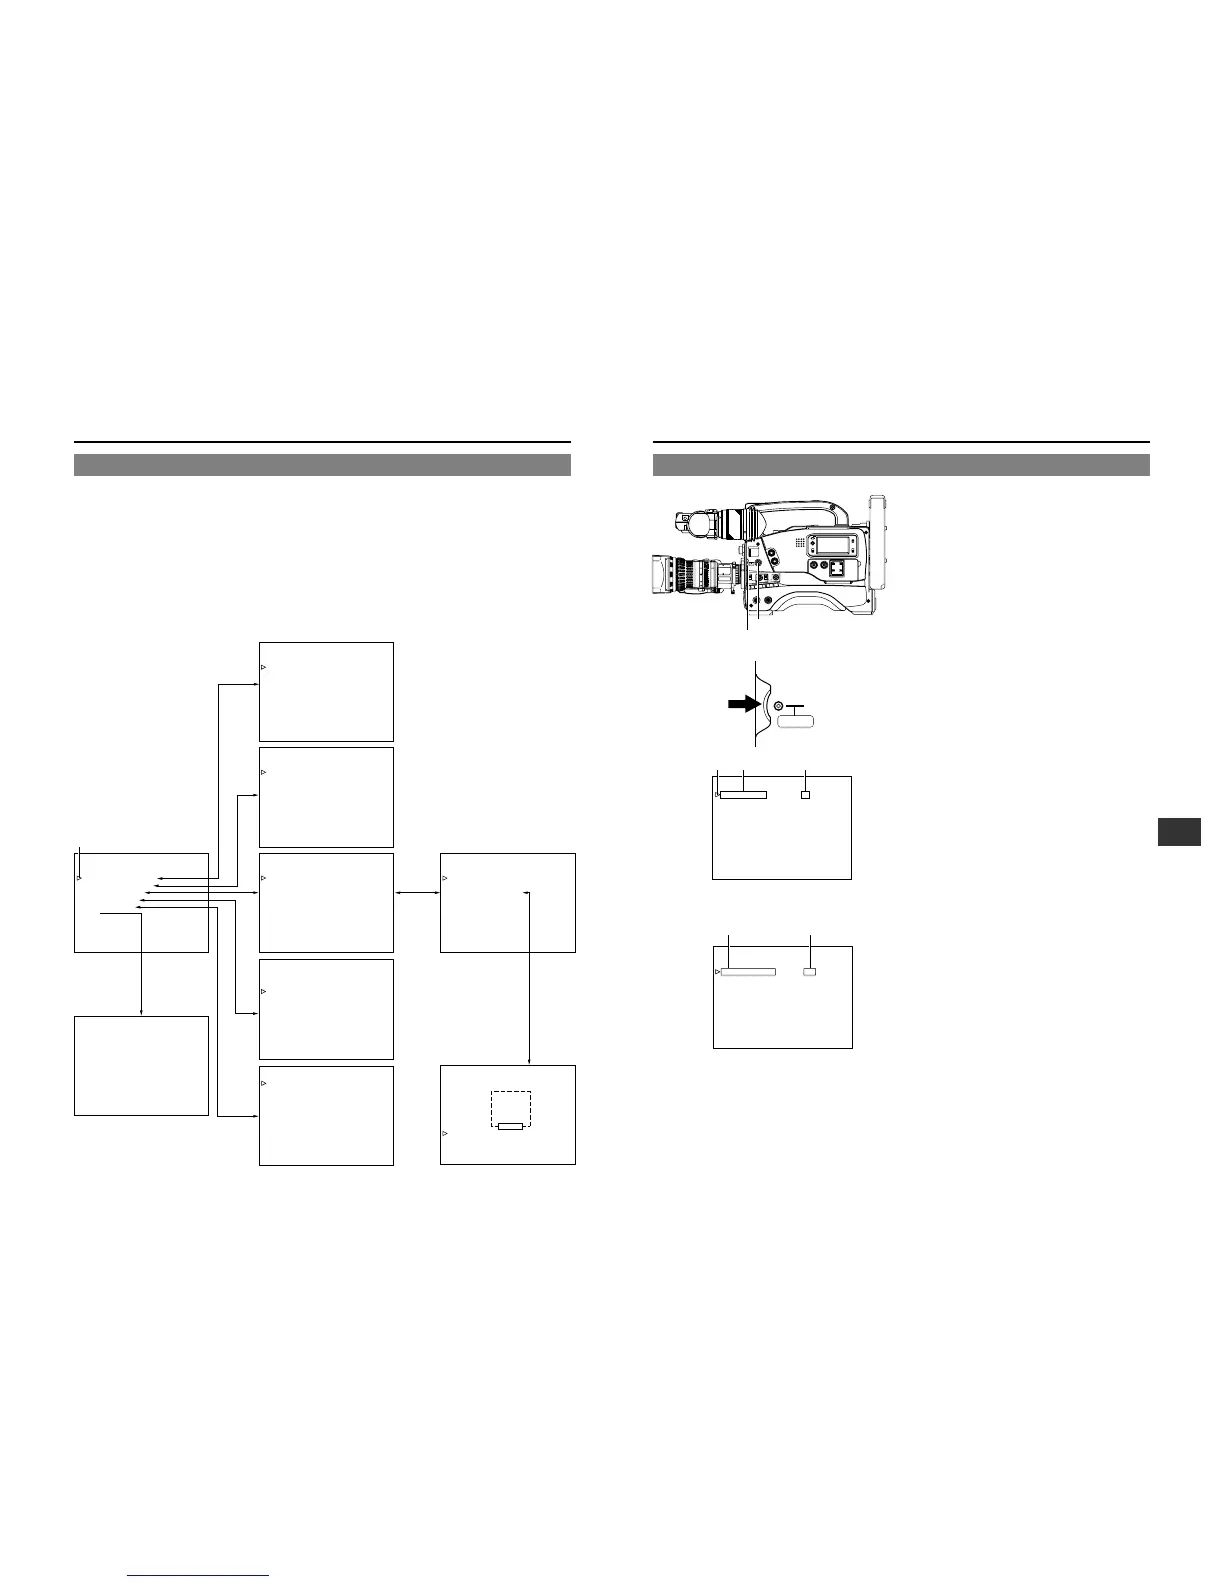
SHUTTER dial
STATUS button
2. 3. 4. 5. 6. 8.
1.
Press the STATUS button for 1 second to display the
CAMERA MENU screen in the viewfinder.
2.
Choose the file with the camera menu settings to be used.
(SCENE FILE A, B or OFF)
1 Turn the SHUTTER dial up or down to align the cursor
with SCENE FILE, and then press the SHUTTER dial
in the direction of the arrow.
• The area with the setting value starts blinking, and the
value can now be changed.
2 Turn the SHUTTER dial up or down to select the setting
value. (A, B or OFF)
3 Press the SHUTTER dial in the direction of the arrow.
• The setting value stops blinking but remains lit.
3.
Turn the SHUTTER dial up or down to align the cursor with
the menu item to be set, and then press the SHUTTER dial
in the direction of the arrow.
• The selected menu screen appears in the viewfinder.
4.
Choose the menu item from the menu screen.
Turn the SHUTTER dial up or down to align the cursor with
the menu item to be set, and then press the SHUTTER dial
in the direction of the arrow.
• The area with the setting value starts blinking, and the
value can now be changed.
5.
Change the setting value.
Turn the SHUTTER dial up or down to change the setting
value, and then press the SHUTTER dial in the direction of
the arrow.
• The setting value stops blinking but remains lit.
To change multiple items, repeat steps
4.
and
5.
above.
6.
Return to the CAMERA MENU screen.
Turn the SHUTTER dial up or down to align the cursor with
the PAGE BACK item, and then press the SHUTTER dial in
the direction of the arrow.
To change the settings of other menu screens, perform
the operations described in steps
3.
to
6.
above.
7.
If SCENE FILE A or B is selected, choose the FILE
MANAGE item from the CAMERA MENU screen and
perform the operations for storing a file.
☞ See "FILE MANAGE Screen" on page 76.
* It is not necessary to perform the file storage operations
for changes made to the SETUP MENU.
8.
Complete the CAMERA MENU setting.
Turn the SHUTTER dial up or down to align the cursor with
the EXIT item on the CAMERA MENU screen, and then
press the SHUTTER dial in the direction of the arrow.
• The normal screen returns in the viewfinder.
--- - - CAMERA MENU -
SCEN F I LE : A
VF D ISPLAY MENU
OPERAT I ON MENU
PROCESS MENU
FILE STORE
SETUP MENU
EX I T
CURSOR Item Setting value
E
CAMERA MENU screen
12-3 How to Select from the Camera Menu
--- VF DISPLAY ---
SCENE F I LE A
F.NO DISPLAY
DI SPLAY
:ON
:ON
:OFF
AUD I O
SAFETY ZONE
:ON
-80%
CENTER MARK
REC T I ME : REMA I N
ZEBRA : 7 0
PAGE BACK
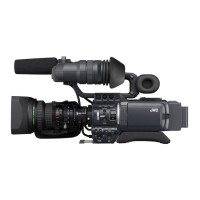
12-2 Camera Menu Screen Flow
Camera Menu Screen Flow
As illustrated below, the Camera Menu is a menu screen comprising several layers. The first layer of the CAMERA MENU screen is
for choosing and setting the menus required in accordance with functions or purposes.
The unit also allows the contents of menu settings to be stored in three files (SCENE FILE A, B, OFF).
• SCENE FILE A, B ........... By performing the FILE STORE operation on the FILE MANAGE screen, the contents of menu
settings can be stored and retained in the unit. However, the SET UP menu contents are stored
even if the FILE STORE operation is not performed.
Use SCENE FILE A or B to store and retain the contents of menu settings that remain more or less
fixed.
• SCENE FILE OFF ........... Whenever you want to change the menu settings, use this SCENE FILE.
The menu setting contents are stored in the unit even if the FILE STORE operation is not performed.
When shooting, select the file with the menu settings to be used from among the three SCENE FILE files on the CAMERA MENU
screen.
Cursor
--- - - CAMERA MENU
Normal screen
-
SCENE F I LE : A
VF D I SPLAY MENU
..
OPER A T I ON MEN
PROCESS MENU
F I LE MANAGE
SETUP MENU
U.
..
..
..
..
.
EX I T
ES- - - ADVANCED PROC - - -S
SCENE F I LE A
COLOR MATR I X :ON
GAMMA : MA
..
X
SK I N COLOR ADJUST
PAGE BACK
- - SK IN COLOR STADJ U - -
EXECUTE
: NORMA L
SK I N COL DET .OR
SK I N COL RANGEOR
PAGE BACK
--- SETUP---
H PHASE : 12 8
:128
:OFF
SC PHASE
CAM M I C + 4 8 V
PAGE ACKB
--- PROCESS ---
SCENE F I LE A
MASTER BL ACK : NORMAL
: NORMA L
: NORMA L
RMA L
DETA I L
DTL . V / H BAL
DTL . FREQUENCY :
V RESOLUT ION : NO
F
SK I N DT L DETECT : OF
ADVANCED PROCESS
--- FILE MANAGE ---
--- VF DISPLAY ---
SCENE F I LE A
F . NO D I SPLAY
DI SPLAY
:ON
:ON
:OFF
FIX
AUD I O
SAFETY ZONE
:
ER 9 5%
:REMAI N
:OV
CENTER MARK
ECRTIME
ZEBRA
PAGE BACK
PAGE BACK
SCENE F I LE A
STORE F I LE : A
:OFF
STORE
RESET F I LE
RESET
STORE OK?
PAGE BACK
--- OPERATION ---
SCENE F I LE A
ASPECT RAT I O : 16 : 9
PAGE BACK
SHUTT ER : STEP
:NONE
:0dB
dB
FAW
GA I N L
GA I N M : 9 d B
GA I N H : 1 8
:OFF
SMOOTH TRANS
ERORR
HHIG
Item Setting value
VF DISPLAY MENU screen
The display is GY-DV700WEK.
 Loading...