3
[Carry out steps 1 to 3 when installing
the mailbox to a monochrome
machine.]
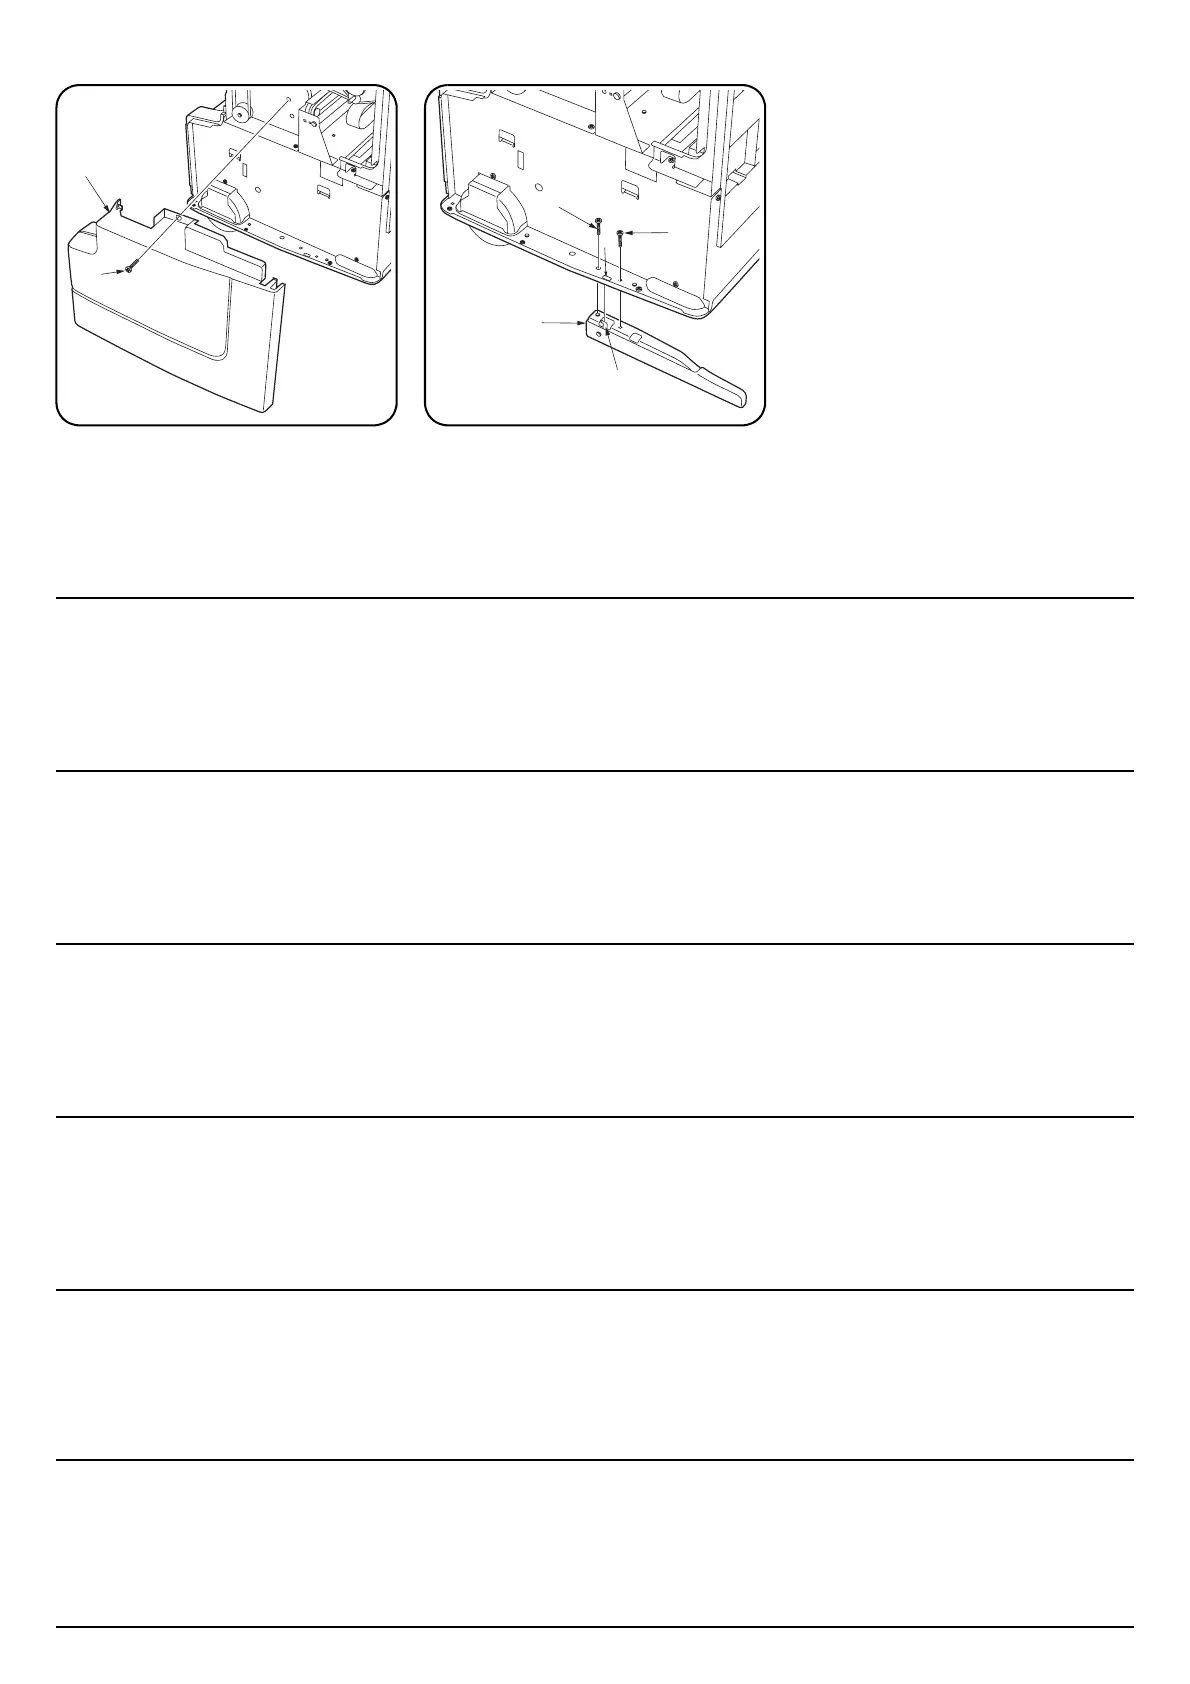
1. Open the front cover of the finisher, remove
the screw (1), and remove the lower front
cover (2).
2. Hang the hook sections (5) of plate foot F (I)
on the finisher frame notches (6), and secure
them using 2 Taptite S binding screws M4 x
10 (J).
3. Refit the lower front cover (2) to its original
position, secure it using the screw (1), and
close the front cover.
[Effectuer les étapes 1 à 3 lorsqu’on
installe la boîte à lettres sur une
machine monochrome.]
1. Ouvrir le couvercle avant du retoucheur,
retirer la vis (1), puis retirer le couvercle
inférieur avant (2).
2. Accrocher les parties en crochet (5) du pied
de plateau F (I) aux encoches du cadre du
retoucheur (6) et les fixer à l'aide de 2
bornes de raccordement Taptite S M4 x 10
(J).
3. Remettre le couvercle inférieur avant (2) à
sa position d’origine, le fixer à l’aide de la vis
(1), puis refermer le couvercle avant.
[Realice los pasos 1 a 3 cuando instale
el buzón de correo en una máquina
monocromática.]
1. Abra la cubierta delantera del finalizador,
quite el tornillo (1) y remueva la cubierta
delantera inferior (2).
2. Cuelgue las secciones con gancho (5) de la
pata de placa F (I) en las muescas de la
carcasa del finalizador (6) y fíjelas por medio
de 2 tornillos de sujeción Taptite S M4 X 10
(J).
3. Vuelva a colocar la cubierta delantera
inferior (2) a su posición original, asegúrela
utilizando el tornillo (1) y cierre la cubierta
delantera.
[Führen Sie die Schritte 1 bis 3 aus,
wenn Sie die Mailbox an einer
Monochrommaschine anbringen.]
1. Öffnen Sie die Frontabdeckung des
Finishers, entfernen Sie die Schraube (1),
und nehmen Sie die untere Frontabdeckung
(2) ab.
2. Hängen Sie die Hakenteile (5) des
Plattenfußes F (I) in die Finisher-
Rahmenöffnungen (6) und befestigen Sie sie
mit den 2 Taptite S-Befestigungsschrauben
M4 × 10 (J).
3. Bringen Sie die untere Frontabdeckung (2)
wieder an ihrer ursprünglichen Position an,
sichern Sie sie mit der Schraube (1), und
schließen Sie die Frontabdeckung.
[Eseguire il procedimento dei passi da
1 a 3 quando si installa la casella
postale su una macchina in bianco e
nero.]
1. Aprire il coperchio anteriore del finitore,
rimuovere la vite (1) e poi il coperchio
anteriore inferiore (2).
2. Agganciare le sezioni dei ganci (5) del
piedino della piastra F (I) sugli incavi (6) del
telaio del finitore, e fissarle utilizzando 2 viti
di seraggio Taptite S M4 x 10 (J).
3. Reinserire il coperchio anteriore inferiore (2)
nella sua posizione iniziale, fissarlo
utilizzando la vite (1) e chiuderlo.
[ 手順 1 ~ 3 はモノクロ機に取り付け
る場合 ]
1. フィニッシャの前カバーを開け、ビス (1)1
本を外し、前下カバー(2) を取り外す。
2. プレートフット F(G) のフック部 (3) をフィ
ニッシャフレーム部の切り欠き (4) に引っ
掛け、ビス M4 × 10 バインドタップタイト
S(G)2 本で固定する。
3. 前下カバー(2) を元通り取り付けビス (1)1
本で固定し、前カバーを閉じる。
[ 在黑白机上安装时的步骤 1 ~ 3]
1. 打开装订器的前盖板,拆下 1 个螺丝 (1),然
后取下前下盖板 (2)。
2. 将底板 F (G) 的挂钩部 (3) 钩在装订器框架部
的凹口 (4) 处,并用 2 个连接用自攻紧固型 S
螺丝 M4
× 10 (G) 进行固定。
3. 按原样装好前下盖板 (2),并 用 1 个螺丝 (1)
进行固定,关闭前盖板。
2
1
I
G
G
4
3
 Loading...