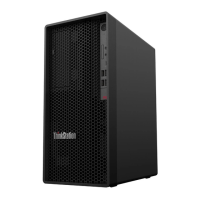
10.Notetheorientationofthenewmicroprocessor.Holdthenewmicroprocessorbyitsedgesandalign
thenotches
1onitwiththetabs2inthemicroprocessorsocket.Then,carefullylowerthenew
microprocessorstraightdownintothemicroprocessorsocket.
Note:Thesmalltriangle3ononecornerofthenewmicroprocessoristhemicroprocessororientation
indicator.Thenewmicroprocessorisinthecorrectorientationwhenthisindicatorpointstothebeveled
corner4ofthemicroprocessorsocket.
Figure39.Installingthemicroprocessor
11.Closethemicroprocessorretainerandlockitintopositionwiththesmallhandle.Ensurethatthenew
microprocessorissecurelyseatedinthesocket.
12.Reinstalltheheatsinkandfanassembly.See“Replacingtheheatsinkandfanassembly”onpage136.
13.Reconnectanycablesthatweredisconnectedfromthesystemboard.
Whattodonext:
•Toworkwithanotherpieceofhardware,gototheappropriatesection.
•Tocompletethereplacement,goto“Completingthepartsreplacement”onpage166.
Installingorreplacinganopticaldrive
Attention:DonotopenyourcomputerorattemptanyrepairbeforereadingandunderstandingtheChapter
1“Readthisfirst:Importantsafetyinformation”onpage1
.
Forsomecomputermodels,theoptical-drivebaymightbeinstalledwithadevicesuchasanopticaldrive,
a5.25-inchflexmodule,aflexstorageenclosure,afrontaccessstorageenclosure,oranoptical/storage
combinationenclosure.
Thissectionprovidesinstructionsonhowtoinstallorreplaceanopticaldrive.Foranyotherdeviceinthe
optical-drivebay,theinstallationorreplacementprocedureissimilar.
Toinstallorreplaceanopticaldrive,dothefollowing:
Chapter9.Installingorreplacinghardware109