Chapter 2—Hardware Description
9
CHAPTER 2—HARDWARE DESCRIPTION
FRONT PANEL The circuit monitor front panel is designed for maximum ease of use. The
circuit monitor has five modes of operation:
• METERS — for viewing real-time metered data
• MIN — for viewing the minimum of the selected metered value
• MAX — for viewing the maximum of the selected metered value
• ALARM — for viewing the status of on-board alarms
• [Setup] — for setting up the circuit monitor
The general procedure for displaying data is simple:
1. Press the MODE button to select one of the five available modes.
2. Press the SELECT METER buttons to select a metered value.
3. Press the PHASE button to select a phase.
In [Setup] mode, use the alternate descriptions in grey to the right of the
LEDs. In SETUP mode, the PHASE, MODE, and SELECT METER buttons
function differently than in the other display modes. For details see
Chapter 4—Front Panel Operation.
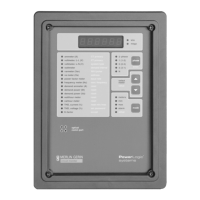
Figure 2-1 shows the front panel of the circuit monitor. A description of the
front panel follows.
➀ 6-Digit LED display. For local display of metered values.
➁ Kilo/Mega LEDs. The Kilo LED lights when the displayed value is in
Kilo units. The Mega LED lights when the displayed value is in Mega
units.
➂ Meter Indication LEDs. The lit LED indicates the value being displayed.
➃ Setup/Reset Parameters. These grey, bracketed values are used to set up
the circuit monitor and perform resets. Refer to these values when in
[Setup] mode.
➄ Phase Indication LEDs. Indicate the phase for the displayed value.
Note: If you select a metered value that does not provide a reading for
the selected phase, the circuit monitor automatically jumps to a phase for
which a reading exists. For example, assume that you are viewing Phase
A Power Factor, then change to Frequency; the circuit monitor
automatically jumps from Phase A to 3-Phase, since the circuit monitor
does not provide a Phase A Frequency reading.
➅ PHASE Select Button. Press to select the phase for the selected meter
value. Note: In [Setup] mode, press this button to move from one setup
parameter to the next. See Chapter 4—Front Panel Operation for details.
➆ SELECT METER buttons. Press to change the metered value being
displayed. Note: In [Setup] mode, press these buttons to change the value of
the displayed setup parameter. See Chapter 4—Front Panel Operation
for details.
 Loading...