44
ROOF REMOVAL
Remove the hatchback (see page 14).
Remove the windscreen (see page 42).
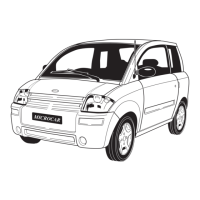
Remove the 2 finishing joints of the roof.
With damaged wood scissors and regulated thermal
scrapper, warm up the back part of the hatchback
(maximum temperature 60°) and remove the roof from the
back cross beam.
Do the same to remove the roof from the sides of the body.
Always start the removal of the back roof to the front
on the both sides, then remove it from the front cross beam.
Remove the roof.
Clean all the residues of the glue which stay on the body
frame. Degrease all the alu surfaces which must be glued with
the product Adekit (ref 1002659).
Put a line of glue in the corners on the front part of the frame
(glue kit TWINTEX-ABS-ALU ref 1002657)
NEW ROOF FITTING
Put a line of glue in the corners on the back parts of the frame.