Chapter 9 Function setup
221
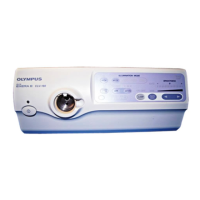
EVIS EXERA II VIDEO SYSTEM CENTER CV-180
Function Outline
Freeze Toggles back and forth between live image and frozen image of the endoscopic image. Same
function as “FREEZE” on the keyboard. See “Freeze (“FREEZE”)” on page 99.
Release 1 Records the images on the monitor into the recording devices. Same function as “RELEASE” on
the keyboard. See “Release (“RELEASE”)” on page 101.
Release 2 Records the images on the monitor into the recording devices. See “Release function” on
page 223.
Iris Switches to the iris mode (type of optical measurement). Same function as the “Iris mode switch”
on the front panel. See “Iris mode” on page 69.
Enhance Switches the image enhancement mode (OFF/1/2/3). Same function as the “Image enhancement
button” on the front panel. See “Image enhancement mode (ENH.)” on page 67.
Contrast Switches the contrast of the endoscopic image. Same function as the “Shift”+”F6” keys on the
keyboard. See “Contrast mode (“Shift” + “F6”)” on page 90.
AGC Toggles back and forth the AGC function between ON and OFF. Same function as the “F6” key on
the keyboard. See “Automatic gain control (AGC) (“F6”)” on page 89.
Image size Changes the image size. Same function as the “F8” key on the keyboard. See “Image size (“F8”)”
on page 94.
VCR Operates either VCR recording or pause. See “Videocassette recorder (VCR)” on page 129.
Capture Takes in the image into the video printer. Same function as the “CAPTURE” key on the keyboard.
See “Video printer” on page 131.
Stop watch Uses the clock on the monitor as a stopwatch. Same function as the “F5” key on the keyboard. See
“Stopwatch (“F5”)” on page 88.
Remove data Erases and displays the patient data on the monitor. Same function as the “F1” key on the
keyboard. See “Clearing characters from the screen (“F1”)” on page 82.
Zoom Enlarges the image. Same function as the “F7” key on the keyboard. See “Image zooming (“F7”)”
on page 91.
White balance Press and hold to execute the white balance adjustment. Same function as the “Shift” + “F9” keys
on the keyboard and “White balance button” on the front panel. See Section 4.5, “White balance
adjustment” on page 52.
Exposure
area
Changes the exposure area of the auto brightness control. See “Exposure area” on page 239.
Exposure (up)
Increases the brightness of the image. Same function as “ ” of the brightness adjustment button
on the front panel. See “Brightness adjustment (Exposure)” on page 71.
Exposure
(down)
Decreases the brightness of the image. Same function as “ ” of the brightness adjustment button
on the front panel. See “Brightness adjustment (Exposure)” on page 71.
NBI Activates the NBI observation mode. See “NBI (narrow band imaging)” on page 151.
PDD mode This function is not available.
PDD gain This function is not available.
OP.2 Reserved for future system expansion. Currently not used.
Table 9.22

 Loading...