Chapter 9 Function setup
227
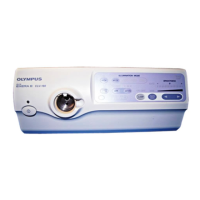
EVIS EXERA II VIDEO SYSTEM CENTER CV-180
Initial enhancement mode
1. Click “ ” of “Mode position” (see Figure 9.21). The numbers of
enhancement mode appear in the pull-down menu.
2. Click the enhancement mode number to use. The selected number is
displayed.
Enhancement modes
1. Click “ ” of “Mode 1” (see Figure 9.21).The enhancement types appear in
the pull-down menu.
• A1 to A8, B1 to B8 and E1 to E8, 24 kinds are displayed.
The larger the number, the higher the enhancement.
2. Click the desired enhancement type. The selected type is displayed.
3. Follow steps 1. and 2. to assign the enhancement type to “Mode 2” and
“Mode 3” in the same way.
• The image enhancement mode used before the video
system center OFF comes up when the instrument is turned
ON. The setting set in “Mode position” comes up when the
user preset is called up.
• B1 to B8 is valid for Scope 1, Scope 4, and Scope 5 shown in
Table 9.30 on page 229. When an endoscope other than
these endoscopes is used, the enhancement automatically
becomes A1 to A8.
• Mesh-like noise may be observed in the image, when the
image enhancement function is on during use of a fiberscope
or hybrid scope. Switch the image enhancement OFF, or use
the recommended camera head below:
OTV-S7H-1N
OTV-S7H-1D
Setting value Explanation
Mode 1 Corresponds to Mode 1 in “Enhancement modes” below.
Mode 2 Corresponds to Mode 2 in “Enhancement modes” below.
Mode 3 Corresponds to Mode 3 in “Enhancement modes” below.
OFF No enhancement
Table 9.27

 Loading...