-6-
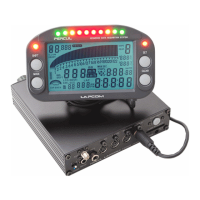
10. BEACON port
Connects the attached laptime sensor.
11. Display port
Connects the attached display.
12. Power switch
It is used when operating the Lapcom with the inner battery. If the switch is ON and the
device is operated with the external DC12V power, the device will shift the operating
with the inner battery when the external power stops.
13. SD card slot
Inserts the SD card.
14. DC12V port
Connects the external battery connection cord (05841) when operation device with the
external DC12V power.
15. THROT port
Connects the optional displacement sensor.
16. STR port
Connects the optional displacement sensor.
17. TMP1 port
Connects various temperature sensors.
18. TMP2 port
Connects various temperature sensors.
19. Pressure1 port
Connects the optional pressure sensor.
20. Pressure2 port
Connects the optional pressure sensor.
21. EXTRA port * This is available for only S Separate 100 Plus.
Five analog channels input are available.
22. Information lamp
It illuminates as a shift lamp that informs the set shift timing for RPM.
23. Status lamp
It illuminates when the temperature or pressure drops below the set alarm value.
24. SHIFT key
It is mainly used when shifting to parameter setting screen or confirming each data. It
sometimes works with MODE key.
25. MODE key
It is mainly used when shifting to parameter setting screen or confirming each data. It
sometimes works with SHIFT key.
26. Status lamp
It illuminates when the temperature or pressure exceeds over the set alarm value.
27. SET key
It is mainly used when choose the setting values on the parameter setting screen.
28. CLEAR key
To return to the default screen from each screen mode, press this button.