CRANKSHAFT AND MAIN
BEARINGS-H.4
3.
Place the
crankshaft
in
position.
4.
Locate
the
upper
thrust
washer in
position
as
shown in Fig. H.6.
5.
Fit the three
lower
bearing shells, oil, and fit the
three main
bearing
caps in
their
respective loca-
tions.
NOTE: Ensure at this stage that the
two
lower
thrust
washer halves are positioned
correctly
either
side
of the rear f\lain bearing cap when it is fitted.
6.
Check
the main bearing setscrews
prior
to fitting
for
signs
of
stretch
or
thread damage. Where
damage
or
any
doubt
exists fit new replacements.
7.
Fit the setscrews then
tighten
evenly
to
the torque
tension
given on Page B.2.
8.
Check
that the
crankshaft
can be rotated freely, if
satisfactory
check
the
crankshaft
end float by
means of feeler gauges as shown in Fig. H.7.
Should it
not
be
within
the limits quoted on Page
B.6, then oversize thrust washers are available to
give the necessary adjustment.
(Refer
to Page H8
H.1J.
9.
Fit
new
sealing
strips
to
the rear main bearing oil
seal housings and refit the housings as
described
under
the heading
"Crankshaft
Rear End Oil
Seal"
below.
10.
Liberally
oil the crankpins, locate
the
connecting
rod bearing shells, again ensuring
their
correct
relative positions,
then
fit
the
connecting
rod caps
as
described
on Page F.5. The
crankcase
should
now
be as shown in Fig. H.2.
11. Refit the
lubricating
oil pump
complete
with suc-
tion
and delivery pipes.
(Refer
to Page
L.4).
12. Refit the sump using
new
seals and joints. (Refer
to
Page
L.1).
13. Refit the
timing
case back plate, fuel pump drive
hub, timing gears, timing
cover
and
crankshaft
front
pulley.
(Refer
to
later
text
commencing
on
Page
J.1
for
their reassembly.
14. Refit and
correctly
align the flywheel housing
as
described
on Page P.2.
15. Refit the flywheel and
starter
motor.
CRANKSHAfT REAR END
OIL
SEAL
This
sealing
arrangement
consists
of
two
half
housings
bolted
around the rear
of
the
crankshaft.
The bore
of
these housings is
machined
to
accommodate
a
rubber
cored
asbestos
strip
which, in
conjunction
with
a
right
hand helix machined between the
thrust
collar
and the
flywheel
mounting
flange to the
dimensions
given on
Page B.6,
acts
to return the
surplus
oil
reaching
the
seal. The
two
half housings fit over
this
helix and the
contact
of
the sealing
strips
with
the
crankshaft
pre-
vents leakage beyond
this
point.
NOTE: When traces
of
oil
become
apparent
from
behind
the flywheel and a faulty
rear
oil
seal is sus-
pected,
first
ensure that the
crankcase
is
breathing
normally. Any build up in
crankcase
pressure
could
cause oil to be
forced
past the rear
sealing
arrange-
ment. If
crankcase
pressure is
normal
and
new
seals
require
to
be fitted the
following
procedure
should
be
adopted
with
the
crankshaft
in
position.
1.
Set
up
a
half
housing
in the
vice
with
the seal
recess uppermost.
2.
Settle
approximately
1 in (25
mm)
of
the
strip, at
each
end,
into
the
ends
of
the
groove
ensuring
that
each
end
of
the.
strip
projects
0.01010.020
in
(0,25/0,50
mm)
beyond
the
half
housing
joint
face.
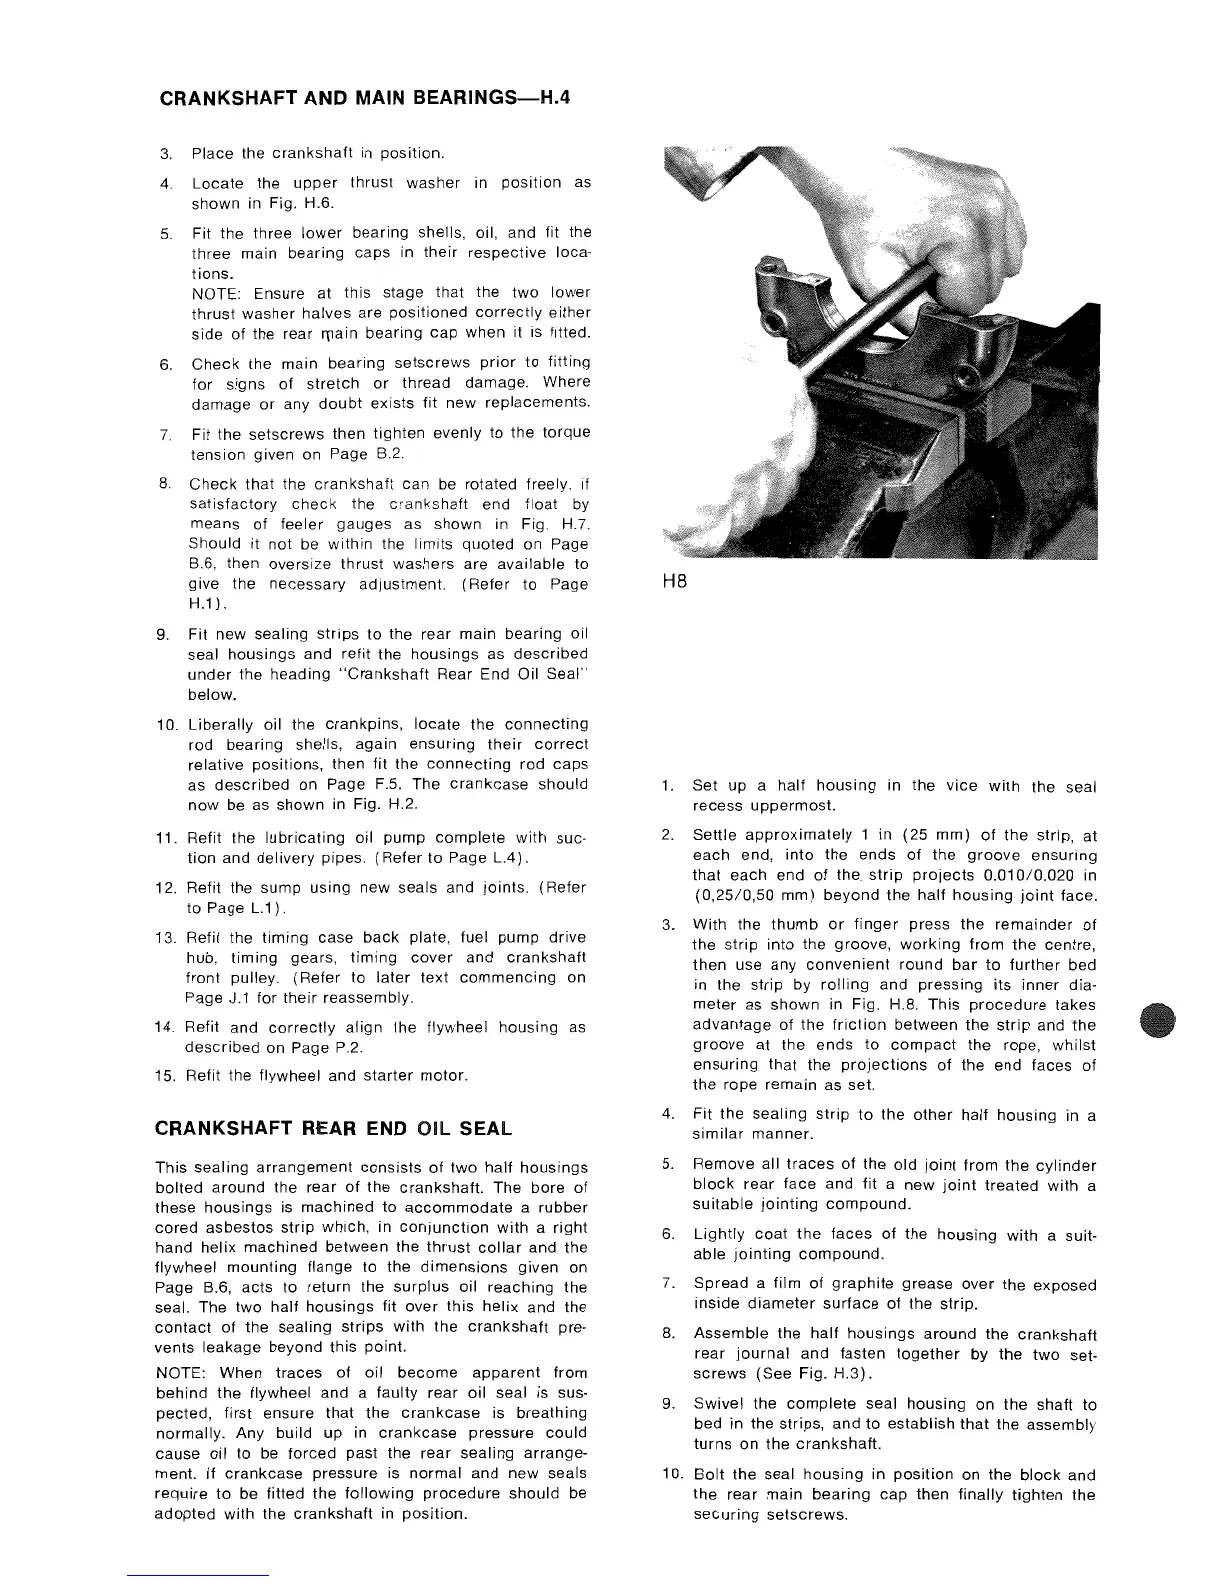
3.
With
the
thumb
or
finger
press the
remainder
of
the
strip
into the groove,
working
from
the
centre,
then use any
convenient
round
bar
to
further
bed
in the
strip
by
rolling
and
pressing its
inner
dia-
meter
as
shown
in Fig. H.8.
This
procedure
takes
advantage
of
the
friction
between the
strip
and the
groove
at the
ends
to
compact
the rope, whilst
ensuring
that the
projections
of
the
end
faces of
the
rope
remain as set.
4.
Fit
the
sealing
strip
to
the
other
half
housing in a
similar
manner.
5.
Remove all
traces
of
the old
joint
from the
cylinder
block
rear face
and
fit a
new
joint
treated with a
suitable
jointing
compound.
6.
Lightly
coat
the faces
of
the
housing
with
a suit-
able
jointing
compound.
7.
Spread
a film
of
graphite
grease
over
the exposed
inside
diameter
surface
of
the strip.
8.
Assemble
the
half
housings
around
the
crankshaft
rear
journal
and
fasten
together
by the
two
set-
screws
(See
Fig.
H.3).
9. Swivel
the
complete
seal housing
on
the
shaft
to
bed in the strips,
and
to
establish
that
the assembly
turns
on
the
crankshaft.
10.
Bolt
the seal
housing
in
position
on the
block
and
the
rear
main
bearing
cap
then
finally
tighten
the
securing
setscrews.