Startup and operation
Page 22 RES-445
11. Temperature coefficient 870ppm, 0…300°C
(software revision 019 or higher)
12.Temperature coefficient 980ppm, 0…300°C
(software revision 019 or higher)
13.Temperature coefficient 1100ppm, 0…200°C
(e.g. Alloy-20)
14.Temperature coefficient 1100ppm, 0…300°C
(Factory settings)
(e.g. Alloy-20)
15.Temperature coefficient 1100ppm, 0…400°C
(e.g. Alloy-20)
16.Temperature coefficient 1100ppm, 0…500°C
(e.g. Alloy-20)
17.Temperature coefficient 3500ppm, 0…200°C
(e.g. NOREX)
18.Temperature coefficient 3500ppm, 0…300°C
(e.g. NOREX)
9.3.5 Configuration of the alloy
(Temperature coefficient)
(as of software revision 100)
The heatsealing band alloy (and the temperature coef-
ficient respectively) can be set with steps 203 and 204
in the Configuration menu.
In step 203 predefined values for the alloy (and the
temperature coefficient repsecitvely) are available:
1. Temperature coefficient 780ppm
(e.g. Alloy-L)
2. Temperature coefficient 1100ppm
(Factory setting)
(e.g. Alloy-20)
3. Temperature coefficient 1400ppm
(e.g. ROPEX CIRUS system)
4. Temperature coefficient 1700ppm
(e.g. ROPEX CIRUS system)
5. Temperature coefficient 3500ppm
(e.g. NOREX)
6. Temperature coefficient „variable“
Further settings in step 204.
In step 204 the temperature coefficent can be set in
a range of 400…4000 ppm individually for the used
heatsealing band then.
Step 204 in the Configuration menu is avai-
lable when step 203 is set to "variable" only.
9.3.6 Configuration of the temperature
range
(as of software revision 100)
The temperature range can be set with steps 205 in the
Configuration menu.
The setting can be 200°C, 300°C (Factory setting),
400°C or 500°C.
9.3.7 Configuration of the timer function
The necessary controller settings are
explained in the detailed functional descrip-
tions in Kap. 10.6 „Menu steps“ auf Seite 34 and
Kap. 10.24 „Time control (timer function)“ auf
Seite 53. They are only allowed to be entered by
technically trained persons.
The timer function is activated with step 26 in the Con-
figuration menu.
9.3.8 Relay K1 (without time control)
The function of relay K1 is specified with step 212 [29]
in the Configuration menu. The following settings are
possible when time control is deactivated:
1. "Off" (Factory setting)
Relay K1 has no function
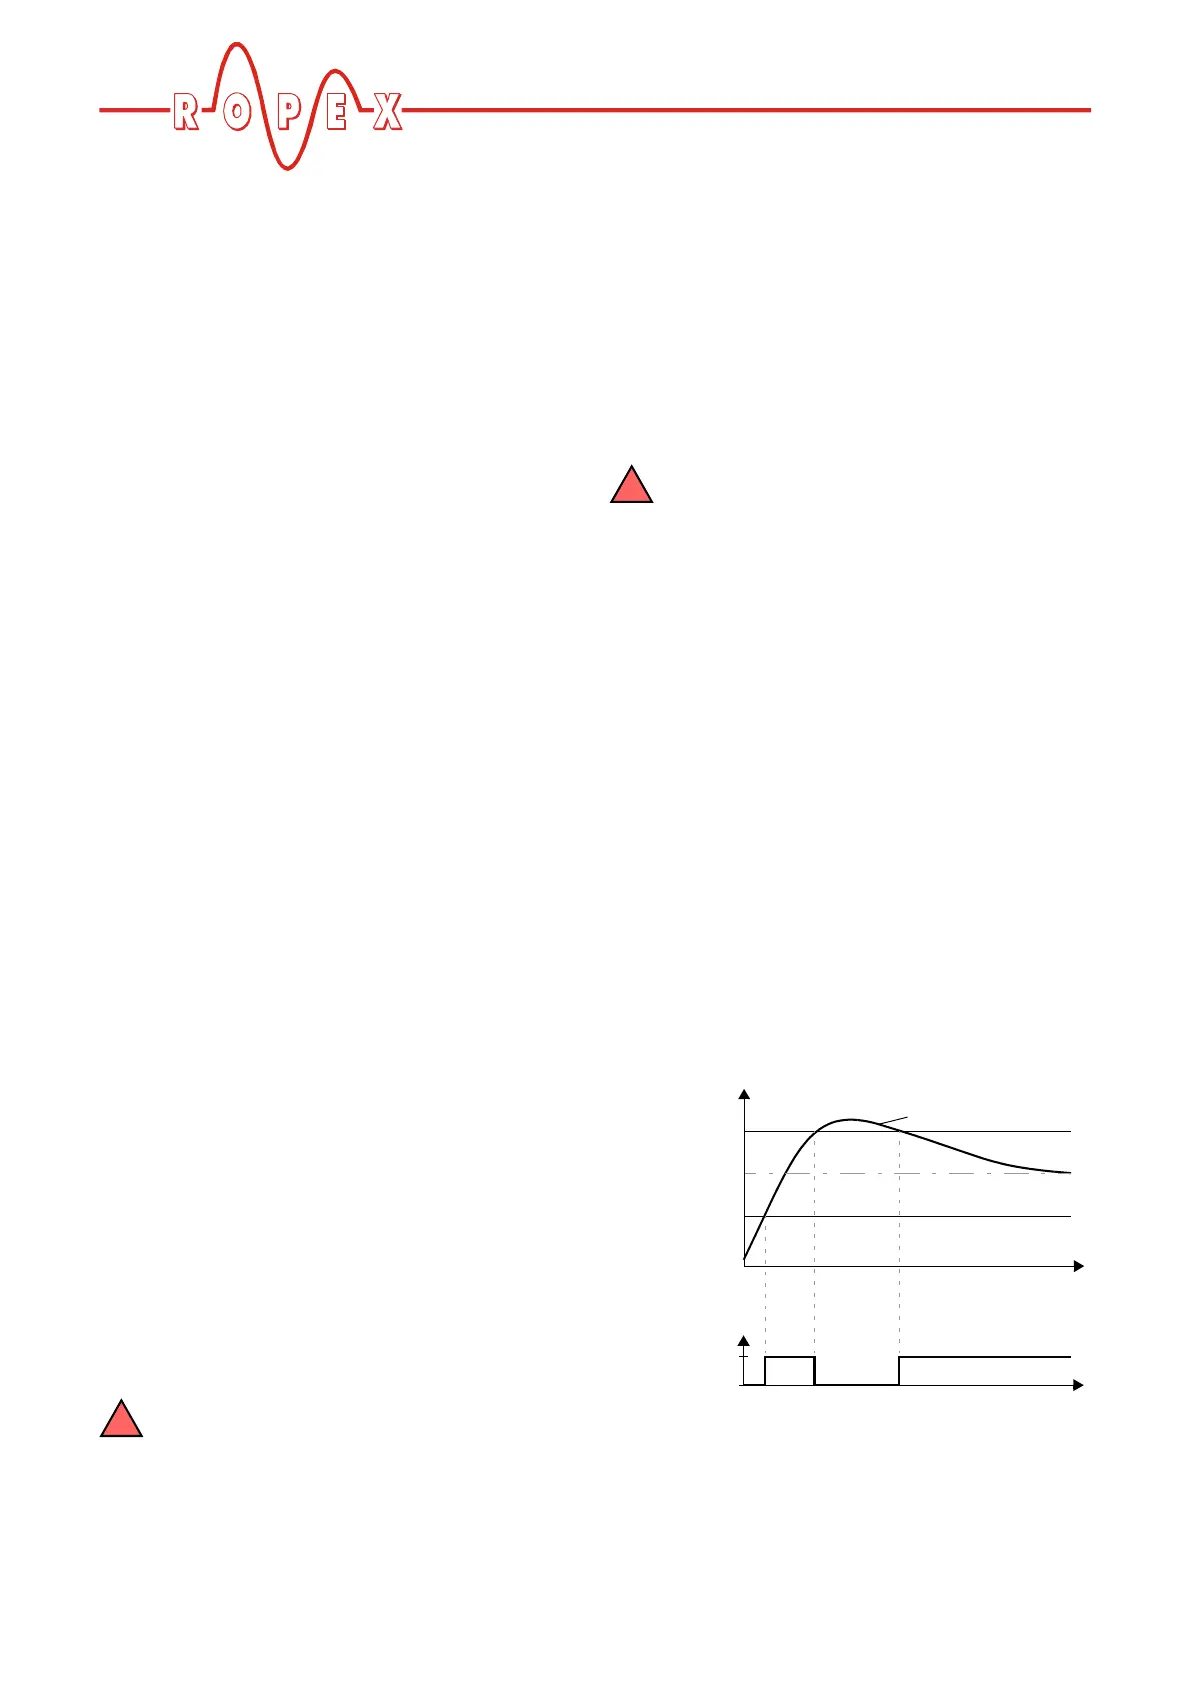
2. "Active if Tact = Tset"
Relay K1 is activated if the actual value is inside the
specified temperature tolerance band (steps
207 [24], 208 [25]). If the actual temperature is out-
side the tolerance band, relay K1 is deactivated (see
graph below).
Actual value
Time
Time
open
closed
Relay K1