37
MT- S
2.4GHZ FH4T RADIO SYSTEM USER'S GUIDE
Telemetry System with Sanwa Synchronized Link Support
Section Continued on Next Page
AUX MENU
MOA MIX MENU
MOTOR ON AXLE MIXING
AUX
The Motor on Axle Mixing function provides you with two Throttle channels. It is typically used for Rock Crawlers and allows
you to control either the Front and Rear motors together or independently, giving you Dig and Burn functions. For example,
you can use Auxiliary Switch Sw2 to switch between Dig or Burn and OFF (Balanced), or you can use Trim Switch Trm3 to
variably change the power distribution between the Front and Rear motors, allowing you the utmost in functionality while you're
driving. In addition, you can use Auxiliary Switch Sw1 to toggle the Motor on Axle Mixing function ON and OFF.
This section details programming the Motor on Axle Mixing function for both Auxiliary 1 (Channel 3) and Auxiliary 2
(Channel 4), since programming each of them is the same. Choose either CH A1 for Auxiliary 1 (Channel 3) or CH A2 for
Auxiliary 2 (Channel 4), depending on which channel you want to program the Motor on Axle Mixing function for.
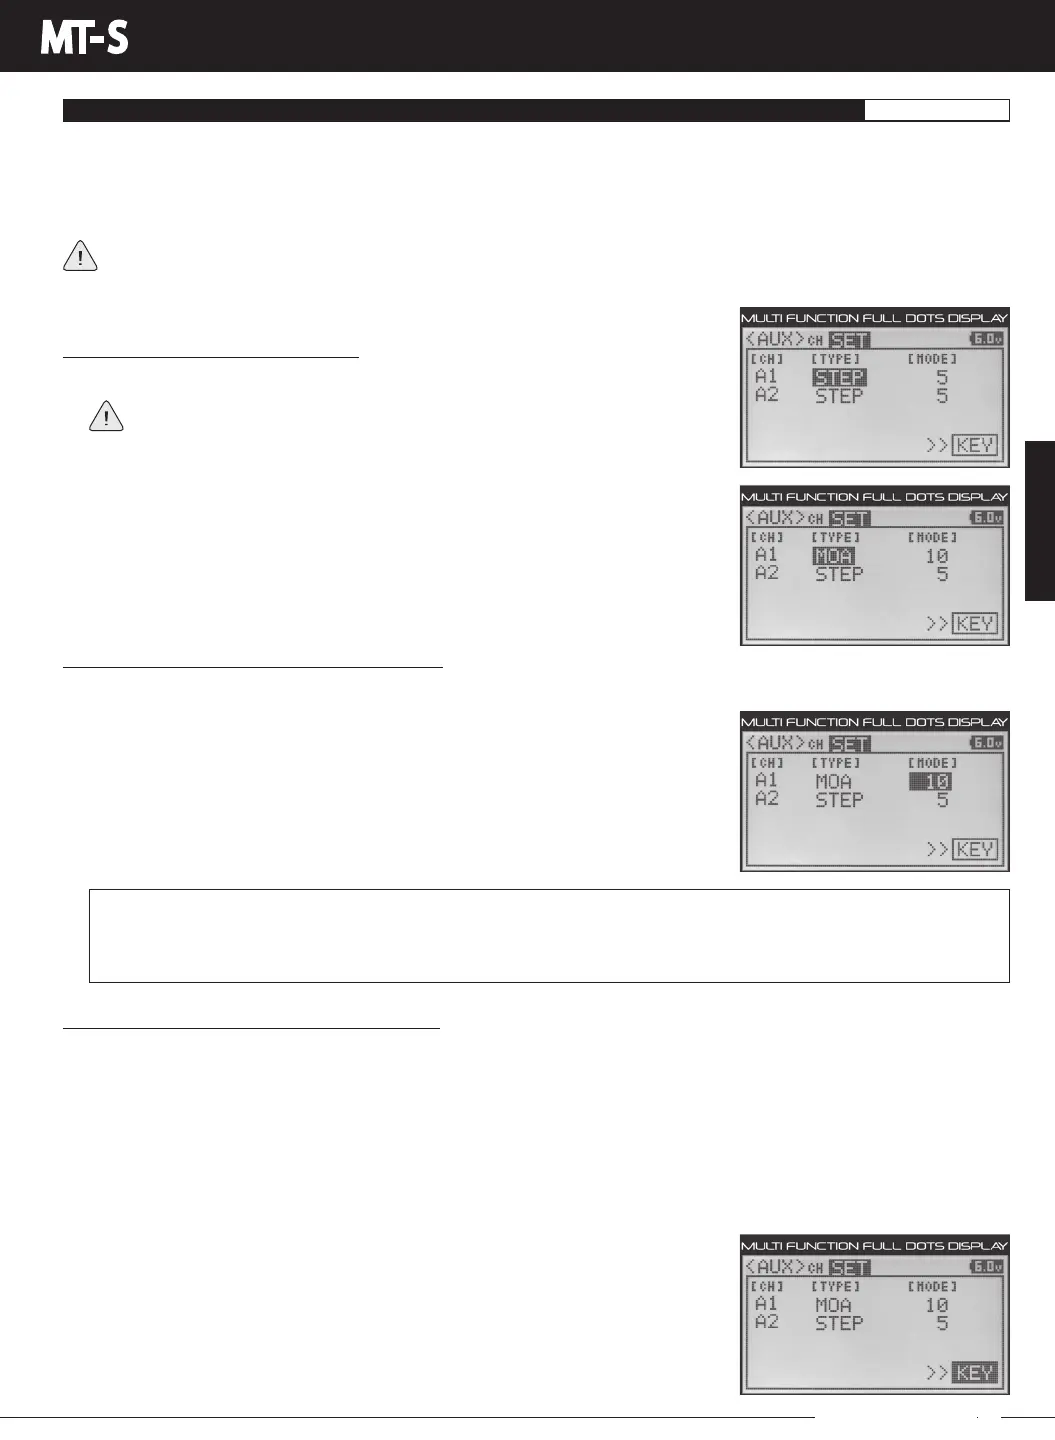
Choosing the Motor on Axle Function:
1) From within the AUX menu, press the UP or DOWN keys to highlight AUX SET.
If the cursor isn't flashing over Channel/Options, press the BACK key, then
press the UP or DOWN keys to highlight the AUX SET menu Option.
2) Press the ENTER key, then press the UP or DOWN keys to highlight either CH A1
TYPEorCHA2TYPE,dependingonwhichAuxiliarychannelyouwanttoprogram,
either Auxiliary 1 (Channel 3) or Auxiliary 2 (Channel 4).
3) Press the ENTER key, then press the UP or DOWN keys to choose the MOA option for
the selected channel.
1) Press the ENTER key, then press the UP or DOWN keys to highlight either CH A1
MODE or CH A2 MODE, depending on which Auxiliary channel you're programming.
2) Press the ENTER key, then press the UP or DOWN keys to choose the desired Motor
on Axle Mixing Mode value.
AUX SET MOA MODE setting range is 1, 2, 5, 10, 20, 25, 50 and 100. The default setting for both channels is 10. Use an
odd value (e.g. 5) if you want to set the Motor on Axle Power Distribution Option values in the AUX CH menu to an odd
value (such as 75) or use a smaller value (e.g. 1) if you want to set the Axle Power Distribution Option values in the AUX
CH menu to a higher resolution value (such as 68).
Changing the Motor on Axle Mixing Mode Value:
The Motor on Axle Mixing Mode value determines the increments that the Motor on Axle Mixing Power Distribution Option
values will change when setting them in the AUX CH menu.
Choosing the Key Option (Key Assign Function):
In the default configuration, AUX1 MOA is controlled by Auxiliary Switch Sw2 and AUX2 MOA is controlled by Auxiliary Switch
Sw3.TheKeyoptionisashortcuttotheKEYASSIGNmenu,whichallowsyoutoAssigntheMotoronAxleMixingfunction
to a different Auxiliary Switch or a Trim Switch.
How you control the Motor on Axle Mixing function will depend on how you want to use it. For example, if you want to switch
only between Dig or Burn and OFF (Balanced), you can Assign AUX1 MOA or AUX2 MOA to Auxiliary Switch Sw2. Or, if you
want to have both Dig and Burn on the same switch, you can Assign AUX1 MOA or AUX2 MOA to Auxiliary Switch Sw3 and
useittoswitchbetweenthem,thenuseAuxiliarySwitchSw1totogglebetweenDigorBurnandOFF(Balanced).Youcould
even Assign AUX1 MOA or AUX2 MOA to Trim Switch Trm3 and variably control the amount of Dig or Burn on the fly, then use
Auxiliary Switch Sw1 to toggle the Motor on Axle Mixing function ON and OFF (Balanced).
1) PresstheENTERkey,thenpresstheUPorDOWNkeystohighlightKEY.
2) PresstheENTERkeytoopentheKEYASSIGNmenu,thenAssignAUX1MOAorAUX2
MOAtothedesiredAuxiliarySwitchorTrimSwitch.Formoreinformation,seetheKEY
ASSIGN Menu section on pages 56 through 60.