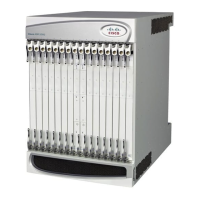
Grounding Procedure
Step 1
Remove the rear bottom cover from the chassis. Grasp both sides of the cover and pull out and up to unsnap the cover.
Step 2
Locate the ground terminal on the lower-left corner at the rear of the chassis.
Step 3
Use a 7/16-inch nut driver or socket wrench to remove the Kep nuts and washers from each post.
Step 4
Insert the lug connected to the grounding cable over the two posts.
Step 5
Secure the lug to the ground terminals with the Kep nuts and washers you removed in step 2. The nuts should be torqued
to 50 in-lb (5.65 N-m).
Step 6
Repeat step 2 through step 5 to connect the ground cable to the grounding posts on the lower-right corner at the rear of
the chassis.
Step 7
If you took steps to reduce the weight of the chassis prior to installation, refer to the instructions in Re-Installing Chassis
Components, on page 45. Otherwise, proceed to the Card Installation chapter.
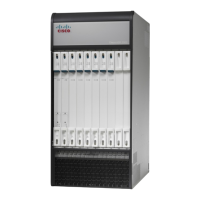
Re-Installing Chassis Components
If you removed chassis components to reduce the weight of the chassis, re-install the components by completing
the following the procedures.
During installation, maintenance, and/or removal, wear a grounding wrist strap connected to the ASR
5500 chassis to avoid ESD damage to the components. Failure to do so could result in damage to sensitive
electronic components and potentially void your warranty.
Caution
Re-install the PFUs
Step 1
At the front of the chassis, locate the PFU bays at the top of the chassis.
Step 2
Slide a PFU into the left bay (Power A).
Step 3
Push the handle on the PFU upward to firmly seat the unit into the power plane connectors. It will take considerable
force to move the handle upward and seat the PFU into the power plane connectors.
Step 4
Use a Phillips #2 screwdriver to tighten each of the four screws on the PFU to secure it to the chassis.
Step 5
Re-install the second PFU in the right bay (Power B) by repeating step 2 through step 4.
ASR 5500 Installation Guide
45
Chassis Installation
Grounding Procedure
 Loading...