Page 45 of 87 DGH 55B-INS-OMENG Rev: 3
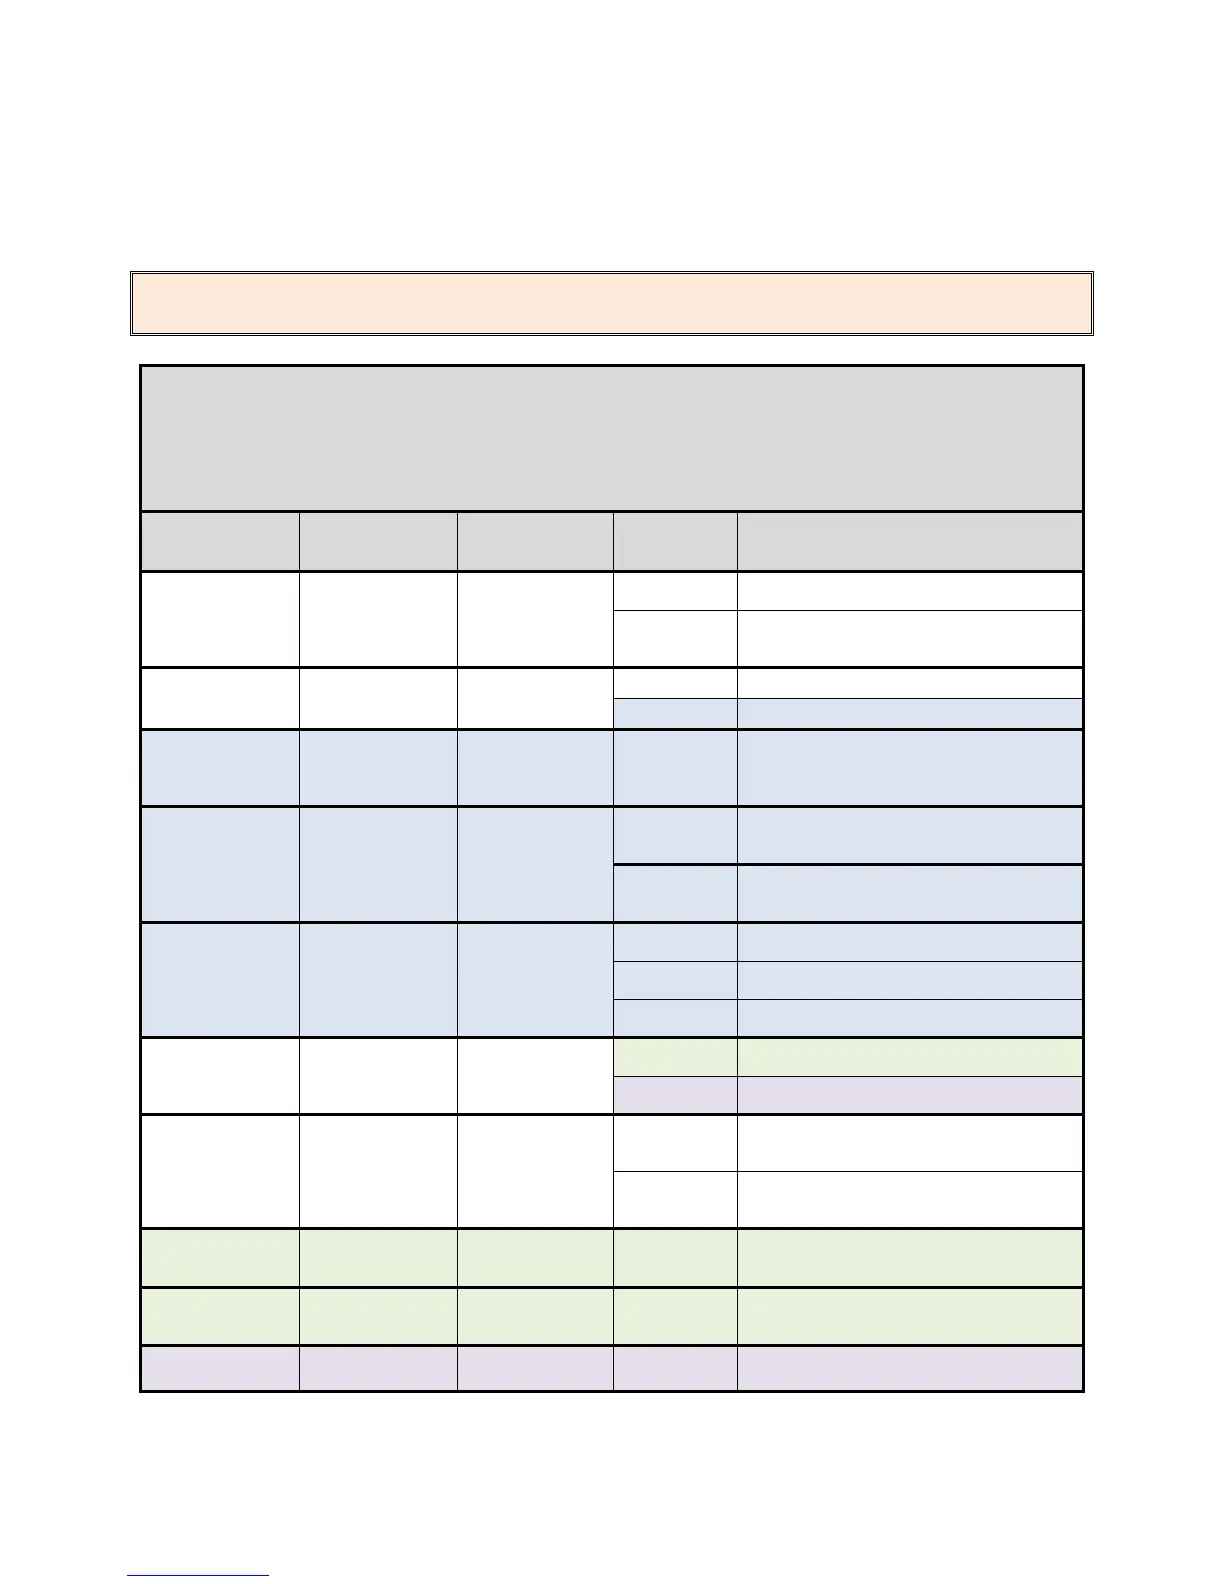
The following table shows all device parameters, in the order that they are displayed in the list.
NOTE: Shaded parameters in this table are only available when certain settings are active, e.g.
Continuous Averaging parameters are only editable when Continuous Averaging is enabled.
Configuration Menu Parameters
Press the CFG key: Enter the Configuration Menu
Press the ENT key repeatedly: Navigate down the Parameters List
Press the CFG key again: Exit the Configuration Menu
Parameter
[default value]
Select Patient
[-- Single --]
Press ↑ or ↓ key to
navigate through
patient files
The device will clear measurements when the user
initiates a new measurement cycle.
Each number indicates a memory location. Patient
measurements will be stored in non-volatile
memory
Press ↑ or ↓ key to
turn Bluetooth
®
module on or off.
The Bluetooth
®
module is turned off.
The Bluetooth
®
module is turned on
Only available if
Bluetooth
®
is
enabled.
Press ↑ or ↓ key to
switch between
linked devices. Press
OD to send data
Will display up
to 5 linked
devices
The user selects the device using the ↑ or ↓ keys.
When the OD button is pressed, the device sends
the data.
Only available if
Bluetooth
®
is
enabled.
Press OD key to
initiate a scan
While the ‘Add PC/Printer’ menu is visible, the
device will be discovered when scanned by other
Bluetooth
®
enabled devices
When the OD key is pressed, the device is
actively scanning for other Bluetooth
®
enabled
devices.
Only available if
Bluetooth
®
is
enabled.
Press ↑ or ↓ key to
switch between
printer config
options. Then press
the OD key to select
what to include
When ‘Y’ (Yes) is displayed, patient information
will be included on the printout.
When ‘Y’ (Yes) is displayed, operator notes will
be included on the printout.
When ‘Y’ (Yes) is displayed, all measurements
will be included on the printout.
Operational Mode
[Continuous Ave]
Press ↑ or ↓ key to
switch between
Continuous Ave and
Mapping.
The device is in Continuous Averaging Mode
The device is in Mapping mode
Auto Switch
OD/OS
[Enabled]
Press ↑ or ↓ key to
enable or disable
Auto Switch
The device WILL NOT automatically switch eyes
when measurements are finished
for an eye in Continuous Averaging Mode
The device WILL automatically switch eyes when
measurements are finished
for an eye in Continuous Averaging Mode
Only available if in
Continuous Ave
Mode
Press ↑ or ↓ key to
change the value
The device will take this number of measurements
at single position
Only available if in
Continuous Ave
Mode
Press ↑ or ↓ key to
change the value
The period of time (in milliseconds) between
measurements while the probe is applanated to the
cornea.
Only available if in
Mapping Mode
Press ↑ or ↓ key to
change the value
Selects the number of positions to be measured
for each eye. One measurement per position.