(8) Again attach clear hose to bleeder screw
located on the top of inboard half of front caliper
assembly being bled (Fig. 2). Put open end of hose
into a clear container partially filled with fresh clean
brake fluid (Fig. 2).
(9) Again repeat steps 2 and 3 above on the
inboard half of the caliper assembly. Then close the
bleeder screw on the outboard caliper.
(10) Remove hose from bleeder screw, and torque
the bleeder screw to 10 N·m (88 in. lbs.).
MANUAL BLEEDING METHOD
NOTE: Manual bleeding of air from the hydraulic
brake system on this vehicle is not the preferred
method. Manual bleeding may not ensure all air is
adequately eliminated from the hydraulic brake
fluid.
In the event a pressure bleeder is not available the
hydraulic brake system can be manually bled. Use
the procedures and steps listed below to ensure a
good and complete bleeding of all air from the brakes
hydraulic fluid can be obtained using a manual
bleeding procedure.
NOTE: When manual bleeding, be sure to monitor
the fluid level in the master cylinder so it stays at a
proper level keeping air from re-entering the brake
system through the master cylinder.
When bleeding the front brakes it is necessary that
both halves of the caliper assembly be bled individu-
ally. This procedure should be followed to ensure that
the caliper assembly is adequately bled.
(1) Attach a clear hose onto bleeder screw located
on the top of the inboard half of the front caliper
assembly (Fig. 2). Put open end of clear hose into a
clear container partially filled with fresh clean brake
fluid (Fig. 2).
(2) Have an assistant pump the brake pedal three
or four times and hold it down before the bleeder
screw is opened.
CAUTION: “Just cracking” bleeder screw often
restricts fluid flow. This will result in a slow and
weak fluid discharge, and will NOT get all the air
out of the hydraulic system.
(3) Open bleeder screw (Fig. 2) on inboard half of
the front caliper assembly at least ONE FULL
TURN or more.
NOTE: When the bleeder screw opens, the brake
pedal should drop to the floor. Release the brake
pedal only after the bleeder screw is closed.
(4) Close the bleeder.
(5) Repeat the above steps until 4 to 8 ounces of
brake fluid is bled through inboard half of front cal-
iper assembly being bled. When an air-free flow is
maintained in clear plastic hose with no bubbles
present in container, a good and complete brake
bleed is indicated.
(6) Torque inboard bleeder screw to 10 N·m (88 in.
lbs.).
(7) Attach clear hose on bleeder screw located on
the top of the outboard half of front caliper assembly
being bled (Fig. 3). Put open end of hose into a clear
container partially filled with fresh clean brake fluid
(Fig. 3).
(8) Repeat steps 2 through 6 above on outboard
half of the caliper assembly.
(9) Again attach clear hose to bleeder screw
located on the top of inboard half of front caliper
assembly being bled (Fig. 2). Put open end of hose
into a clear container partially filled with fresh clean
brake fluid (Fig. 2).
(10) Repeat steps 2 through 6 above on the
inboard half of the caliper assembly. Then close the
bleeder screw on the outboard caliper.
(11) Remove hose from bleeder screw, and torque
the bleeder screw to 10 N·m (88 in. lbs.).
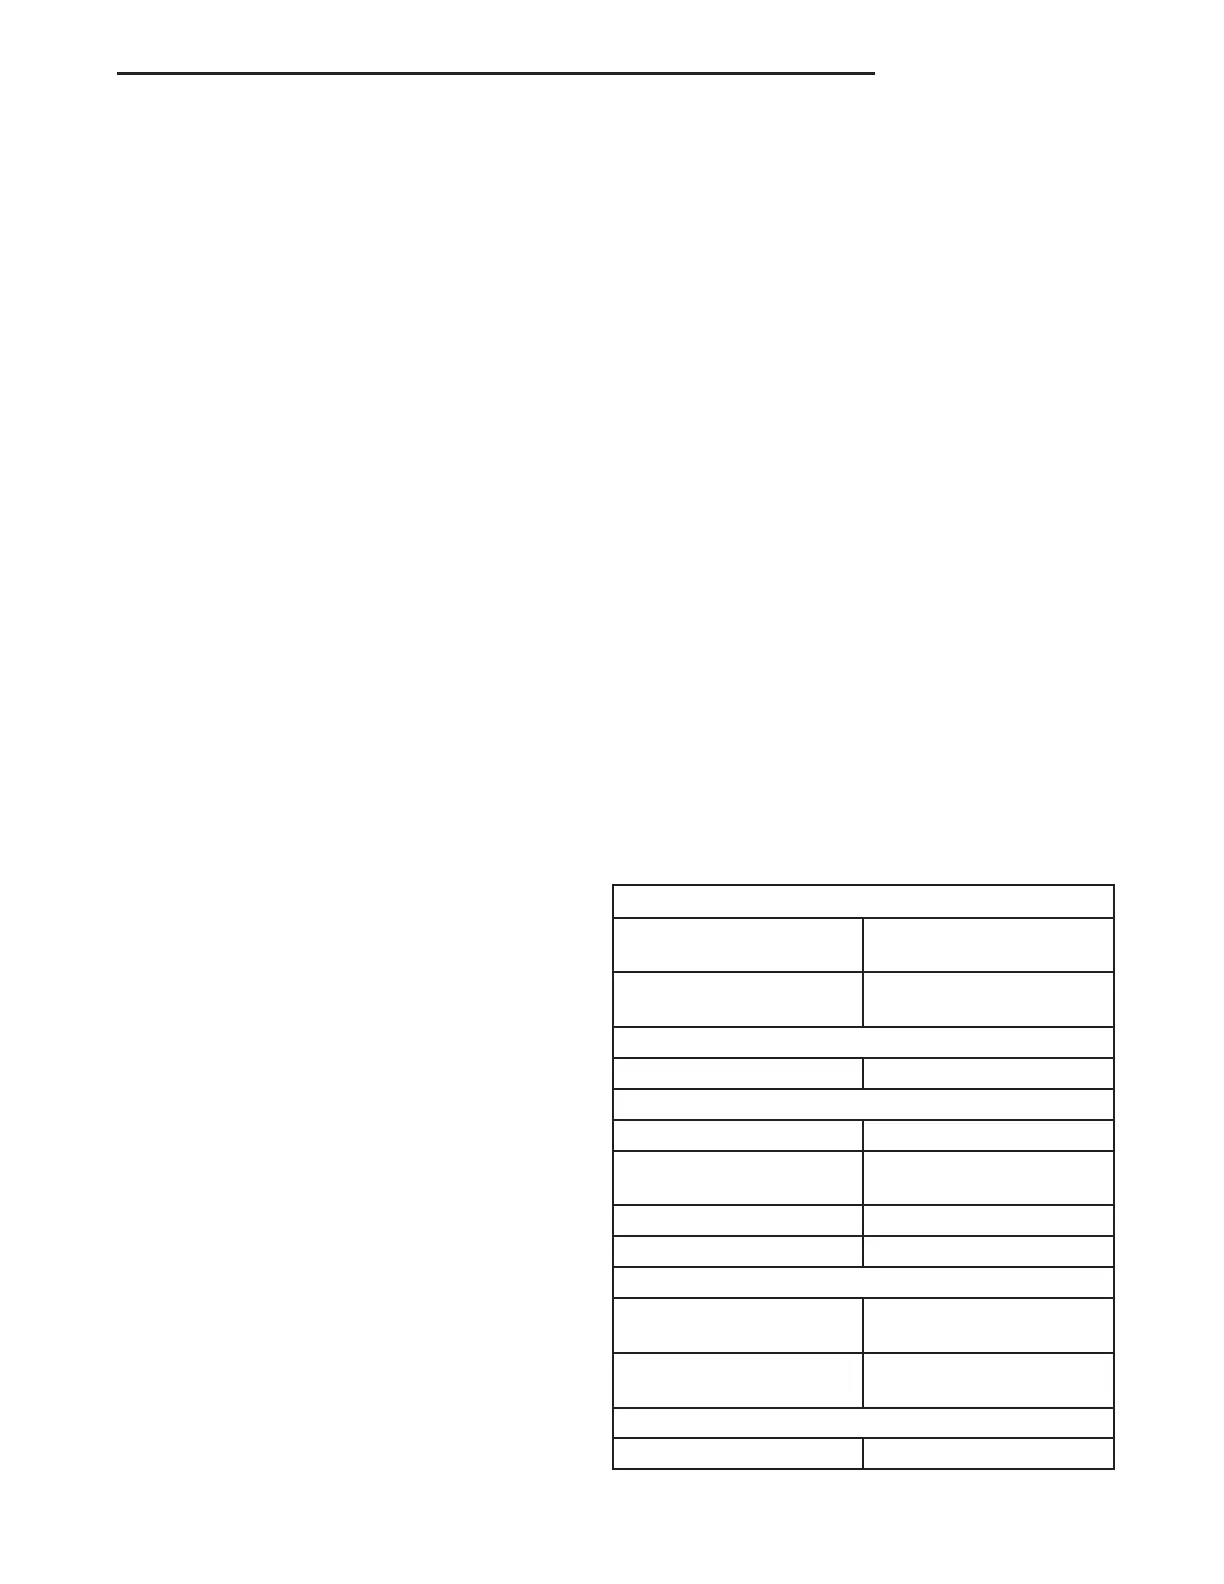
SPECIFICATIONS
BRAKE ACTUATING SYSTEM
Actuation:
Vacuum Boosted
Power Brakes
Standard
Hydraulic System Dual Vertically Split
(Front To Rear)
Brake Pedal:
Pedal Ratio 3.48:1
Master Cylinder:
Manufacturer Bosch
Type Tandem Compensating
Port Design
Body Material Anodized Aluminum
Reservoir Material Polypropelene
Master Cylinder Bore/Stroke And Split:
Bore And Stroke 39.0 mm x 28.57 mm
(1.54 in. x 1.125 in.)
Displacement Split
Front To Rear
65/35
Master Cylinder Fluid Outlet Ports:
Primary Thread Size 3/8–24 UNF-2B
ZB BRAKES - BASE 5 - 7
BRAKES - BASE (Continued)





 To Next Page