REMOVAL
NOTE: Before proceeding, review Warnings and
Cautions. (Refer to 19 - STEERING/COLUMN -
WARNING).
WARNING: WHEN AN UNDEPLOYED AIRBAG MOD-
ULE IS TO BE REMOVED FROM THE STEERING
WHEEL, FIRST DISCONNECT THE BATTERY
GROUND CABLE AND ISOLATE IT. ALLOW THE
SYSTEM CAPACITOR TO DISCHARGE FOR A MINI-
MUM OF TWO MINUTES, THEN BEGIN THE AIRBAG
REMOVAL.
(1) Disconnect negative (-) cable from battery and
isolate it.
(2) Remove lower instrument panel steering col-
umn cover. (Refer to 23 - BODY/INSTRUMENT PAN-
EL/STEERING COLUMN OPENING COVER -
REMOVAL)
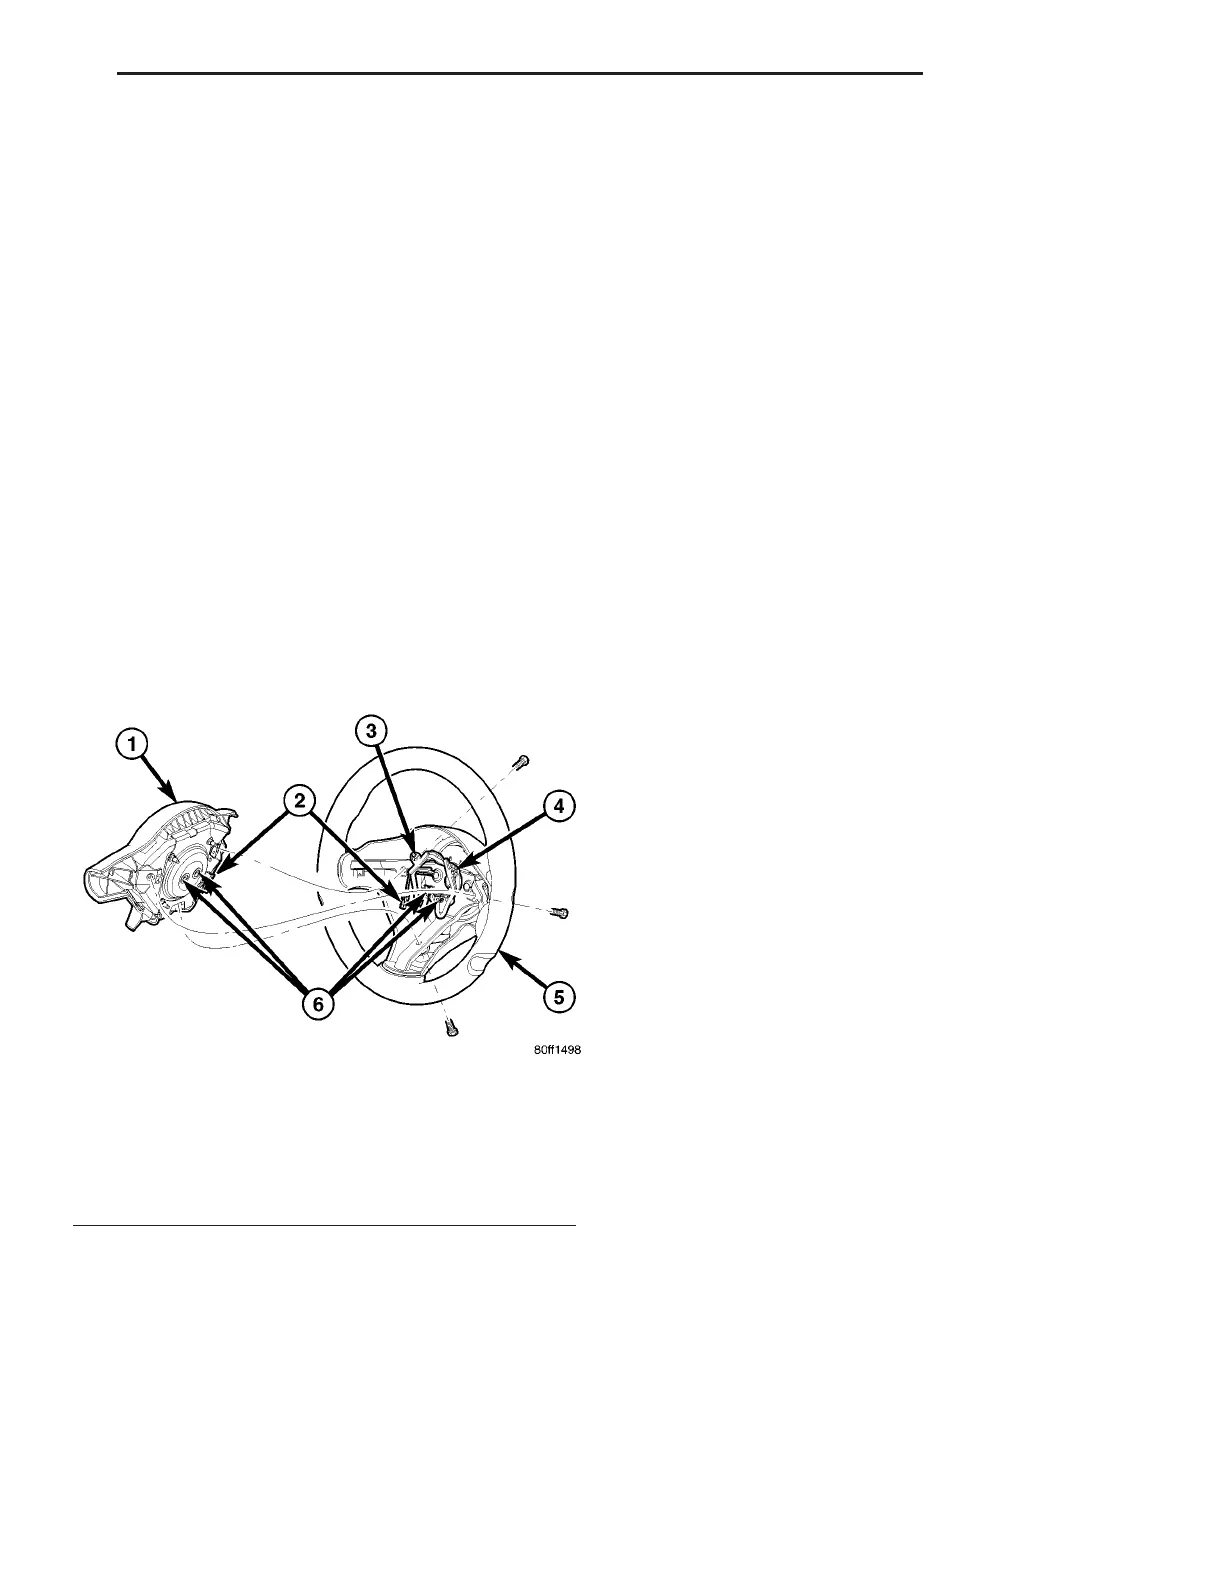
(3) Remove three screws securing driver airbag to
steering wheel (Fig. 1).
(4) Tip driver airbag outward, then disconnect two
squib wiring connectors and horn wiring connector.
Remove driver airbag.
(5) Remove squib wiring routing clips from steer-
ing wheel (Fig. 1).
(6) Place front wheels of vehicle in STRAIGHT-
AHEAD position.
(7) Remove ignition key from ignition key cylinder.
(8) Holding steering wheel firmly in place, remove
steering wheel retaining bolt from steering column
shaft in center of steering wheel (Fig. 2).
CAUTION: When installing a wheel puller on the
steering wheel, be sure the puller bolts are fully
seated in the threaded holes on the steering wheel.
If the bolts are not fully seated in the threaded
holes, the threads may be stripped out of the steer-
ing wheel when attempting to remove the steering
wheel. Take care not to over-thread the puller bolts
such that they contact the clockspring possibly
damaging it.
Also, threading the retaining bolt back in the end of
the shaft until approximately 13 mm (0.5 in.) of
thread is showing between the wheel and the head
of the bolt allows a safe reaction surface for the
puller to work against.
(9) Thread wheel retaining bolt back into end of
steering shaft until approximately 13 mm (0.5 in.) of
thread is showing between wheel and head of bolt.
(10) Install steering wheel puller on steering
wheel.
CAUTION: Do not bump or hammer on steering
wheel or steering column shaft when removing
steering wheel from steering column.
(11) While holding steering wheel firmly in
STRAIGHT-AHEAD position, remove steering wheel
from steering column shaft using puller. Remove
puller, wheel retaining bolt and steering wheel.
(12) Remove two screws attaching lower shroud to
steering column and upper shroud (Fig. 2). After
removing screws, unclip the shrouds from one
another by applying hand pressure along seams
where shrouds connect, then remove lower shroud
from upper shroud and column.
(13) Remove upper shroud from steering column.
(14) At base of steering column, remove intermedi-
ate shaft extension pinch bolt (Fig. 2). Separate the
intermediate shaft extension from the steering col-
umn shaft.
NOTE: If same steering column is to be reinstalled,
clamp tilt lever to lock column in place so that it
can be easily reinstalled in same location.
(15) Remove two lower mounting nuts attaching
steering column to instrument panel.
(16) Remove two upper mounting nuts attaching
steering column to instrument panel.
(17) Disconnect wiring harness electrical connector
from clockspring (Fig. 3).
(18) Disconnect wiring harness electrical connec-
tors from multi-function switch, windshield wiper
switch, and ignition switch (Fig. 4).
(19) Remove steering column from vehicle.
(20) If steering column is being replaced, perform
following:
Fig. 1 Airbag Mounting To Steering Wheel
1 - DRIVER AIRBAG
2 - HORN WIRING CONNECTION
3 - LEFT WIRING CLIP
4 - RIGHT WIRING CLIP
5 - STEERING WHEEL
6 - SQUIB WIRING CONNECTION
ZB COLUMN 19 - 11
COLUMN (Continued)






 To Next Page