Do you have a question about the DURKOPP ADLER Class 271 and is the answer not in the manual?
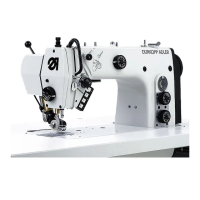
Details the features and purpose of the DÜRKOPP ADLER 271-274 sewing machines.
Explains the intended application and limitations for using the sewing machines.
Lists and describes the different subclasses of the 271-274 series sewing machines.
Lists available optional accessories and their compatibility with machine subclasses.
Provides detailed technical specifications for various sewing machine classes.
Covers the procedures for operating the sewing machine.
Step-by-step guide for threading the needle.
Instructions for adjusting needle thread tension for optimal stitch formation.
Explains how to release needle thread tension during operation.
Instructions for winding thread onto the bobbin.
Guide on how to properly insert the bobbin into the bobbin case.
Procedures for setting and adjusting underthread tension.
Steps for safely replacing the sewing machine needle.
Guidance on adjusting the thread regulator for correct stitch formation.
Instructions on how to adjust the sewing foot pressure.
Explains how to set and adjust the stitch length.
Details on how to lift the sewing foot mechanically or solenoidally.
How to secure the sewing foot in its raised position.
Information on the roller top feed for specific machine classes.
Operation and control of the edge trimmer for specific models.
How to adjust the setting dial on the machine head cover.
Overview and function of the keypad on the sewing machine arm.
Lists all parts included in the sewing machine package based on subclass.
Important notes regarding installation and removal of transport guards.
Step-by-step instructions for assembling the sewing machine stand.
Guides on how to assemble the individual components of the stand.
Instructions for preparing the table top and attaching it to the stand.
Procedure for adjusting the working height of the sewing machine table.
Steps for mounting the sewing machine head onto the table.
Guide on how to correctly insert the machine head into the table cutout.
Information on the sewing drives used with the machines.
Details the components included with the DC1500/DA220C and QE3760/DA40MS02 drives.
Lists the machine classes compatible with different sewing drive systems.
Instructions for attaching the sewing machine control unit.
Steps for mounting the controller unit to the machine.
How to install the cable duct for wire management.
Guide for mounting and positioning the sewing machine pedal.
Procedures for connecting the sewing machine to the electrical supply.
How to verify the mains voltage is within the specified range.
Steps for ensuring proper electrical grounding and potential equalization.
Instructions for installing and connecting the optional sewing light transformer.
How to connect the light transformer to DA220C controls.
Identifies and explains the connection sockets on control units.
Steps for connecting the DA220C control unit.
Steps for connecting the DA40MS02 control unit.
How to check and ensure the correct rotation direction of the sewing drive.
Procedures for checking and confirming needle and foot positioning.
Information on setting machine-specific parameters.
General information on setting machine-specific parameters.
How the machine identifies and configures itself via Autoselect.
Lists specific parameters for DA220C controls by class.
How to perform a master reset of the DA220C controls.
Overview of the operation of the DA220C controls.
Explains the functions determined by the DA220C control program and parameters.
Details the different access levels for preventing accidental changes.
Identifies and explains the controls and indicators on the DA220C unit.
Describes the function of keys during sewing mode.
Explains the function of keys during programming mode.
How to change parameter values at the operator level without a code.
Step-by-step process to change parameters sequentially.
Method to directly access and change operator level parameters.
Instructions for reducing the maximum speed of the machine.
A list of parameters available at the operator level with their functions.
How to change parameters in technician and supplier levels.
Procedures for setting machine positions within the DA220C controls.
Steps to set the reference position for machine operation.
How to set specific needle positions 1 and 2.
How to adjust parameters specific to the machine model.
General information on setting machine-specific parameters.
How the machine identifies and configures itself via Autoselect.
A table detailing machine-specific parameters for DA220C controls.
Steps to perform a master reset on the DA220C controls.
Information on status indicators and error messages for DA220C controls.
Identifies controls and indicators on the V810 panel.
Explains the functions of the keys on the V810 control panel.
Describes the meaning of symbols displayed on the V810 control panel.
How to change parameter values at the operator level using the V810 panel.
Procedure for reducing the maximum speed via the V810 panel.
How to change parameters in technician/supplier levels via V810.
Procedures for setting machine positions using the V810 panel.
Steps to set the reference position via V810 panel.
How to set specific needle positions 1 and 2 using V810.
How to adjust machine-specific parameters via V810 panel.
Steps to perform a master reset on V810 controls.
Information on status and error messages for V810 controls.
Identifies controls and indicators on the V820 panel.
Explains the functions of the keys on the V820 control panel.
Describes the meaning of symbols displayed on the V820 control panel.
How to change parameter values at the operator level using the V820 panel.
Procedure for reducing the maximum speed via the V820 panel.
How to change parameters in technician/supplier levels via V820.
Procedures for setting machine positions using the V820 panel.
Steps to set the reference position via V820 panel.
How to set specific needle positions 1 and 2 using V820.
How to adjust machine-specific parameters via V820 panel.
Steps to perform a master reset on V820 controls.
Information on status and error messages for V820 controls.
How to program seams using the V820 control panel.
Overview of the operation of the DA40MS02 controls.
Explains the functions determined by DA40MS02 control program and parameters.
Details the different access levels for preventing accidental changes.
Identifies controls and indicators on the DA40MS02 unit.
Describes the physical operating elements of the DA40MS02.
Explains the different display modes and functions of the DA40MS02.
How to display and change bartack stitch counts on DA40MS02.
Instructions for reducing the maximum speed of the DA40MS02.
How to view the current sewing speed on the DA40MS02.
Guide on activating various sewing functions on the DA40MS02.
How to change parameters at the operator level on DA40MS02.
How to change parameters at the mechanic level on DA40MS02.
How to change parameters at the special level on DA40MS02.
Procedures for checking and setting machine positions on DA40MS02.
Steps to set the reference position on DA40MS02.
How to set needle position 1 on DA40MS02.
How to set needle position 2 on DA40MS02.
How to change the rotation direction of the DA40MS02 drive.
How to adjust machine-specific parameters for DA40MS02.
General information on setting machine-specific parameters.
Explanation of the Autoselect function for DA40MS02 configuration.
A table detailing machine-specific parameters for DA40MS controls.
Steps to perform a master reset on DA40MS02 controls.
Identifies controls and indicators on the OC-TOP panel.
Explains the functions of the keys on the OC-TOP control panel.
How to display and change bartack stitch counts using OC-TOP.
How to view current stitches/min on OC-TOP.
How to change parameters at the operator level using OC-TOP.
A list of parameters available at the operator level for OC-TOP.
How to change parameters in mechanic/special levels via OC-TOP.
Procedures for setting machine positions using OC-TOP.
Steps to set the reference position using OC-TOP.
How to set needle position 1 using OC-TOP.
How to set needle position 2 using OC-TOP.
How to change the rotation direction using the OC-TOP panel.
How to adjust machine-specific parameters using OC-TOP.
General information on setting machine-specific parameters.
Explanation of the Autoselect function for OC-TOP configuration.
Table of machine-specific parameters for DA40MS controls via OC-TOP.
Steps to perform a master reset on OC-TOP controls.
Information on malfunctions and error messages for DA40MS/OC-TOP.
How to program seams using the OC-TOP control panel.
Details the components of the pneumatics connection pack.
Instructions for connecting the compressed air maintenance unit.
How to set and adjust the operating pressure for the pneumatic system.
Guide on how to fill the oil reservoirs for machine lubrication.
| Brand | DURKOPP ADLER |
|---|---|
| Model | Class 271 |
| Category | Industrial Equipment |
| Language | English |