Reference Manual
00809-0100-4731, Rev FA
April 2003
APEX
™
and APEX Sentry
™
Radar Gauge
3-6
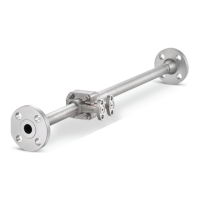
Null Zones
The gauge can be programmed to ignore signals that are outside of the
normal operating span of the vessel. There are two user-configurable null
zones—one at the top of the tank and one at the bottom—that, in conjunction
with the gauge height, define the measurement limits for the gauge (see
Figures 3-1 and 2-3). The gauge will ignore any signals reflected outside
these null zones limits.
The upper null zone is measured from the face of the flange down. The
factory default setting for the upper null zone is 19.6 in. (0.5 m). This setting
means that the gauge will ignore all signals within 19.6 in. (0.5 m) of the
gauge flange. Typically, the upper null zone is at least the length of the gauge
antenna and mounting nozzle. The nozzle length must not be the same as
the dimension (see Figure 3-1) or the signal will not generate properly. The
length of the nozzle must be set so the antenna is not even with the roof of the
tank.
The lower null zone is measured from the reference line and may be either a
positive or negative number. The factory default setting for the lower null zone
is –19.6 in. (–0.5 m). This setting allows the gauge to read a level below the
reference line, although it would result in a negative value.
If the lower null zone is a positive value, the gauge will not read level below
that point. This may be useful if there are any obstacles near the bottom of the
tank that would give a false reading. The overall level reading is still based on
the reference line, however.
The null zone settings can be changed using a HART Communicator and the
“Detailed Setup” procedure as outlined on Figure 3-9 on page 3-16.
FIELD CONFIGURATION
USING THE INTEGRAL
DISPLAY OPTION
(APEX Radar
Gauge Only)
NOTE
For information on configuring the APEX Radar Gauge using a Model 275
HART Communicator, refer to page 3-18. The same parameters will need to
be entered regardless of which method you use to configure the gauge.
NOTE
To ensure long life for your radar gauge, and to comply with hazardous
location installation requirements, tighten covers on both sides of the
electronics housing to achieve metal-to-metal contact.
The gauge integral display may be used in explosion-proof areas. Verify that
the operating environment of the gauge is consistent with the appropriate
hazardous locations certifications. You do not need to remove the cover to
operate the integral display.
To operate the integral display once it has been activated (see page 3-7),
place your finger over one of the optical sensors—ENTER, NEXT, UP, or
DOWN (see Figure 3-4). A light beam reflects off your finger and activates the
sensor and the corresponding function. When you activate a sensor, a red
light confirms that you made contact.
 Loading...