5700MSC-IP
IP Network Grand Master Clock & Video Master Clock System
Page - 72 Revision 0.2
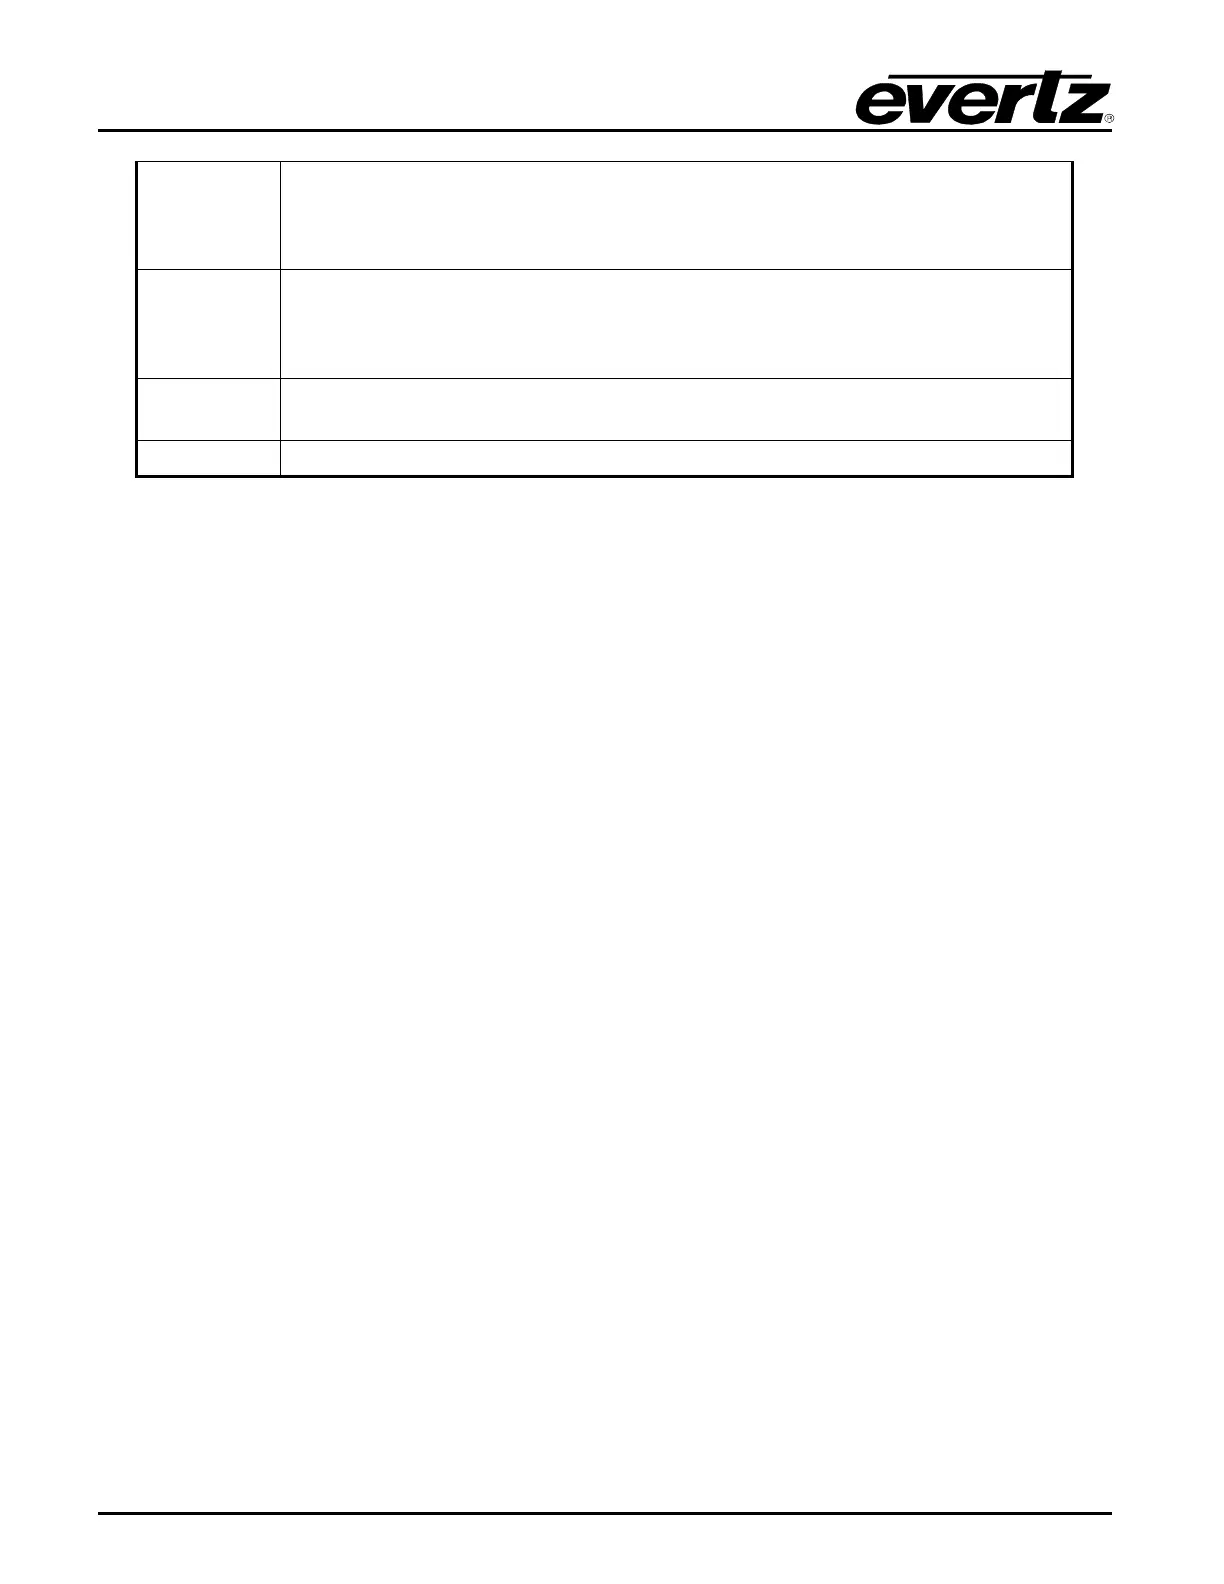
Temp Hi
Appears blinking red in the bottom-left corner. Indicates the internal
temperature of the unit has exceeded operating limits. Re
attention. May be due to excessive ambient temperature, fan failures, missing
power supply or fan module, or blocked exhaust vents on the side of the unit.
Ps fail
Appears blinking red in the bottom-left corner. Indicates that one of the power
supplies is not producing the correct voltage. Only applicable for dual power
supply installations. If only a single power supply is in use, make sure the
Number PS menu item is set correctly.
Warning
Appears in yellow text in the bottom-left corner. Indicates a non-critical fault in
the unit such as frequency or time reference missing, or fan failure.
Sys Ok Appears in green text in the bottom-left corner. Indicates no system fault.
Table 5-1: System Status Messages
In the bottom-right corner of the left LCD the frequency reference status is shown. When Ref Ok is
displayed this means the currently selected frequency reference is present and the 5700MSC-IP has
locked to it properly. This will be Ref unlk with a yellow background if the frequency reference is
missing or the 5700MSC-IP is unable to lock to the supplied reference.
Other messages are possible on the left LCD. These messages require a manual user jam, or mode
change to clear. Such messages include REF JAM NEEDED, which will be displayed if the 5700MSC-
IP is in Slow mode and is in the process of gradually relocking to a change in the frequency reference.
If the time reference lock type has been set to USER, then TIME JAM NEEDED will be displayed
when the system time and reference time mismatch.
5.2. FRONT PANEL MENU SYSTEM
The 5700MSC-IP menu system consists of three root menus. The INPUT, OUTPUT, and GENERAL
buttons allow you to quickly go to each of the three main menus, while the
SELECT, ESC, and
buttons and control knob are used to navigate the menu.
To enter the Input menu, press the INPUT button, which will then illuminate to show that it is now the
active menu. Likewise the Output or General menus can be entered by pressing the OUTPUT or
GENERAL buttons. The menu selections will be displayed on the right LCD. The > character is used
as a selection cursor to show which menu item is currently selected. Use the and buttons or turn
the control knob to move the > character beside the desired sub-menu and press the SELECT button
to enter it. The menu tree is shown on the left LCD and identifies which menus have been entered.
Press the ESC button to return to the previous level in the menu structure.
When a menu item is selected, there can be several different formats to modifying the value of the
selected setting. The most common is the selection list. In a selection list, the currently active value is
highlighted in white. The > character can be moved to select a new value, but the change won’t take
effect until the SELECT button is pressed, after which the new value will become highlighted to show it
is now active. Press the ESC button at any time to exit from the selection list. Other formats are used
for changing numeric items.
When accessing some menu items, the message LIVE CONTROL will be displayed on the left LCD
with a red background. This message is a warning that pressing SELECT on the menu item will
perform an immediate task such as jamming a reference. Use caution with such menu items.