5700MSC-IP
IP Network Grand Master Clock & Video Master Clock System
Page - 68 Revision 0.2
GENERAL - Enters the GENERAL menu that contains controls for configuring the Syncro, GPOs, DST,
SNMP, and NTP features of the 5700MSC-IP.
SELECT - In the menu system the SELECT button is used to enter a sub-menu or to select a menu
parameter that is to be changed.
ESC - When in a sub-menu the ESC button is used to exit the next higher menu level. It is also used to
abort changing the setting of a menu item.
,
- The arrow buttons are used to navigate through the menu system. The currently selected menu
item is indicated by the > character. The arrow buttons are used to select the next or previous menu
item. When changing a menu item’s value, the arrow buttons are used to select the next or previous
items in a list, or for a numerical value are used to increment or decrement the current value.
CONTROL - The control knob can be used as an alternative to the and buttons and allows quicker
navigation and setting of menu items. Turning the control knob clockwise (to the right) has the same
effect as pressing the button. Turning the control knob counter-clockwise (to the left) has the same
effect as pressing the button. Depressing the control knob inwards has the same effect as pressing
the SELECT button. When changing a numerical value (such as when phasing an output) depressing
the knob while turning allows changing the numerical value in steps of 16. This makes it easier to
change large numerical values.
When in the menu or a selection list, pressing the control knob has the same effect
as pressing the SELECT button. When adjusting a numerical value, depressing the
control knob while turning it will increment or decrement in larger steps of 16.
5.1.2. The Status Screens
There are several status screens available on the 5700MSC-IP that can be accessed by pressing the
STATUS button on the front panel. Each screen displays relevant information about the subsystem it
represents. At the root level, the screens are listed just like menu items. Press the and buttons or
turn the control knob to move the selection cursor to the desired status screen. Press SELECT to view
the status screen. The ESC button will return to the status screen list.
The status screens are still accessible even when the front panel is locked.
The status screen list can be used to quickly locate the source of a fault within the 5700MSC-IP. By
scrolling through the status screen list, any faults can be quickly identified. The status screens are
described in detail below. Each status screen can display multiple messages depending on the
configuration of the 5700MSC-IP.
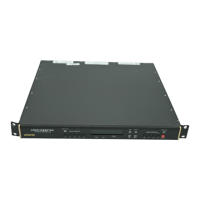
The System/In time status screen shows the system clock time and date on the
first two lines.
The third line, prefixed with “L i", shows the current LTC timecode being read
from the LTC/IRIG input (if present). If the LTC input is lost, the time shown here
will be replaced with “--:--:--:--”. If drop frame is detected, the last colon ‘:’ will