126 Detail program description - Dual Rate / Expo | Helicopters
0%
0%
0%
Roll
Pitch ax
Tail rot
DUAL
–––
SEL
–––
–––
–––
100%
100%
100%
EXPO
SEL
Normal
3
Select the right-hand column at the lower edge of the
display marked with SEL and activate the value fi eld
with a brief tap on the center
SET key of the right
touch pad, the selection keys on the left or right touch
pad can now be used to alter the Expo value shown
in the highlighted fi eld, separately for each of the two
switch positions.
Now, for example, you have the opportunity to fl y with
a linear curve characteristic with the switch in one
direction, and to pre-set a value other than 0 % in the
other switching direction:
+50%
0%
0%
Roll
Pitch ax
Tail rot
DUAL
–––
SEL
–––
–––
–––
100%
100%
100%
EXPO
SEL
Normal
3
At the same time, the Expo curve will be presented
in the graph. A simultaneous tap on the cd or ef
keys of the right touch pad (CLEAR) will reset a
changed entry fi eld value displayed in inverse video
back to "0 %".
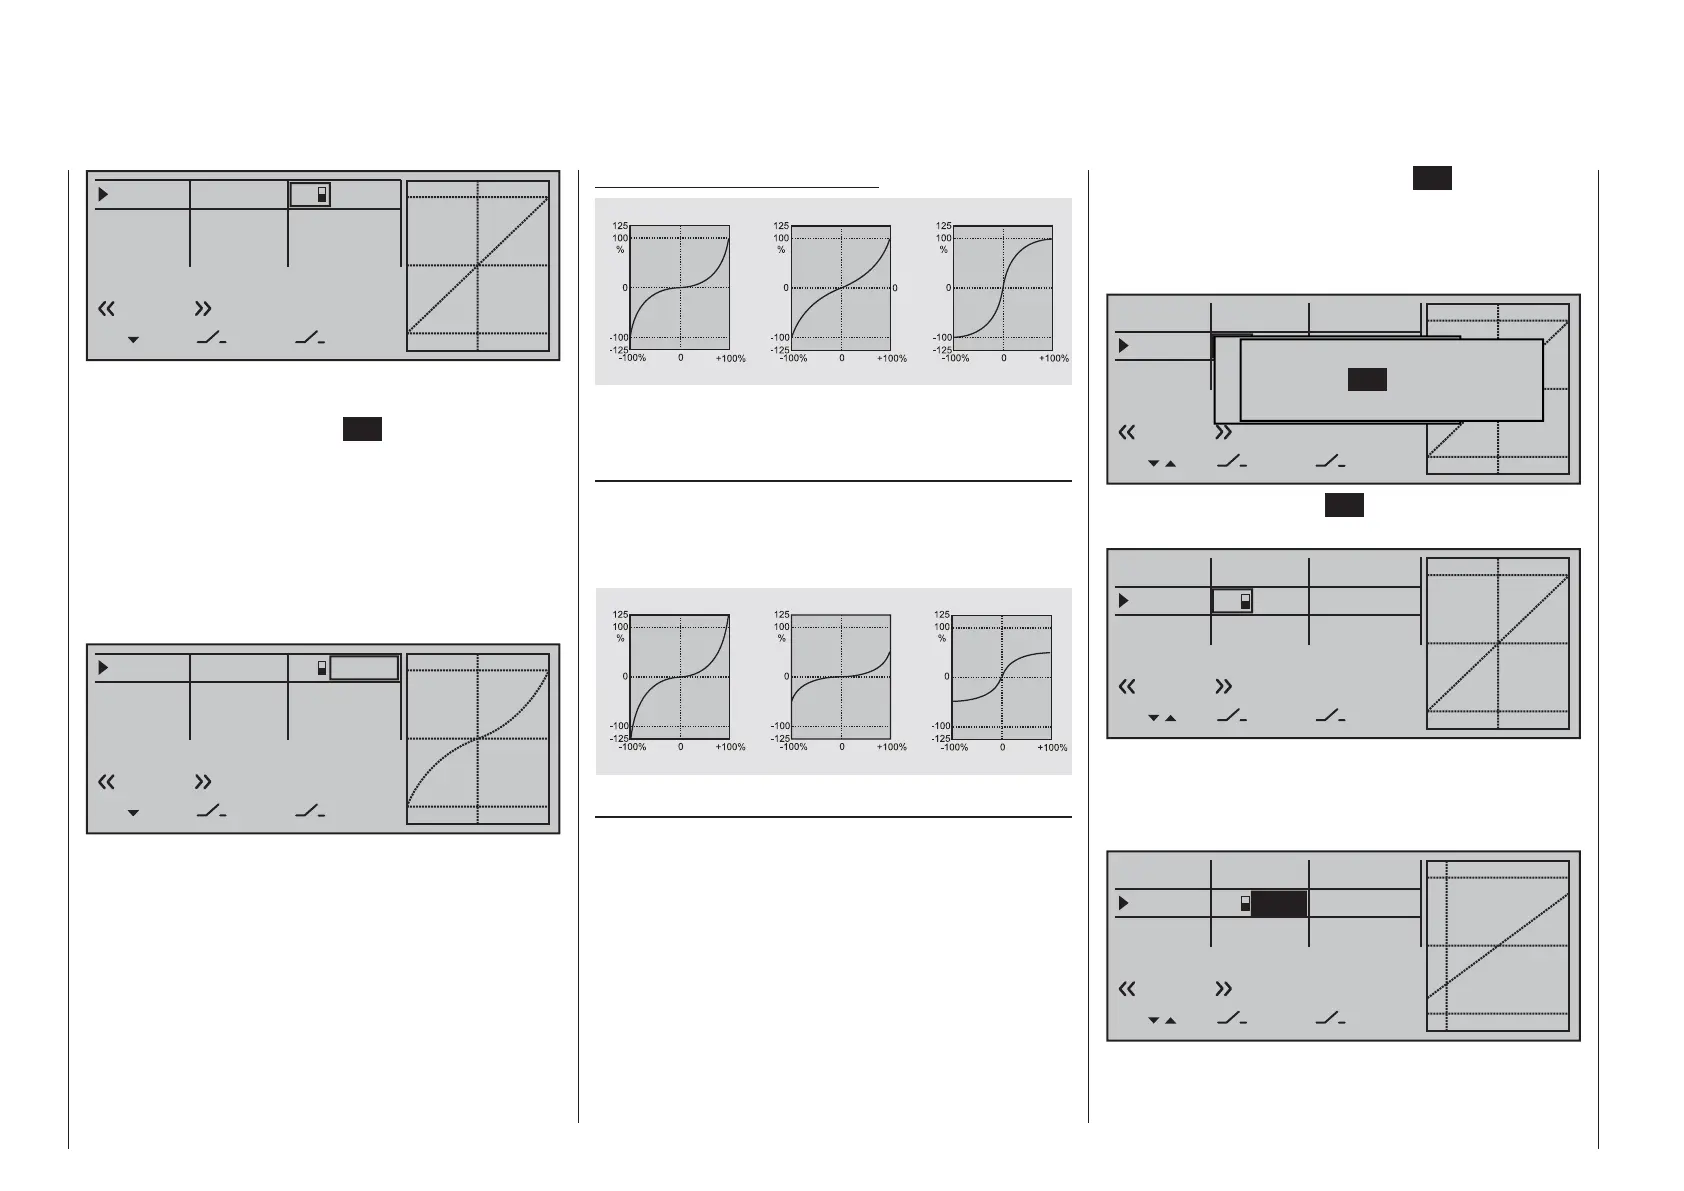
Some examples of Expo values:
Servo travel
Servo travel
Servo travel
Stick deflection
Stick deflection
Stick deflection
Expo = +100%
Expo = +50%
Expo = –100%
In each of these examples, the Dual Rate value
equals 100 %.
Combining Dual Rate and Expo
If you have entered values for both the Dual Rate
and the Expo function, the effect from on function
is superimposed on the other, as shown in these
examples:
Servo travel
Servo travel
Servo travel
Stick deflection
Stick deflection
Stick deflection
Expo = +100%, DR = 125%
Expo = +100%, DR = 50%
Expo = –100%, DR = 50%
Asymmetric setting of Dual Rate and Expo
To make an asymmetric setting, i.e. a Dual Rate
or Expo setting dependent on the direction of
the respective joystick, fi rst access the »Control
switch« menu and assign one of the C1 … C4
control switches – "C3" for example – to the desired
transmitter control, e.g. control 3 for the pitch
function. Do not change the switching point for
the joystick's neutral position (0 %). Now return
to the "Dual Rate / Expo" menu and select the
corresponding control function ("Pitch ax" in this
example).
Now, with a brief tap on the center SET key of the
right touch pad, activate the switch assignment
and change to the expanded switches then use the
selection keys to move on to the previously defi ned
"C3" control switch.
0%
0%
0%
Roll
Pitch ax
Tail rot
DUAL
––––––
–––
SEL
–––
–––
–––
100%
100%
100%
EXPO
SEL
Moünschten Schalter
to die EIN Position
(erw. Schalter: SET)
Normal
Control/Logic/fix switch
C2 C4 C5 C6
C7
C8
FX FXi L1 L2
C1 C3
A brief tap on the center SET key of the right touch
pad will confi rm the assignment of this switch.
0%
0%
0%
Roll
Pitch ax
Tail rot
DUAL
–––
–––
SEL
–––
–––
–––
100%
100%
100%
EXPO
SEL
G3
Normal
Now use one of the selection keys to move into the
right column then move the pitch-axis joystick to the
appropriate end-point in order to enter a separate Dual
Rate value for each direction, e.g. for "Pitch-axis up" …
0%
0%
0%
Roll
Pitch ax
Tail rot
DUAL
–––
–––
SEL
–––
–––
–––
100%
77%
100%
EXPO
SEL
G3
Normal
and "Pitch-axis down":

 Loading...


