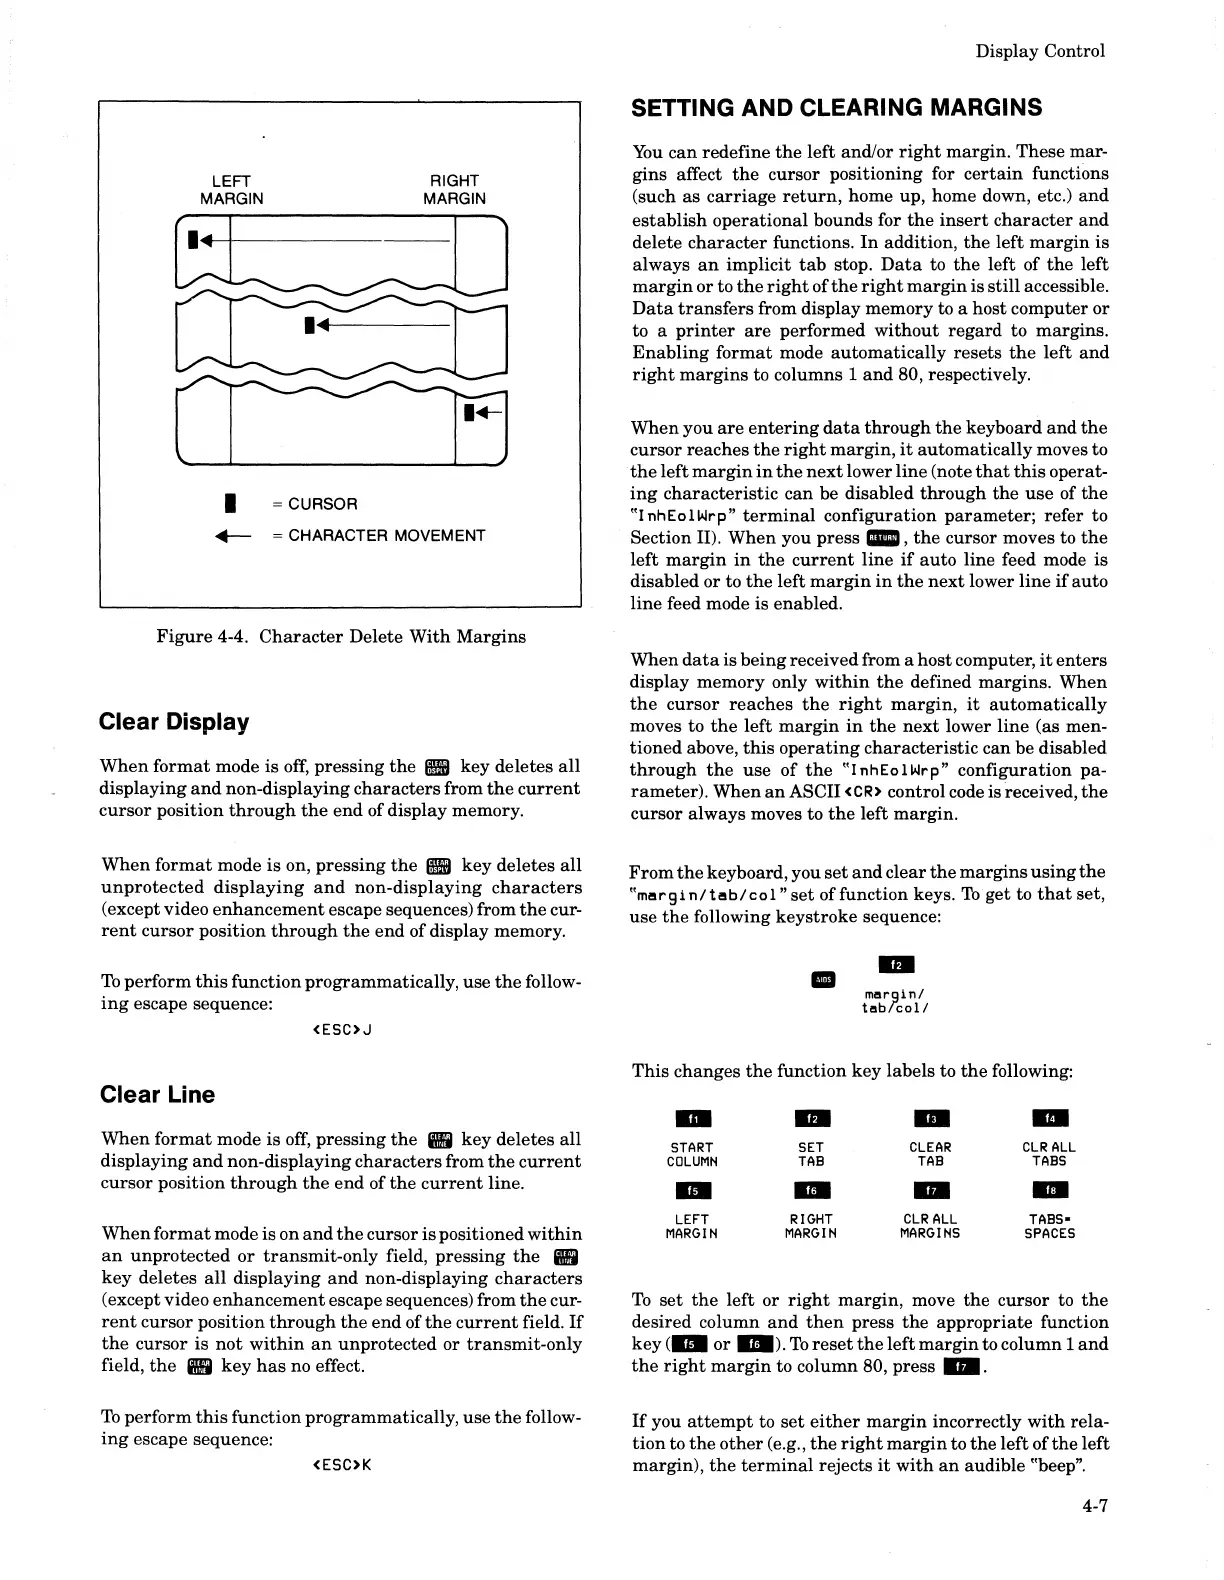
LEFT
MARGIN
I = CURSOR
RIGHT
MARGIN
.-
= CHARACTER MOVEMENT
Figure
4-4.
Character
Delete
With
Margins
Clear Display
When
format
mode is
off,
pressing
the
• key deletes
all
displaying
and
non-displaying
characters
from
the
current
cursor
position
through
the
end
of display memory.
When
format
mode is on,
pressing
the
•
key
deletes
all
unprotected
displaying
and
non-displaying
characters
(except video
enhancement
escape sequences) from
the
cur-
rent
cursor
position
through
the
end
of display memory.
To
perform
this
function
programmatically, use
the
follow-
ing
escape sequence:
<ESC>J
Clear Line
When
format
mode is
off,
pressing
the
•
key
deletes
all
displaying
and
non-displaying
characters
from
the
current
cursor
position
through
the
end
of
the
current
line.
When
format
mode is on
and
the
cursor
is
positioned
within
an
unprotected
or
transmit-only
field,
pressing
the
•
key
deletes
all
displaying
and
non-displaying
characters
(except video
enhancement
escape sequences) from
the
cur-
rent
cursor
position
through
the
end
of
the
current
field.
If
the
cursor
is
not
within
an
unprotected or
transmit-only
field,
the
•
key
has
no effect.
To
perform
this
function programmatically, use
the
follow-
ing
escape sequence:
<ESC>K
Display Control
SETTING AND CLEARING MARGINS
You
can
redefine
the
left and/or
right
margin. These mar-
gins affect
the
cursor positioning for
certain
functions
(such as
carriage
return,
home up, home down, etc.)
and
establish
operational
bounds for
the
insert
character
and
delete
character
functions.
In
addition,
the
left
margin
is
always
an
implicit
tab
stop.
Data
to
the
left of
the
left
margin
or to
the
right
ofthe
right
margin
is
still
accessible.
Data
transfers
from display memory to a host computer or
to a
printer
are
performed
without
regard
to margins.
Enabling
format
mode
automatically
resets
the
left
and
right
margins
to columns 1
and
80, respectively.
When
you
are
entering
data
through
the
keyboard
and
the
cursor reaches
the
right
margin,
it
automatically
moves to
the
left
margin
in
the
next
lower
line
(note
that
this
operat-
ing
characteristic
can
be disabled
through
the
use
of
the
"I
nhEolWrp"
terminal
configuration
parameter;
refer to
Section II). When you press l1'li,
the
cursor moves to
the
left
margin
in
the
current
line
if
auto
line feed mode is
disabled or to
the
left
margin
in
the
next
lower
line
if
auto
line
feed mode is enabled.
When
data
is being received from a
host
computer,
it
enters
display
memory
only
within
the
defined
margins.
When
the
cursor
reaches
the
right
margin,
it
automatically
moves to
the
left
margin
in
the
next
lower
line
(as men-
tioned
above,
this
operating
characteristic
can be disabled
through
the
use
of
the
"lnhEolWrp"
configuration
pa-
rameter).
When
an
ASCII
<CR>
control code is received,
the
cursor always moves to
the
left margin.
From
the
keyboard, you
set
and
clear
the
margins
using
the
"margi
n/
tab/
co
1"
set
of function keys.
To
get to
that
set,
use
the
following
keystroke
sequence:
II
margin/
tabrcol!
This
changes
the
function
key
labels to
the
following:
-
IIDII
..
-
START
SET
CLEAR
CLR
ALL
COLUMN
TAB
TAB
TABS
m
-
..
-
LEFT
RIGHT
CLR
ALL
TABS-
MARGIN MARGIN
MARGINS
SPACES
To
set
the
left or
right
margin,
move
the
cursor to
the
desired column
and
then
press
the
appropriate
function
key
(m
or
a).
To
reset
the
left
margin
to column 1
and
the
right
margin
to column 80,
press".
If
you
attempt
to
set
either
margin
incorrectly
with
rela-
tion
to
the
other
(e.g.,
the
right
margin
to
the
left
ofthe
left
margin),
the
terminal
rejects
it
with
an
audible "beep".
4-7