JUSTIFY/NO
JUSTIFY
ATTRIBUTE.
For
those types
of
fields which
do
not
include
automatic
field editing (all
characters,
alphabetic, auto-upshift,
alphanumeric,
in-
teger, signed deciinal,
and
numeric), you
may
select
the
"JUST
I
FY"
attribute
which causes
any
data
within
the
field
to
be automatically
justified
whenever
the
cursor leaves
the
field. Like
the
optional/required
attribute,
this
at-
tribute
is
specified
by
way
of
the
field definition menu.
For
all
characters, alphabetic, auto-upshift,
and
alphanumeric
fields,
the
data
is
left-justified.
For
integer, signed decimal,
and
numeric
fields,
the
data
is right-justified.
The
jus-
tify/nojustify
attribute
is
ignored for implied decimal, con-
stant,
integer
fill, signed decimal fill,
and
implied decimal
fill fields.
TOTAL
FILUNO
TOTAL
FILL
ATTRIBUTE.
For
any
type
of field (except,
of
course,
constant
fields) you
m.a,y
specify
"TOTAL
FILL"
attribute.
This
attribute
signifies
that,
if
any
character
position
within
the
field contains a
valid
character,
then
every
character
position
within
the
field
must
contain
a
valid
character.
Like
the
optional/required
and
justify/no
justify
attributes,
this
at-
tribute
is
specified by
way
of
the
field definition menu.
The
"TOTAL
FILL"
attribute
is
checked
as
the
cursor
is
about
to
leave
the
field.
If"TOTAL
FILL" is
in
effect
and
all
character
positions
of
the
field
do
not
contain valid characters,
then
the
keyboard
is
"locked",
the
bell is sounded,
the
cursor
moves to tp.e
start
of
the
field,
and
an
error
message ap-
pears
at
the
bottom
of
the
screen.
To
correct
the
situation,
press
_
and
then
enter
the
data
item
in
a
manner
which
ensures
that
all
character
positions contain a valid char-
acter
(right
justify
it
and
include
leading
zeros, for
example, for
the
numeric
field types).
Designing
and
Using Forms
Defining Fields From the Keyboard
From
the
keyboard, you specify
the
desired field
type
and
explicit
attributes
using
a
menu
which you access using
the
following keystroke sequence:
II
-
define
f1l!!lds
-
define
edits
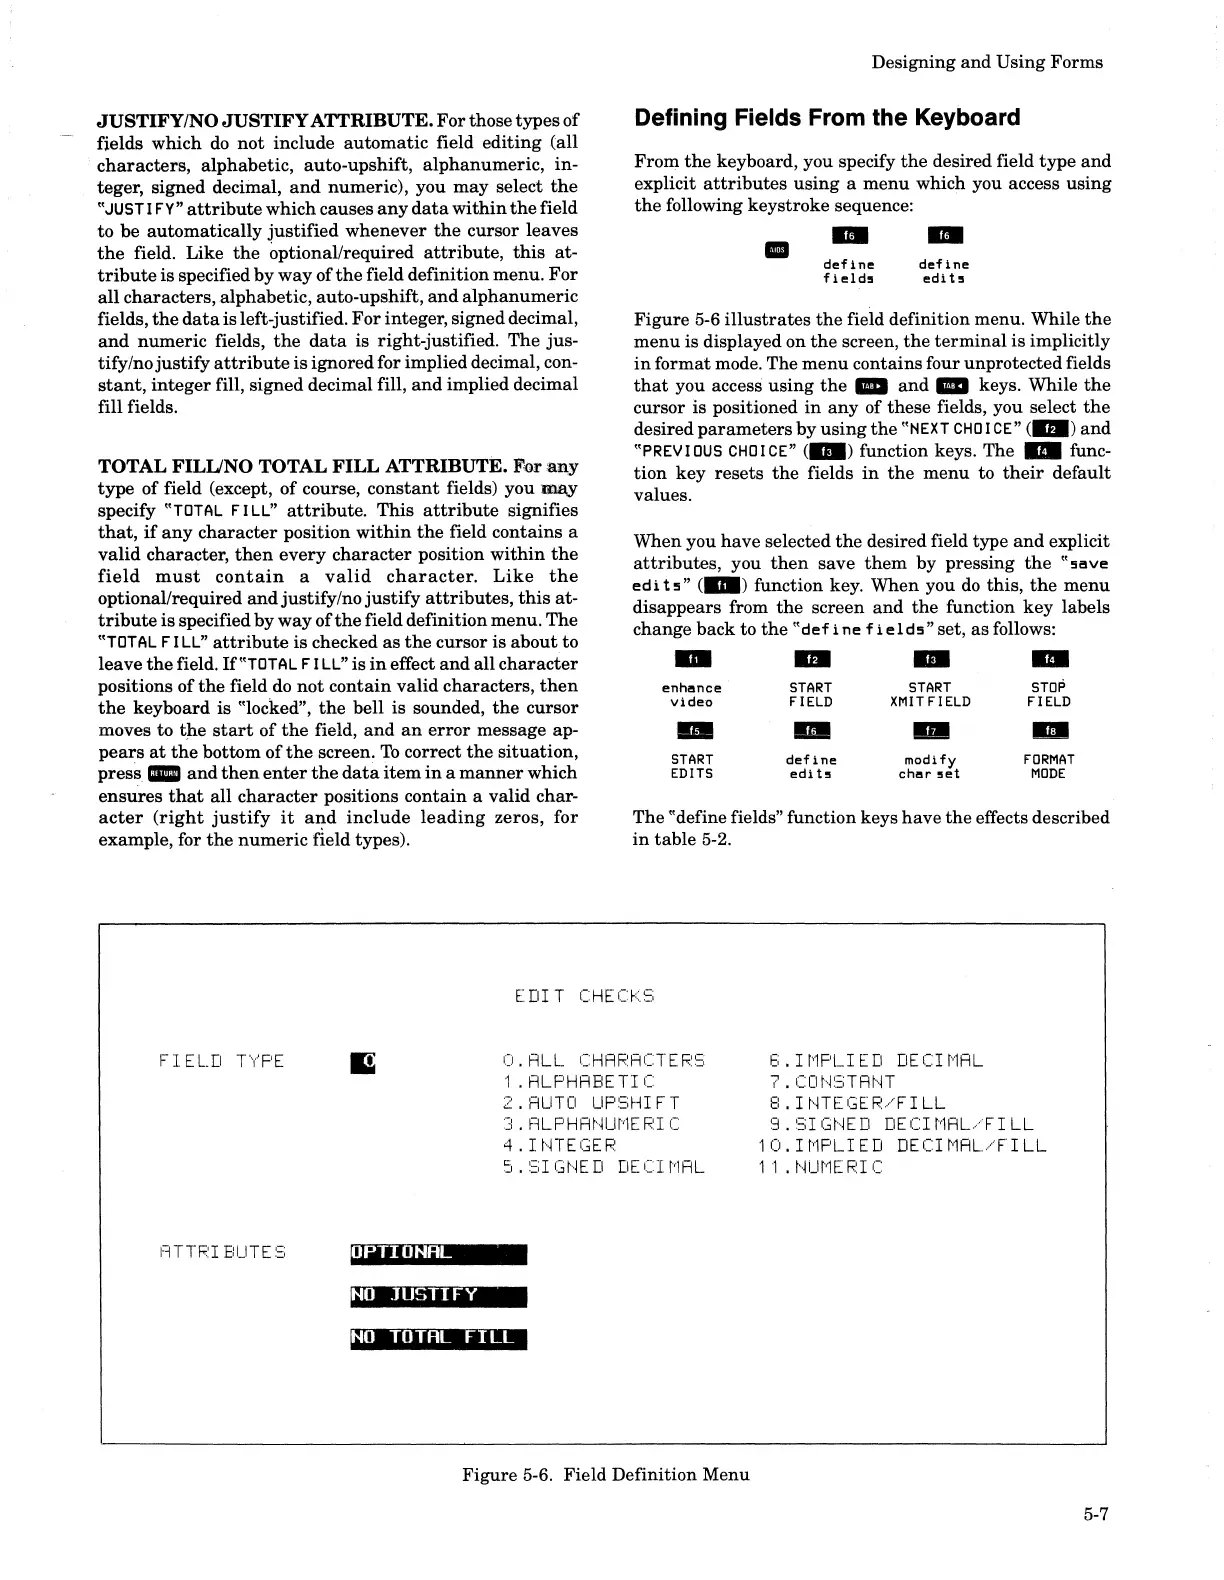
Figure
5-6
illustrates
the
field definition menu. While
the
menu
is displayed on
the
screen,
the
terminal
is
implicitly
in
format mode. The
menu
contains four unprotected fields
that
you access using
the
_
and
_ keys. While
the
cursor is positioned
in
any
of
these
fields, you select
the
desired
parameters
by
using
the
"NEXT
CHO
I
CE"
(
..
)
and
"PREVIOUS
CHOICE"
(
..
) function keys.
The"
func-
tion
key
resets
the
fields
in
the
menu
to
their
default
values.
When you have selected
the
desired field type
and
explicit
attributes,
you
then
save
them
by pressing
the
"!lave
edi
h"
(_)
function key. When you
do
this,
the
menu
disappears from
the
screen
and
the
function
key
labels
change back to
the
"def
i
ne
f 1
eld!l"
set,
as
follows:
..
.. ..
..
enhance
START START
STOP
Video
FIELD
XMITFIELD
FIELD
- - -
..
START
clefine
modify
FORMAT
EDITS
edits
char
set
MODE
The "define fields" function keys
have
the
effects described
in
table 5-2.
EDIT
CHECI<.::;
FIEL.D
T\'F'E
RTTF.:I
ElUTE
~=;
OPTIONAL
NO
.lUSTI
FY
O.ALL
CHARACTERS
1 .
RLPHABETI
C
2.RUTCI
UPSHIFT
3.
ALPHm·1Ut'lE
RI
C
4.
I
HTEGER
5.SIGHED
DECIMAL
NO
TOTAL
FI
LL
Figure 5-6. Field Definition Menu
6.IMPLIED
DECIMAL
7 .
CCIt"1~:3TAHT
B.IHTEGER/FILL
9.SIGHED DECIMAL/FILL
10.IMPLIED DECIMRL/FILL
1 1 .
HUt"lE
RI
C
5-7