1 - 19
Transpector XPR 3+ Operating Manual
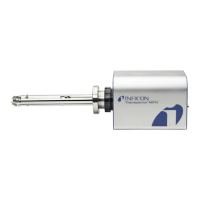
1.16.5 Sensor Installation
Do not touch any surface on the vacuum side of the
sensor with bare fingers. If it is necessary to touch any of
these parts, always wear clean linen, nylon, powder free
latex or vinyl laboratory gloves.
Before installing the sensor on your system, check for
any signs of loose or broken parts.
Do not attempt to clean the sensor in any kind of solvent.
Cleaning the sensor requires its disassembly. If the
sensor is contaminated and needs cleaning, contact
INFICON.
1.16.5.1 Attaching the Sensor to the Vacuum Chamber
The sensor may be mounted in any position when attaching it to the vacuum vessel
or chamber.
1 Attach the Transpector XPR 3+ Sensor Flange to the Pirani Interlock Weldment
Assembly CF-40 Flange with a Cu gasket using ¼-28 x 1¼ in. 12pt SS silver
plated bolts, with the nut plates on the Transpector XPR 3+ side of the Flange.
Tighten the bolts finger tight.
2 Tighten all the bolts evenly and gradually in a star pattern until the flange faces
come into contact.