25
English
English
1
Select a disc and start playback.
Example: When planning to record a track on CD1
2
Insert a recordable CD-R or CD-RW disc in the
CDR disc tray.
• The disc is read.
3
While the disc is playing back the track you
want to record or if that track is being paused,
press CD REC (main unit/remote control).
“1TR DUBBING” is shown in the information display.
• When a blank disk is in the CDR tray, “UPDATE OPC” is
shown following “1TR DUBBING”.
When “ADD FINALIZE?” is shown in the information
window:
• No response (no input) assumes that finalization is to be per-
formed, or you can press the SET button (main unit/remote con-
trol) to confirm that finalization is to be done. Press the
CANCEL button (main unit/remote control) to keep the disc
unfinalized.
Note
• This message will not be shown if the menu FINALIZE func-
tion setting is “OFF”. The default setting is “ON”.
The CD restarts playback from the beginning of the track
and the CDR starts recording simultaneously.
• When a track is recorded, its digital signals are recorded in their
original form. A new track mark is automatically placed at the
beginning of the track being recorded.
When recording completes
“STOP DUBBING” flashes and recording automatically stops.
When recorded without canceling “ADD FINALIZE?“
“FINALIZE” is shown in the information window after recording
is stopped and finalization is automatically performed.
To stop recording at any time
Press the CD or CDR STOP 7 button on the main unit or the 7
(stop) button on the remote control to end recording. The recording
mode is released after “STOP DUBBING” is shown in the infor-
mation display.
Notes
• There is no need to adjust the recording level when recording a
digital signal.
• If the source CD being recorded from the 3-CD changer is itself
a first-generation digital copy, digital recording cannot be per-
formed. When this occurs, the recording type will switch from
digital to analog automatically.
• Upon completion of recording, “STOP DUBBING” is shown in
the information display. Always wait for the “STOP DUBBING”
message to be cleared before proceeding with the next operation.
• You can make a complete copy of a CD that you want to record
onto a CD-R/CD-RW disc. When recording a CD with song
numbers but no silence between songs such as a live CD, for
example, you can use the 1 DISC DUBBING feature to make a
recording without any silence.
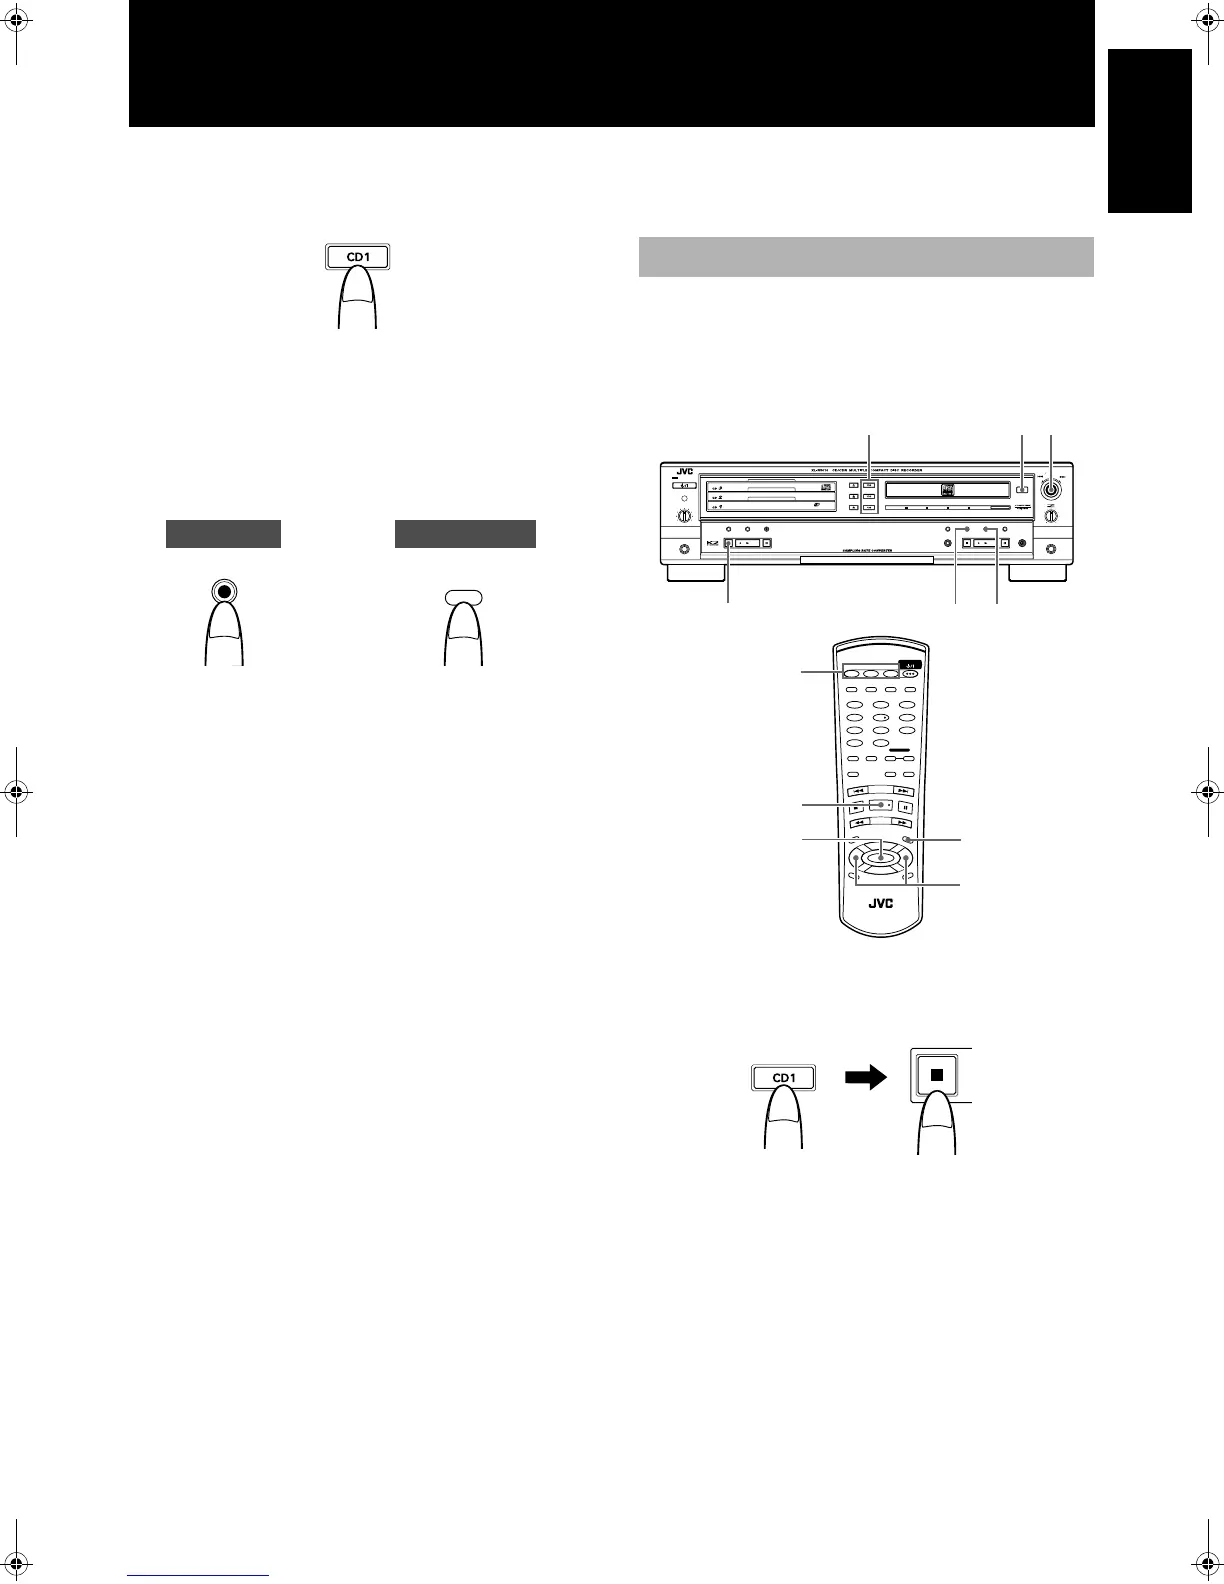
1
Select and stop the CD to be recorded.
Example: To record the CD loaded in tray CD1.
• Only the selected CD is recorded.
2
Load a recordable CD-R or CD-RW disc into the
CDR and close the tray.
• The disc is read.
3
Press the MENU button (main unit/remote
control), and then turn the MULTI JOG control on
the main unit or press the
2
or
3
button on the
remote control until “1 DISC DUBBING” is
shown in the information display.
4
Press the SET button.
“DUBING READY?” is shown in the information display.
• Only the selected CD is recorded.
5
Press the SET button.
CD REC
CD REC
Remote ControlMain Unit
1 Disc Dubbing
STANDBY
STANDBY/ON
PLAY & EXCHANGE
3
-
CD
MAXMIN
PHONES
PLAY MODE
PHONES LEVEL
EJECT
REC SOURCE SELECTOR
MIX BLANCE
CD
LINE
LINE
MIC
MULTI JOG
REC LEVEL
+
–
MIC
CANCELSETMENU
PAUSE
REC/
REC MUTING
PLAYSTOP
SYNCHRO
CD EDIT CD REC
STOP PLAY PAUSE
FINALIZE
MICLINECDDIGITAL
123
3 4,51
STANDBY/ON
CD1 CD2 CD3
CD REC
PLAY
MODE
•
REC
REC MUTING
REC
SOURCE
MENU
PITCH
0
C
H
A
N
C
E
L
REPEAT CD
PITCH
+
SET
PITCH–
RM
–
SXLR5010A
REMOTE CONTROL
CDR
CD EDIT FINALIZE DISPLAY
1 2
4 5
7 8
3
6
9
10
+
10
FAD E SYNCHRO
CONTROL
3
3
1
1
4,5
STOP
(To be continued on the next page)
XL-R5010BK.book Page 25 Monday, June 4, 2001 11:40 AM
 Loading...