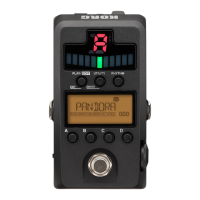
10
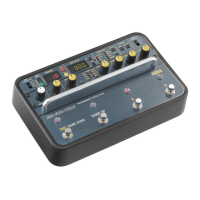
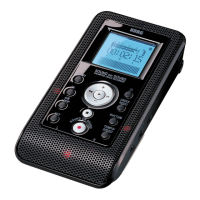
Control Panel
1. LCDdisplay
Indicatesvarioussettings.Whenarectangularframeisdisplayedin
thelowerarea,youcaninputorchangeparametervaluesbytouching
andslidingoverthisareawithyourfinger(seepage12).
2. Controllerbuttons
The , , ,+and‐buttonsareusedtocontrolrecordingandplay‐
backandadjus
tva
rioussettingsinMenumode.
3. MENUbutton
PressthisbuttontoenterMenumodetoaccessvarioussettings(see
page25).PressingtheStopbuttonwhileholdingdowntheMENUbut‐
tonwillcausetheunittoenterHoldmode,inwhichallbuttonopera‐
tionswillbedisabled.Tocance
lHold
mode,presstheStopbutton
againwhileholdingdowntheMENUbutton.
4. FXbuttonandindicator
Pressthisbuttonbrieflytoturntheeffectson(theLEDwilllightup)or
off(theLEDwillturnoff ).Pressandholddownthebuttontoaccess
theeffectsettingpage(seepage22
).
5.
A/BLOOPbuttonandindicator ,A/BSETbutton
Thesebuttonsenableyoutosetuploopplaybackandrecording(see
page19).
6. Stopbutton
Pressthisbuttontostoprecordingorplayback,orcancelthesetting.
7. Record(SOUNDONSOUND)buttonandindicator
PresstheRecordbuttontoplacetheunitinRec
ord
Readymode.The
Recordindicatorwillflash.PresstheRecordbutton again tostart
recordingwhiletheunitisinRecordReadymode.TheRecordindica‐
torwilllightupsteadily.
8. ClipindicatorsL&R
Theseindicatorswillflashredduringclipping.
9. Internalstereomicrophone
10. Speaker
Thebuilt‐inspe
akerwill
bemutediftheheadphonejackisconnected.
Thespeakerwillalsobemutedtoavoidfeedbackwhileyouare
recordingviathebuilt‐inorexternalmicrophone,settingtheinput
level,usingthetuner,orwhentheunitisinRecordReadymode.
11. Powerbutton(seepage8)
12
. U
NDObuttonandindicator(seepage21)
 Loading...