4
[Steps 1 to 6 below are only for
monochrome machines.]
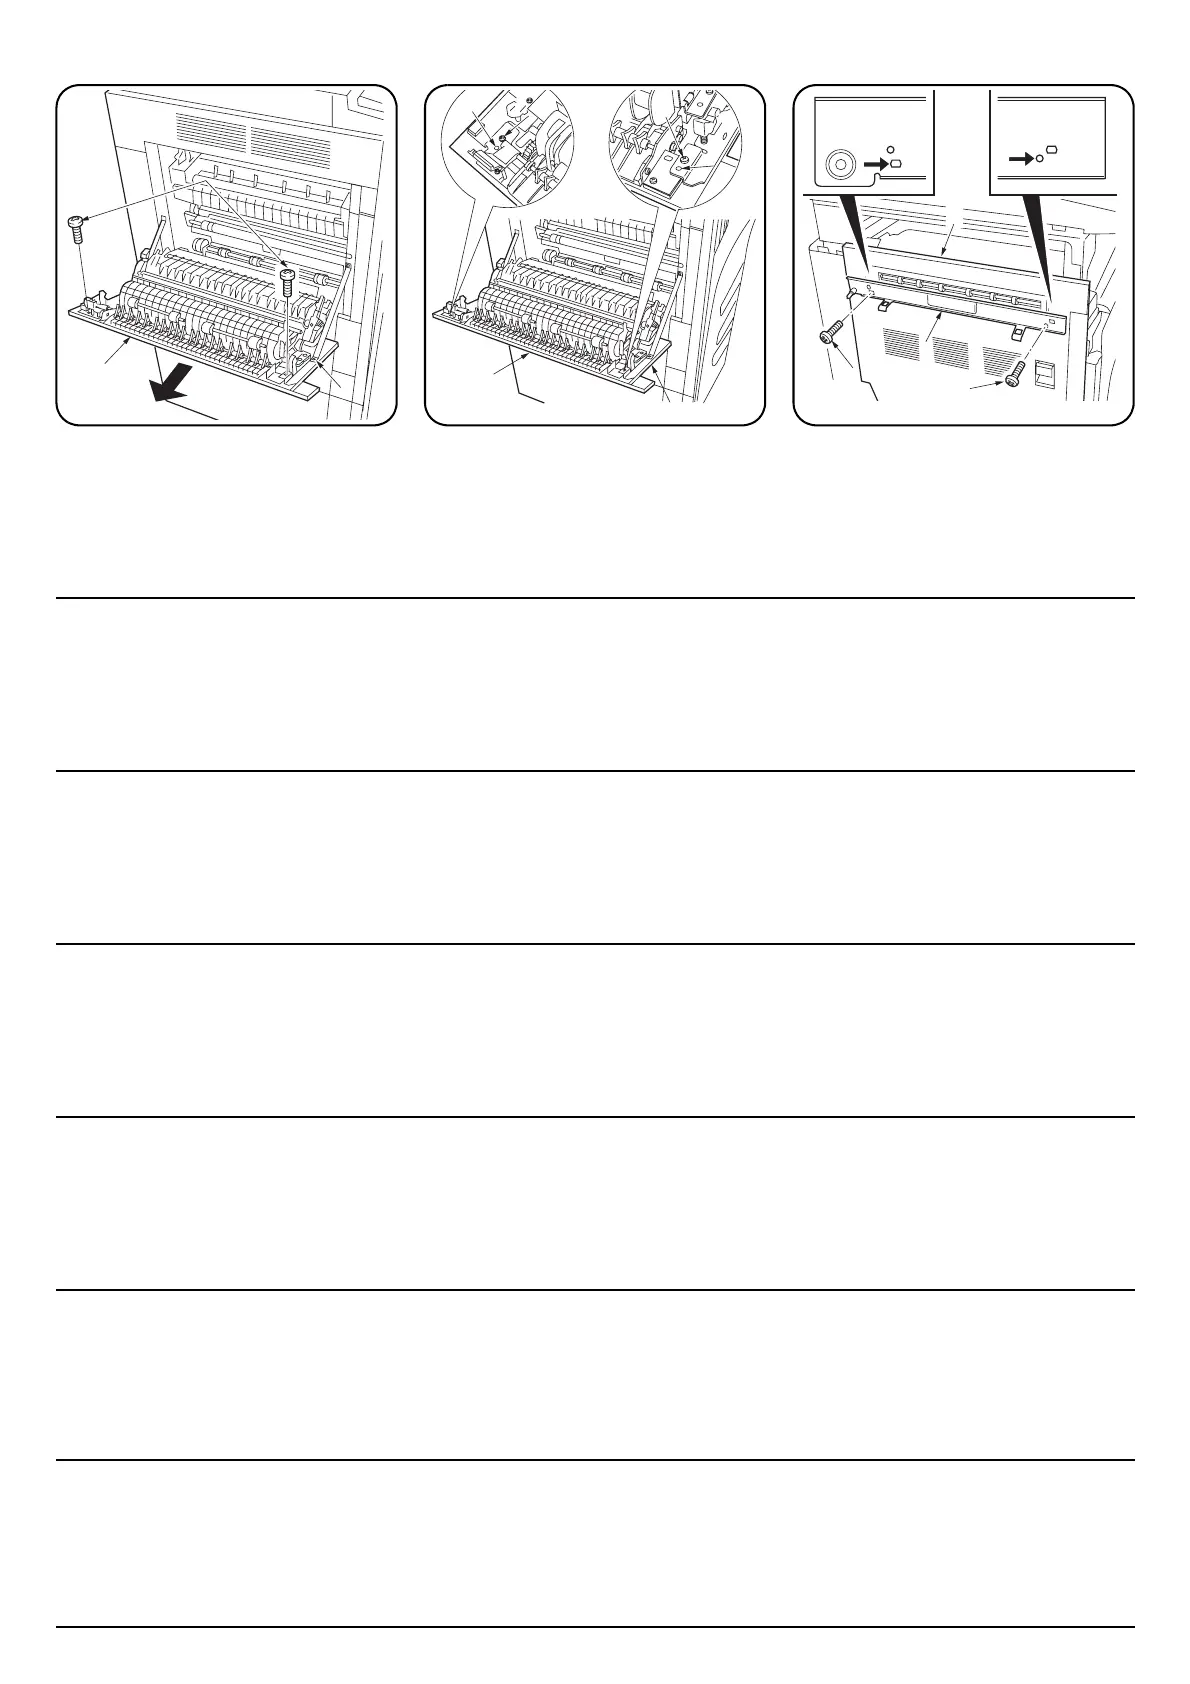
1. Open the eject cover (1) of the MFP or the
printer.
2. Remove the two screws (2) securing the
feedshift guide assembly (3) and then the
assembly.
3. Fit the curl eliminator (M) to the eject cover
(1) such that the projections (4) on the cover
fit into the two ends of the curl eliminator (M).
4. Secure the curl eliminator (M) using the two
screws (2) removed in step 2.
5. Close the eject cover (1).
6. Fit the latch catch (B) to the eject cover (1)
using two M4 × 10 binding screws (F).
[Les étapes 1 à 6 ci-dessous
concernent les machines
monochromes seulement.]
1. Ouvrir le couvercle d’éjection (1) du MFP ou
imprimante.
2. Retirer les deux vis (2) fixant l’assemblage
de la glissière d’alimentation (3) puis retirer
l’assemblage.
3. Fixer l’élément d’élimination des boucles (M)
au couvercle d’éjection (1) de telle façon que
les projections (4) du couvercle s’insèrent
dans les deux extrémités de cet élément (M).
4. Fixer l’élément d’élimination des boucles (M)
à l’aide des deux vis (2) retirées à l’étape 2.
5. Fermer le couvercle d’éjection (1).
6. Fixer le pontet du loquet (B) au couvercle
d’éjection (1) à l’aide de deux vis de
raccordement M4 × 10 (F).
[Los pasos 1 a 6 a continuación son
sólo para máquinas monocromáticas.]
1. Abra la cubierta de expulsión (1) del MFP o
impresora.
2. Quite los dos tornillos (2) que aseguran el
ensamble guía de la unidad de cambio de
alimentación de papel (3) y luego el
ensamble.
3. Coloque el eliminador de enrollamiento (M)
en la cubierta de expulsión (1) de modo que
las proyecciones (4) de la cubierta encajen
en los dos extremos del eliminador de
enrollamiento (M).
4. Asegure el eliminador de enrollamiento (M)
usando los dos tornillos (2) que quitó en el
paso 2.
5. Cierre la cubierta de expulsión (1).
6. Coloque el cerrojo (B) en la cubierta de
expulsión (1) usando dos tornillos de
sujeción M4 × 10 (F).
[Die folgenden Schritte 1 bis 6 gelten
nur für Monochrommaschinen.]
1. Öffnen Sie die Auswurfabdeckung (1) des
MFP oder Drucker.
2. Entfernen Sie die zwei Schrauben (2), die
den Zuführungswechsel-Bausatz (3)
befestigen und dann den Bausatz.
3. Bringen Sie den Wellenverhinderer (M) so
an die Auswurfabdeckung (1) an, daß die
Vorsprünge (4) auf der Abdeckung in die
zwei Enden des Wellenverhinderers (M)
passen.
4. Befestigen Sie den Wellenverhinderer (M)
mittels der in Schritt 2 entfernten zwei
Schrauben (2).
5. Schliessen Sie die Auswurfabdeckung (1).
6. Bringen Sie den Riegelschloßbausatz (B)
mittels der zwei M4 × 10 Verbundschrauben
(F) an die Auswurfabdeckung (1) an.
[I seguenti passi da 1 a 6 sono solo
per le macchine in bianco e nero.]
1. Aprire la copertura dell’uscita carta (1)
dell’MFP o stampatore.
2. Rimuovere le due viti (2) che fissano il
gruppo di guida di cambio alimentazione (3)
e quindi il gruppo.
3. Inserire l’eliminatore degli accartocciamenti
(M) nella copertura dell’uscita carta (1) in
modo tale che le proiezioni (4) sulla
copertura siano inserite nelle due estremità
dell’eliminatore degli accartocciamenti (M).
4. Fissare l’eliminatore degli accartocciamenti
(M) utilizzando le due viti (2) rimosse al
punto 2.
5. Chiudere la copertura dell’uscita carta (1).
6. Inserire il dispositivo di arresto (B) nella
copertura dell’uscita carta (1) utilizzando due
viti di serraggio M4 × 10 (F).
[ 手順 1 ~ 6 はモノクロ機のみ ]
1. MFP 本体またはプリンタ本体の排出カバー
(1) を開く。
2. ビス (2)2 本を外し、分岐ガイド組立 (3) を
取り外す。
3. デカーラー(M) の両端に半押し (4) がはまる
位置で、デカーラー(M) を排出カバー(1) に
取り付ける。
4. 手順 2 で外したビス (2)2 本でデカーラー
(M) を固定する。
5. 排出カバー(1) を閉じる。
6. ラッチ受け板 (B) をビス M4 × 10 バインド
(F)2 本で排出カバー(1) に取り付ける。
[ 步骤 1 ~ 6 仅限于黑白机 ]
1. 将 MFP 或打印机的出纸盖板 (1) 打开。
2. 将两个小螺钉 (2) 摘下,并将分支导向组件 (3)
卸下。
3. 将带凸肩压板的凸部 (4) 嵌入防卷曲部件 (M)
两端后 , 将防卷曲部件 (M)安装于出纸盖板 (1)
上。
4. 用依步骤 2 摘下的两个小螺钉 (2) 来固定防卷
曲部件 (M)。
5. 将出纸盖板 (1) 关上。
6. 用两个 M4 × 10固结螺钉 (F) 将挂钩承支架 (B)
安装于出纸盖板 (1) 上。
11
3
22
4
1
2
2
M
B
F
F
1
 Loading...