7
H
C
16
D
A
A
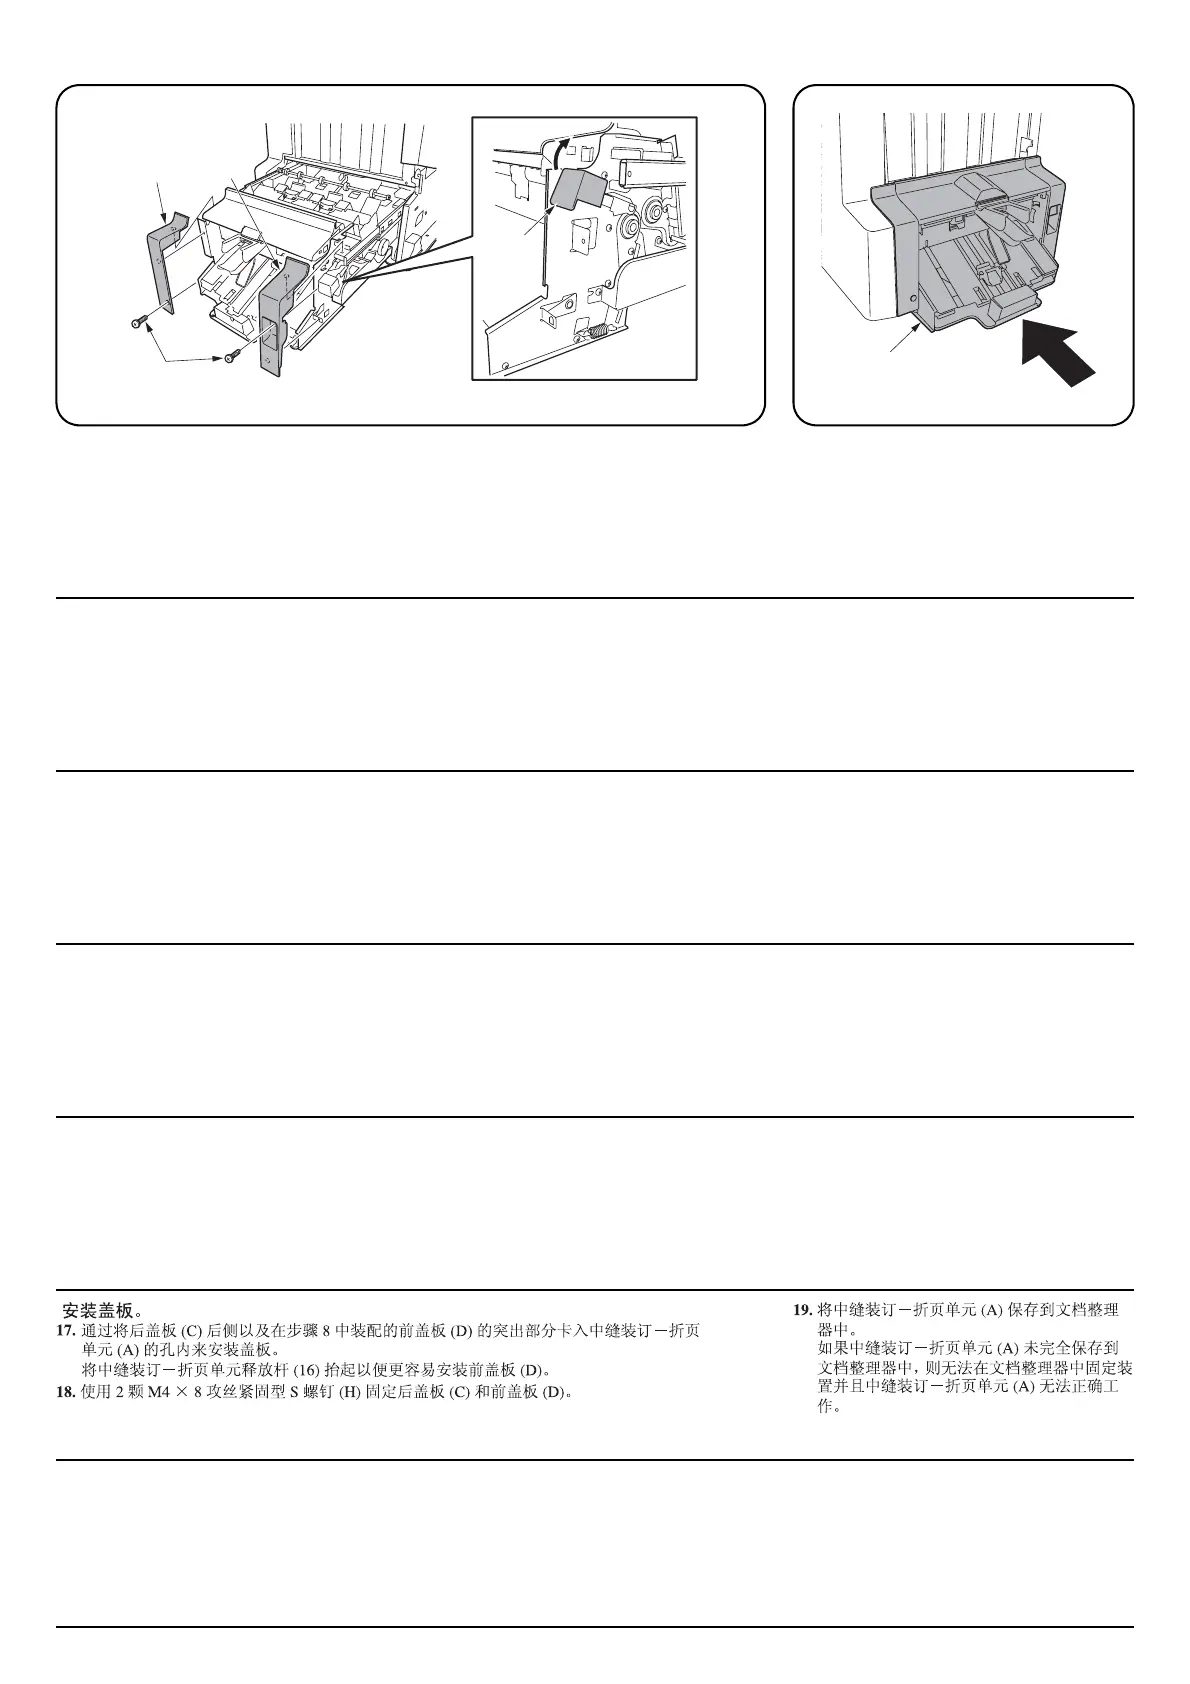
カバーの取り付け
17.手順 8 で組み立てたカバー後 (C)、カバー前 (D) を、裏側の突起を中折りユニット (A) の穴にはめ
込み、取り付ける。
カバー前 (D) は、中折りユニット解除レバー(16) を上げると取り付けやすい。
18.ビス M4 × 8 タップタイト S(H)2 本でカバー後 (C)、カバー前 (D) を固定する。
19.中折りユニット (A) をドキュメントフィ
ニッシャに収納する。
確実に収納されていない場合、中折りユニッ
ト (A) がドキュメントフィニッシャに固定
されず、中折りユニット (A) が正常に動作し
ない。
Installing covers.
17.Install the covers by fitting the projections on the rear side of the rear cover (C) and front cover (D)
assembled in step 8 into the holes in the center-folding unit (A).
It is easy to install front cover (D) by lifting center-folding unit releasing lever (16).
18.Use two M4 × 8 tap-tight S screws (H) to secure rear cover (C) and front cover (D).
19.Store center-folding unit (A) into the docu-
ment finisher.
If center-folding unit (A) is not stored com-
pletely inside the document finisher, the unit
cannot be fixed in the document finisher and
center-folding unit (A) won’t operate prop-
erly.
Installation des capots.
17.Installer les capots en insérant les saillies côté arrière du capot arrière (C) et du capot avant (D)
montés à l'étape 8 dans les trous de la plieuse (A).
Il est facile d’installer le capot avant (D) en soulevant le levier de relâchement de la plieuse (16).
18.Utiliser deux vis S taraudées M4 × 8 (H) pour fixer le capot arrière (C) et le capot avant (D).
19.Ranger la plieuse (A) dans le finisseur de
document.
Si la plieuse (A) n’est pas complètement
rangée à l’intérieur du finisseur de
document, la plieuse ne peut pas être fixée
dans le finisseur de document et la plieuse
(A) ne fonctionne pas correctement.
Instalación de cubiertas.
17. Instale las cubiertas insertando las salientes en el lado posterior de la cubierta trasera (C ) y la
cubierta delantera (D), ensambladas en el paso 8, en los orificios de la bandeja de plegado (A).
Es más fácil instalar la cubierta frontal (D) levantando la palanca de liberación de la unidad de
plegado (16).
18.Utilice dos tornillos de ajuste M4 × 8 (H) para asegurar la cubierta posterior (C) y la cubierta
frontal (D).
19.Meta la unidad de plegado (A) en el
finalizador de documentos.
Si la unidad de plegado (A) no se mete
completamente en el finalizador de
documentos, ésta no podrá fijarse en el
finalizador de documentos y no funcionará
correctamente.
Anbringen der Abdeckungen.
17.Die Abdeckungen montieren, indem man die Vorsprünge an der Rückseite der hinteren Abdeck-
ung (C) und der vorderen Abdeckung (D), die in Schritt 8 angebracht wurden, in die Öffnungen
der Mittenfalteinheit (A) einsetzt.
Um den Einbau der vorderen Abdeckung (D) zu erleichtern, ist der Entriegelungshebel (16) der
Mittenfalteinheit anzuheben.
18.Verwenden Sie die beiden M4 × 8 Passstift-Verbundschrauben (H), um die hintere Abdeckung
(C) und die vordere Abdeckung (D) zu befestigen.
19.Setzen Sie die Mittenfalteinheit (A) in den
Dokument-Finisher ein.
Wenn die Mittenfalteinheit (A) nicht
vollständig in den Dokument-Finisher
eingesetzt wurde, kann die Mittenfalteinheit
nicht im Dokument-Finisher befestigt
werden, und die Mittenfalteinheit (A)
funktioniert dann nicht richtig.
Installare i pannelli.
17.IInstallare i pannelli inserendo le parti sporgenti poste sul retro del pannello posteriore (C) e del
pannello anteriore (D), assemblati nel passo 8, nei fori nell’unità di piegatura centrale (A).
È semplice installare il pannello anteriore (D) sollevando la leva di rilascio unità (16)
18.Utilizzare due viti con testa a croce S M4 × 8 (H) per fissare i pannello posteriore (C) ed anteriore
(D).
19.Inserire perfettamente l’unità di piegatura
centrale (A) nella finitrice.
Se l’unità di piegatura centrale (A) non è del
tutto inserita all’interno della finitrice, è
impossibile fissarla alla finitrice stessa e
l’unità di piegatura centrale (A) non
funzionerà correttamente.
 Loading...
