5
14
12
13
A
5
10
A
5
A
B
C
E
E
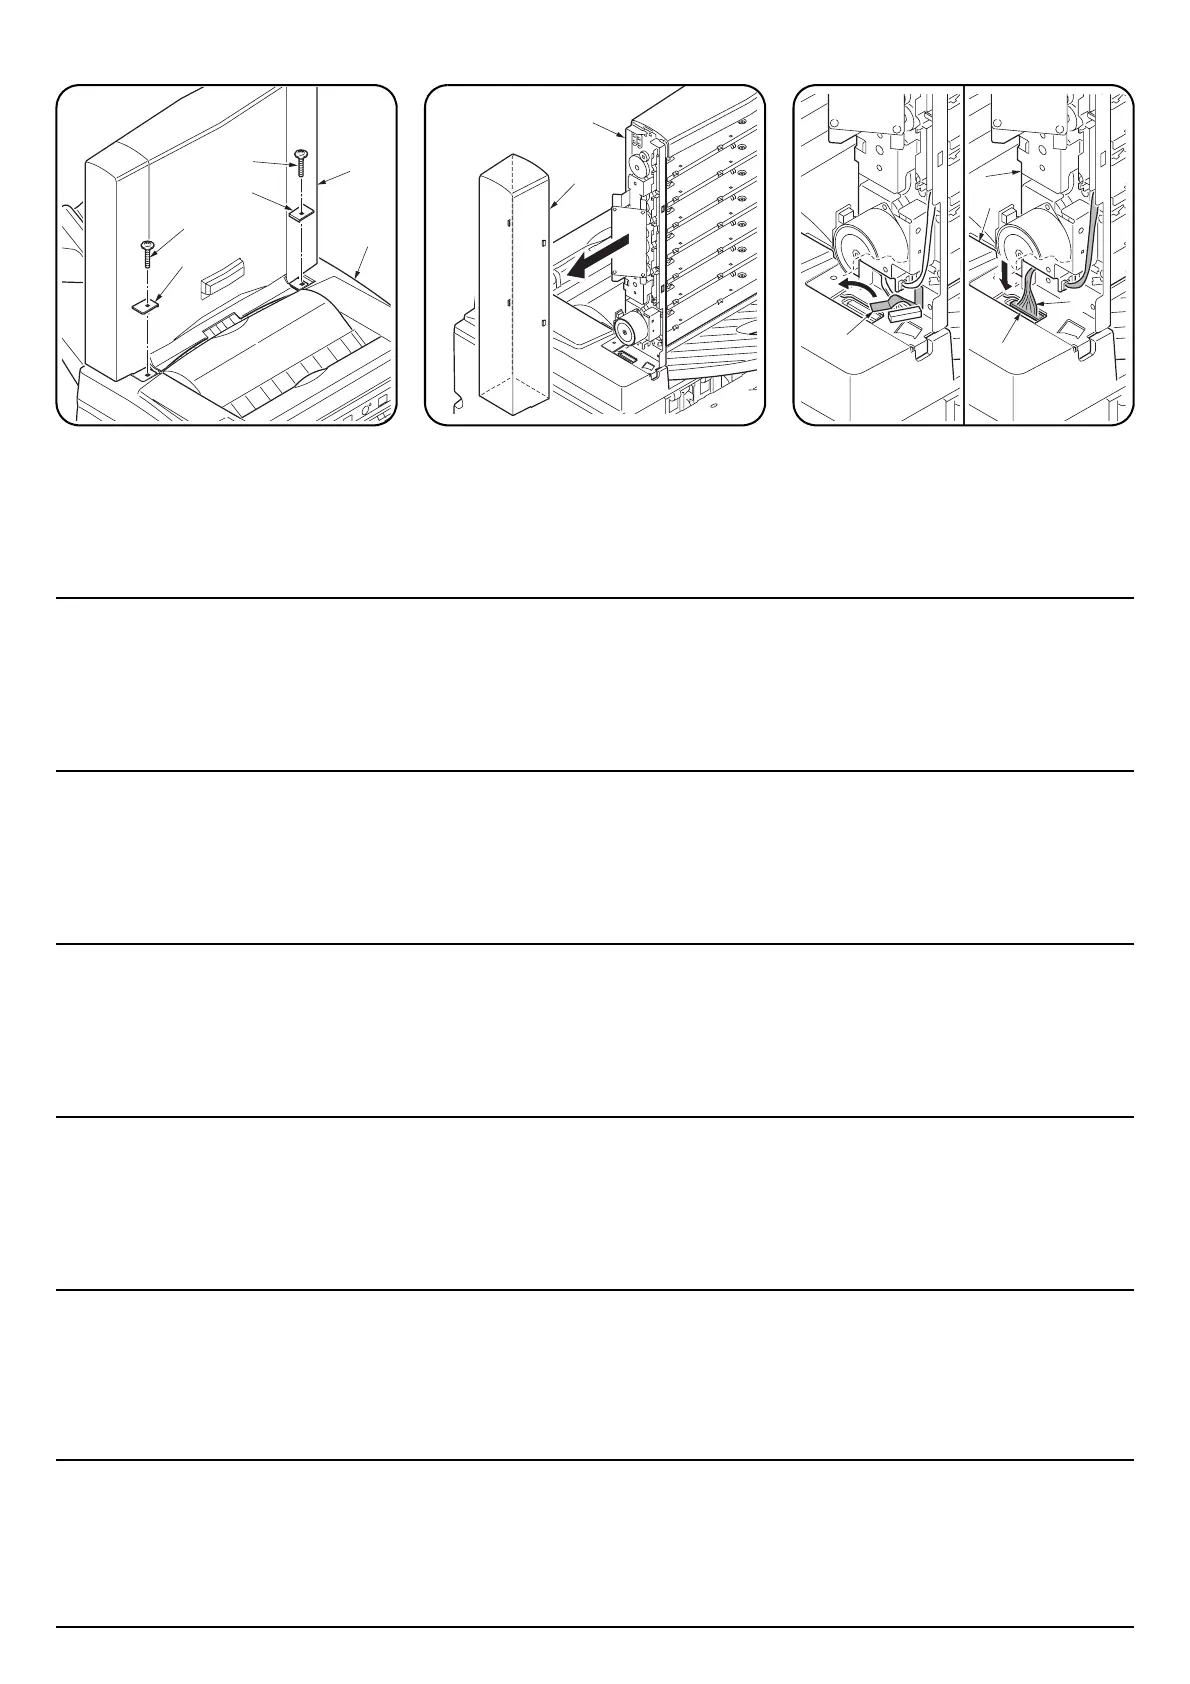
6. Secure the front connection portion of the
mailbox (A) and the finisher (1) with the front
mounting plate cover (B) using a M4 x 14TP
tap-tight S screw (E) and secure the rear
connection portion with the rear mounting
plate cover (C) using a M4 x 14TP tap-tight S
screw (E).
7. Remove the rear cover (10) at the rear of the
mailbox (A) using a flat-blade screwdriver or
the like.
8. Remove the fixing tape (12).
9. Connect the connector (13) of the mailbox
(A) to the connector (14) of the finisher (5).
10.Reinstall the rear cover (10).
6. Fixer la partie raccordement avant de la
boîte aux lettres (A) et le retoucheur (1) avec
le couvercle de la plaque de montage avant
(B) en procédant à l'aide d'une vis
autotaraudeuse S M4 x 14TP (E) et fixer la
partie raccordement arrière avec le
couvercle de la plaque de montage arrière
(C) en procédant à l'aide d'une vis
autotaraudeuse S M4 x 14TP (E).
7. Déposer le couvercle arrière (10) à l'arrière
de la boîte à lettres (A) en procédant à l'aide
d'un tournevis à lame ou autre.
8. Enlever la bande adhésive de fixation (12).
9. Raccorder le connecteur (13) de la boîte à
lettres (A) au connecteur (14) du retoucheur
(5).
10.Reposer le couvercle arrière (10).
6. Asegure la parte de conexión frontal del
buzón de correo (A) y el finalizador (1) con la
cubierta de la placa de montaje frontal (B)
por medio de un tornillo de ajuste M4 x 14TP
(E) y asegure la parte de conexión trasera a
la cubierta de la placa de montaje trasera (C)
por medio de un tornillo de ajuste M4 x14TP
(E).
7. Quite la cubierta trasera (10) en la parte
posterior del buzón de correo (A) utilizando
un destornillador de pala plana o elemento
similar.
8. Despegue la cinta de fijación (12).
9. Conecte el conector (13) del buzón de
correo (A) al conector (14) del finalizador (5).
10.Vuelva a instalar la cubierta trasera (10).
6. Sichern Sie den vorderen Anschlussbereich
der Mailbox (A) und des Finishers (1) mit der
vorderen Abdeckung (B) der Montageplatte
unter Verwendung einer TP Taptite S-
Schraube M4 × 14 (E), und sichern Sie den
hinteren Anschlussbereich mit der hinteren
Abdeckung (C) der Montageplatte unter
Verwendung einer TP Taptite S-Schraube
M4 × 14 (E).
7. Entfernen Sie die hintere Abdeckung (10) an
der Rückseite der Mailbox (A) mit einem
Klingenschraubendreher oder dergleichen.
8. Entfernen Sie das Klebeband (12).
9. Stecken Sie den Stecker (13) der Mailbox
(A) in den Anschluss (14) des Finishers (5).
10.Bringen Sie die hintere Abdeckung (10)
wieder an.
6. Fissare la porzione di collegamento
anteriore della casella postale (A) e del
finitore (1) con il coperchio della piastra di
montaggio anteriore (B) utilizzando una vite
con testa a croce S M4 x 14TP (E) e fissare
la porzione di collegamento posteriore con il
coperchio della piastra di montaggio
posteriore (C) utilizzando una vite con testa
a croce S M4 x 14TP (E).
7. Rimuovere il coperchio posteriore (10) dietro
la casella postale (A) utilizzando un giravite
a punta piana o strumento simile.
8. Rimuovere il nastro adesivo (12).
9. Collegare il connettore (13) della casella
postale (A) al connettore (14) del finitore (5).
10.Reinstallare il coperchio posteriore (10).
6. メールボックス (A) とフィニッシャ(1) の前
側の接続部を取付板カバー前 (B) と共にビ
ス M4 × 14TP タップタイト S(E)1 本で、後側
の接続部を取付板カバー後 (C) と共にビス
M4 × 14TP タップタイト S(E)1 本で固定す
る。
7. メールボックス (A) 後部の後カバー(10) を
マイナスドライバなどで取り外す。
8. 固定テープ (12) を剥がす。
9. メールボックス (A) のコネクタ (13) をフィ
ニッシャ(5) のコネクタ (14) に接続する。
10.後カバー(10) を元通り取り付ける。
6. 使用 M4
× 14TP 自攻紧固型 S 螺钉 (E) 将邮
箱 (A) 的前连接部分和装订器 (1) 紧固在支撑
板前盖板 (B) 上,并使用 M4
× 14TP 自攻紧固
型 S 螺钉 (E) 将后连接部分紧固在支撑板后
盖板 (C) 上。
7. 使用一字型螺钉刀或类似工具拆下邮箱 (A)
后侧的后盖板 (10)。
8. 拆下固定胶带 (12)。
9. 将邮箱 (A) 的接插件 (13) 连接至装订器 (5) 的
接插件 (14)。
10. 重新安装后盖板 (10)。
 Loading...