6
D
D
15
16
A
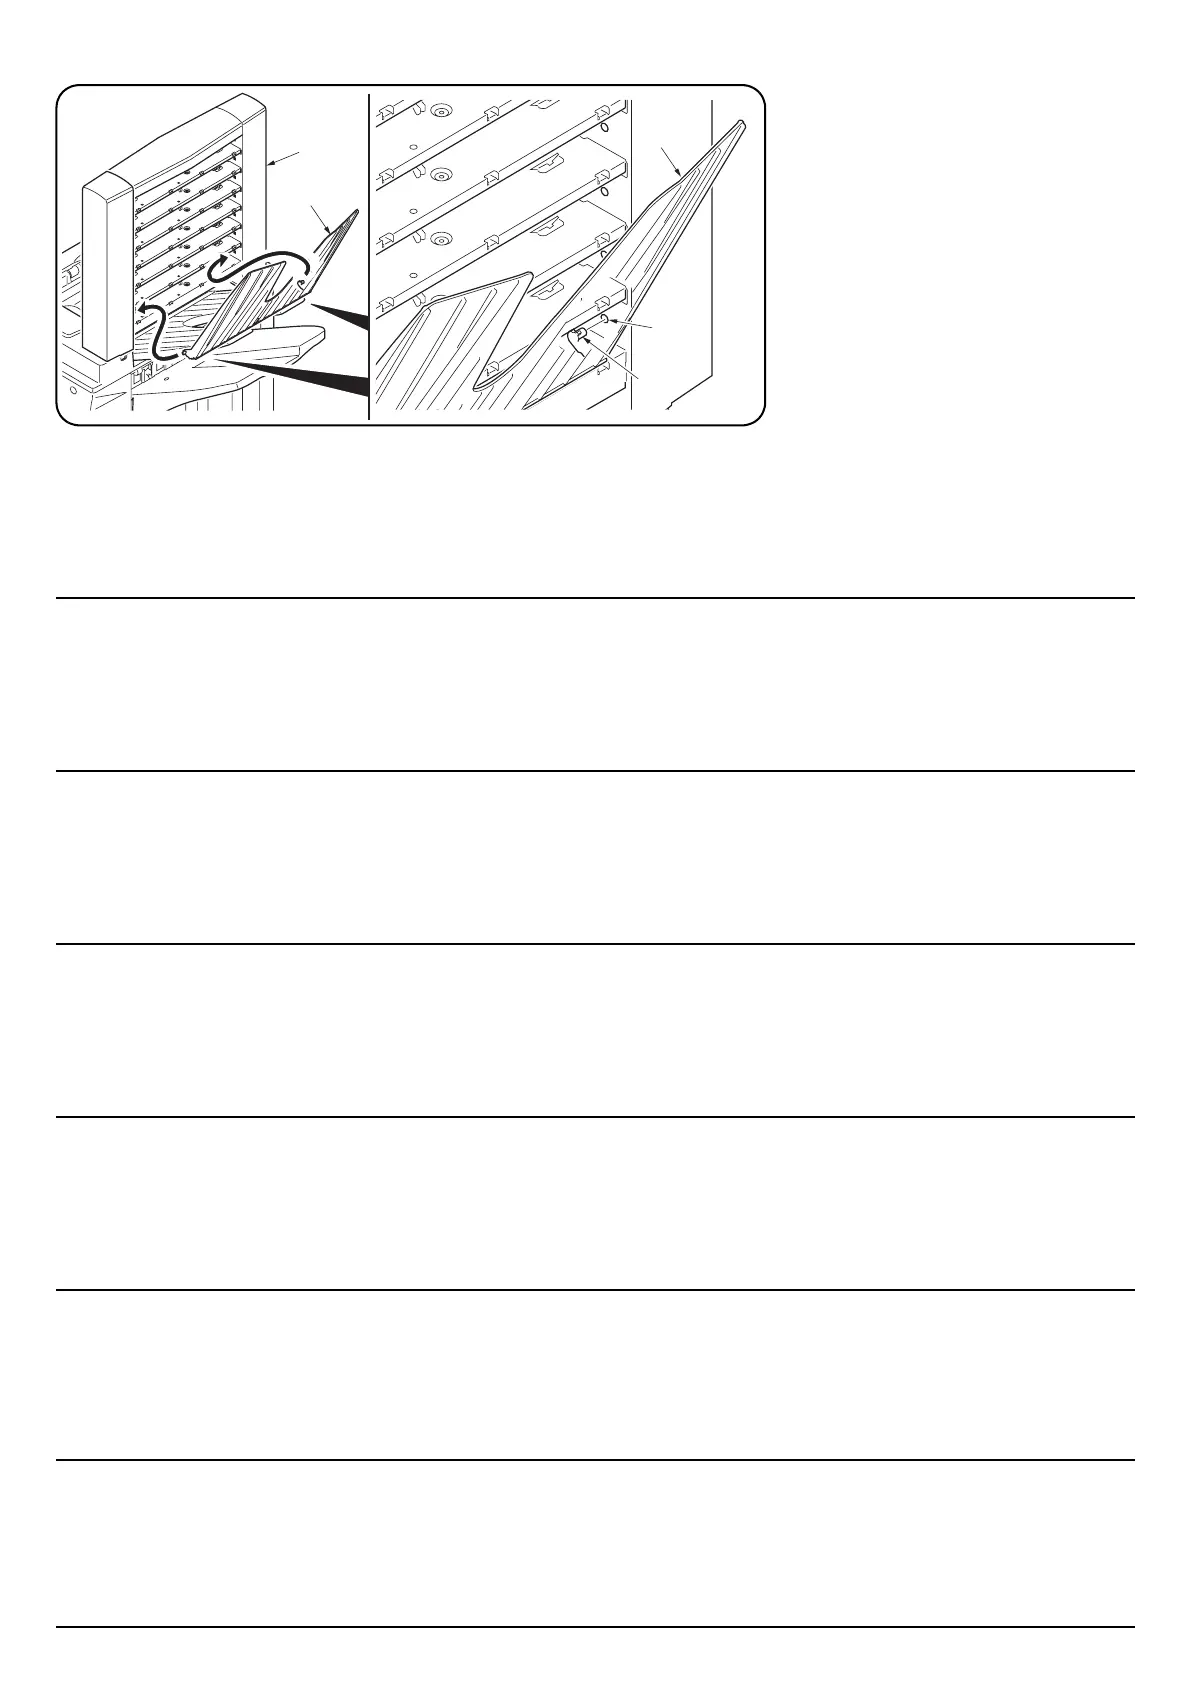
11. Fit the seven copy eject bins (D) to the ejection section of the mailbox (A) from the lowest bin to
the highest.
While pressing both ends of each copy eject bin (D) to bend it a little, fit the bin at a nearly upright
angle as shown in the illustration by inserting the front and rear pins (15) into the round holes (16)
at the front and rear of the mailbox (A).
12.Insert the MFP power plug to the outlet and
turn the MFP main power switch on to check
the operation.
11. Fixer les sept cases d’éjection de copies (D) sur la section d’éjection de la boîte à lettres (A), en
procédant de la case située tout en bas à celle située tout en haut.
Tout en appuyant sur les deux extrémités de chaque case d’éjection de copies (D) de manière à
la plier légèrement, fixer la case à un angle presque droit, comme indiqué sur l’illustration, en
insérant les broches avant et arrière (15) dans les trous ronds (16) situés à l’avant et à l’arrière de
la boîte à lettres (A).
12.Insérer la fiche d’alimentation du MFP dans
la prise et mettre l’interrupteur principal du
MFP sur la position de marche pour vérifier
le fonctionnement.
11. Fije las siete bandejas de expulsión de copias (D) en la sección de expulsión del buzón de correo
(A) de la bandeja más baja a la más alta.
Mientras presiona ambos extremos de cada bandeja de expulsión de copias (D) para doblarlo un
poco, fije la bandeja en un ángulo casi vertical tal como en la figura, insertando los pasadores
delantero y trasero (15) en los orificios redondos (16) en los lados delantero y trasero del buzón
de correo (A).
12.Enchufe el cable eléctrico del MFP en el
tomacorriente y encienda el interruptor
principal del MFP para verificar el
funcionamiento.
11. Setzen Sie die sieben Kopienausgabefächer (D) in den Ausgabeabschnitt der Mailbox (A) ein,
beginnend vom untersten Fach zum höchsten.
Drücken Sie bei jedem Kopienausgabefach (D) beide Enden zusammen, um es ein wenig zu
biegen, und setzen Sie dabei das Fach in einem fast aufrechten Winkel ein, wie in der Abbildung
dargestellt, indem Sie den vorderen und hinteren Stift (15) in die Rundlöcher (16) an der Vorder-
und Rückseite der Mailbox (A) einsetzen.
12.Stecken Sie den Netzstecker des MFP in
eine Netzsteckdose und schalten Sie den
Hauptschalter des MFP ein, um den Betrieb
zu prüfen.
11. Installare i sette scomparti di espulsione delle copie (D) nella parte di espulsione della casella
postale (A), cominciando dallo scomparto più in basso fino a quello più in alto.
Premendo alle due estremità di uno scomparto di emissione delle copie (D) in modo da piegarle
un poco, installare lo scomparto come mostrato in illustrazione mantenendolo quasi ad angolo
retto inserendo i perni anteriore e posteriore (15) nei fori rotondi (16) che si trovano sul davanti e
sul dietro della parte di fondo della casella postale (A).
12.Inserire la spina del cavo di alimentazione
dell’MFP nella presa della rete elettrica e
accenderla utilizzando l’interruttore
principale di alimentazione in modo da
controllare il funzionamento.
11.排出ビン (D)7 枚をメールボックス (A) の排出部に下から順番に取り付ける。
排出ビン (D) の左右を押し少したわませながら、イラストのように立てた状態の角度で、前後の
ピン (15) をメールボックス (A) の前後の丸穴 (16) に挿入する。
12.MFP 本体の電源プラグをコンセントに差し込
み、主電源スイッチを ON にして動作を確認
する。
11. 从邮箱 (A) 的排出部下面起按顺序安装 7 个接纸盘 (D)。
轻轻按下接纸盘 (D) 的左右使之前倾 ( 如图所示呈竖起状态的角度 ),将 前 后 销 (15) 插入邮箱 (A) 的
前后圆孔 (1
6) 内。
12. 将 MFP 主机的电源插头插入插座,然后按下
主开关并确认是否接通。
 Loading...