PLMNL0232 REV. H Effective Date: 01/14/19 38 FiberCUT
®
2D Operation Manual
To replace the gas jet nozzle tip:
For steps 3 and 4, see Figure 50.
3. Insert the gas jet tip into the inner
retainer.
4. Screw the inner retainer into the outer
hex. Do not over tighten.
Hand tighten the tip retainer nut
assembly. Do not use a wrench.
5. Screw the tip retainer nut assembly with
gas jet tip into the tip assembly. Do not
over tighten. See Figure 49.
Hand tighten the tip retainer nut
assembly. Do not use a wrench.
6. Verify beam centering according to
Section 2.4.
Adjust the beam as necessary using
the beam centering knobs. See
Figure 11.
It should not be necessary to make
any collimator adjustments along
the X-axis or Y-axis. See Figure 15.
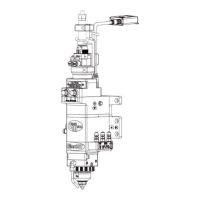
5.3 Servicing the Cover Glasses
Before opening any part of the
head, clean off the dust and/or
process debris according to Section
5.1.
Always wear powder free gloves or
finger cots when handling optics
and optic holders.
DO NOT BLOW OFF THE HEAD
WITH COMPRESSED AIR!
The FiberCUT
®
2D has an upper and a
lower cover glass. See Figure 51.
A. The lower cover glass is behind a
sealed door, just below the focusing
optic.
To service the lower cover glass,
see Section 5.3.1.
B. The upper cover glass bolts in
place, just above the collimating
optic(s).
REMOVING THE UPPER
COVER GLASS DRAWER
RUNS THE RISK OF THE
FOLLOWING:
Contamination in the
collimating optics and/or
fiber.
Possible destruction of the
collimating optics and/or
fiber.
ONLY REMOVE THE UPPER COVER
GLASS DOOR WHEN:
The fiber has been removed.
The upper cover glass
experiences a temperature
fault.
To service the upper cover glass
drawer, see Section 5.3.2.