Do you have a question about the Mark-10 WT3-201M and is the answer not in the manual?
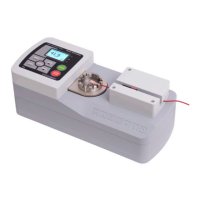
Covers assembling, mounting, and fixture installation.
Details securing the terminal and inserting the wire into the fixture.
Describes the I/O connector, fuse, power plug, and USB connector.
Instructions for installing the USB driver before connecting the tester.
Safety checks and procedures for connecting the power cord.
Explains the demo mode and available optional functions.
Details the elements displayed on the home screen and their meanings.
Explains the primary functions of the tester's control buttons.
Guides users on how to navigate through the tester's menus and sub-menus.
Describes the Real Time operating mode for live measured readings.
Explains the Peak operating mode for retaining the peak tension reading.
Information on using pass/fail limits for tolerance checking and output signaling.
How to configure upper and lower pass/fail limits.
How to enable and set the threshold for break detection.
How to view stored data points and their associated details.
Instructions for deleting the last recorded data point.
Explains the calculation and availability of statistical data.
How to output stored load data to an external device.
How to output data with time, date, and profile name.
How to output calculated statistics to an external device.
How to clear all stored data from the tester's memory.
Setup for RS-232 and USB communication settings.
Details commands for controlling the tester via RS-232 or USB.
Configuration for connecting to Mitutoyo BCD compatible devices.
Describes the analog output for chart recorders and data acquisition systems.
Customizing the function of the DATA key.
Pinout diagram for the 15-pin I/O connector.
Shows the currently selected profile and allows renaming.
Saves current settings to the active profile.
Allows viewing and selecting saved profiles.
Saves current settings as a new profile.
Deletes the currently selected profile.
Setting a password specifically for the calibration section.
Setting a password for accessing the MENU key.
Locking individual keys like MODE, ZERO, and DATA.
Explains how password prompts are displayed and how to handle incorrect entries.
Configuring the date and time settings.
Adjusting the display contrast.
Configuring audible tones for alerts and key presses.
Configuring initial unit of measurement and mode at power-on.
Restoring the tester to its factory default settings.
Displays model, serial number, and version information.
Details the demo mode and how to reset its timer.
Procedure for permanently installing optional functions using activation codes.
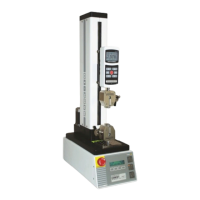
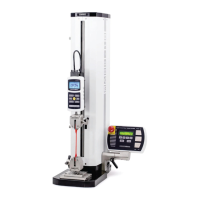
Requirements for mounting the tester for calibration.
Step-by-step guide for performing calibration.
Process for calculating calibration offsets.
Options to save or exit calibration.
Lists general specifications like force capacity, accuracy, and power.
Table detailing the tester's default factory settings.
Provides dimensional drawings and measurements of the tester.
| Brand | Mark-10 |
|---|---|
| Model | WT3-201M |
| Category | Test Equipment |
| Language | English |