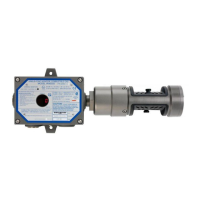
13. Re-install the cover of the Remote Sensor Ultima
Gas Monitor.
"
WARNING
Do not let the cover remain off of an explosion-proof Remote
Sensor Ultima Gas Monitor. Since a source of ignition is
exposed, an explosion may occur if a metal object contacts
the circuitry and produces sparks in an atmosphere of
combustible gas.
14. Locate the Remote sensor Ultima Gas Monitor base plate
and two #10-32 screws and lock washers.
15. Remove the four screws holding the module mounting
bracket (FIGURE A-14).
16. Fasten the Remote Sensor module to the bracket using two
#10-32 screws and lock washers.
• These screws pass through the bracket and into two
tapped holes in the module.
17. Push the Remote sensor Ultima Gas Monitor through the slit
gasket on the Duct Mount base plate (FIGURE A-15).
18. Fasten the sensor module bracket to the base plate using the
#10-32 screws removed in step 15.
• Do not tighten completely.
19. Fasten the calibration tubing fitting into the center post of the
SensorGard (FIGURE A-15).
20. Locate the two Remote sensor Ultima Gas Monitor spacers.
Screw one end of each spacer into the Duct Mount Kit base
plate.
21. Place the Remote sensor Ultima Gas Monitor clamp on the
top of the spacers.
• Ensure the folded part of the clamp is mounted on the
back side of the Remote Sensor Ultima Gas Monitor.
22. With the 1/4-inch hex nut and lock washers, secure the clamp
onto the spacers (FIGURE A-15).
• Tighten the #10-32 screws that secure the module
mounting bracket to the base plate.
23. Clean the area around the hole made in step 2.
• Ensure that no grease, metal shavings or other material
is in the area where the gasket will be seated.
Appendix A, Optional Ultima Duct Mount Kit
A-13