This document is the User's Manual for the Omron TM Collaborative Robot: Conveyor Tracking system, providing comprehensive instructions for its setup, operation, and maintenance.
Function Description
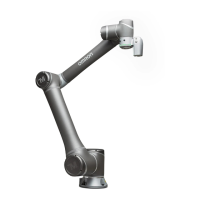
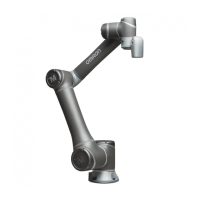
The Omron TM Conveyor Tracking system enables a collaborative robot to track and interact with objects moving on a conveyor belt. This functionality is achieved by integrating the robot with a vision system and an encoder, allowing it to detect, locate, and manipulate objects in motion. The system supports both Sensor Mode and ETH Mode for object detection and tracking. In Sensor Mode, the robot uses a sensor to detect objects, while in ETH Mode, it utilizes an external camera and light sourcing devices for advanced vision-based tracking. The system is designed for applications requiring the robot to perform tasks such as picking, placing, or processing items as they move along a conveyor, thereby enhancing automation and efficiency in production lines.
The core function involves the robot obtaining position and motion data of objects on a conveyor using a vision system and/or a sensor. The conveyor tracking software runs on TMflow, and the Sensor Mode and ETH Mode are distinct functionalities that require specific licensing. The TM Dongle is essential for activating the ETH Conveyor Tracking function. The system allows for the creation of new conveyor tracking projects, where users can define encoder settings, boundary settings for the robot's working area, and advanced settings for conveyor vector compensation. It supports multiple conveyors and various types of objects.
Important Technical Specifications
The manual details several technical specifications crucial for the system's operation:
- Conveyor Speed and Precision: The system supports conveyor speeds up to 300 mm/s with an average precision of ±1 mm (when the workpiece angle variation is within ±15°).
- Robot Compatibility: The system is designed for use with a single robot and supports up to two conveyors. It does not support multiple types of objects.
- Encoder and EtherCAT Coupler Modules: The manual provides a table of applicable EtherCAT coupler models and encoder modules, including their rated voltage, current, and ON/OFF voltage. For instance, applicable EtherCAT coupler models include Beckhoff EK1100, Omron NX-ECC201, NX-ECC202, and NX-ECC203, with a rated voltage of DC24V and rated current ranging from 417mA to 950mA depending on the model. Applicable encoder modules include Vipa 050-1BA00, Beckhoff EL5151/EL5152, and Omron NX-EC0112/NX-EC0122/NX-EC0132/NX-EC0142/NX-EC0212/NX-EC0222, with varying rated voltages and currents.
- Code Wheel Specifications: Reference specifications for the code wheel include a resolution of 300 mm (or 95.49 mm in diameter). For different sized wheels, a 4.1.1 Encoder Setting is used to adjust parameters for perimeters, ensuring accurate conveyor speed measurement.
- Camera Specifications: The manual lists compatible camera models such as Basler acA2440-20gc, Basler acA2500-20gc, and Basler acA2500-14gc, along with their shutter types (Global or Rolling), sensor types (Color 2/3 inch, Color 1 inch, Color 1/2.5 inch), and connection interfaces (GigE interface). The recommended conveyor speed for optimal camera performance is less than 300 mm/s, with an average tolerance of ±1 mm.
- Lens Specifications: For ETH Mode, an industrial-grade C/CS Mount lens is recommended. Lens selection examples are provided, with calculations for pixel resolution based on lens focal length and object distance. For instance, using a 12 mm lens, the field is 232 x 174 mm², and pixel resolution is 232/2590 ≈ 0.09 mm/pixel.
- Light Source Requirements: For optimal image quality and rapid imaging time, a strong light source is recommended. The light source intensity should range from 2500 Lux to 2500 Lux, with uniformity higher than 90% to avoid light reflection. At light levels below 2500 Lux, increasing exposure time or decreasing conveyor belt speed may be necessary. For example, when the camera is 500 mm from the focus object, the light intensity is 2500 Lux, exposure time setting should be 0.5 ms, and the conveyor speed should be set to 300 mm/sec.
- Calibration Point Compensation: The system allows for conveyor vector compensation, including X offset (mm) and Y offset (mm) when adjusting calibration, to compensate for calibration plate direction offset. Z offset (mm) is also adjustable for calibration plate Z direction offset based on Robot Base coordinates.
Usage Features
The manual provides detailed instructions for using the Omron TM Conveyor Tracking system:
- Project Creation: Users can create new Conveyor Tracking projects by selecting "New > New Flow" from the Project page in TMflow. This involves choosing between "Conveyor_0" (single conveyor) or "Conveyor_1" (two conveyors) and then selecting either "Sensor Mode" or "ETH Mode."
- Encoder Setting: After opening the Conveyor Tracking project, users can set encoder parameters, working boundary, camera, and advanced conveyor parameters. Encoder resolution (Pulse/Rev) and wheel resolution (mm) are configurable. The "Reverse" option allows for adjusting the speed indicator in positive values if shown in negative values.
- Boundary Setting: The working area boundary for the robot is defined by "B Start" (work start point) and "B End" (work end point). The robot working range is specified in millimeters, with recommended maximum ranges for different TM robot models (e.g., 650 mm for TM5-700 model). The "New object range" defines the range the robot selects new objects.
- Advanced Setting (Conveyor Vector Compensation): This feature allows for compensating the calibration plate X and Y direction offsets, and Z direction offset based on robot base coordinates.
- CVSensor Configuration: Users can configure the CVSensor by setting the I/O Number (digital input channel of the control box), Enable Time (minimum trigger time), and Rising Edge Detect (default checked for active high signal). Calibration of the sensor is required, where users place an object on the conveyor before the sensor and activate the conveyor.
- CVNewObj Configuration: This node is used to define the waiting time for a valid object detected by the sensor. Users select the conveyor number (Conveyor_0 or Conveyor_1) and set the "Time Out" in seconds.
- CVPoint Configuration: This node defines the linear motion under Conveyor main thread for tracking objects. It includes settings for Pass Path and Fail Path, Follow Time, Get Point, Teach, Stop Criteria (Analog Input, Digital Input), Motion Settings (speed of CVPoint in-position process), Digital Output (status of control box or tool end), Output Variables (current motion state), Blending (robot movement to different points), and Advanced Settings (switch end tool).
- CVCircle Configuration: This node is used for circular motion setting under Conveyor main thread, applicable for specific applications such as gluing operations. It includes similar settings to CVPoint for motion control and object interaction.
- Vision Job Setup (ETH Mode): For ETH Mode, users create a new vision job, input a job name, and load a workspace. They can then perform pattern matching (Shape) by selecting a pattern and confirming the editing procedure. This involves saving the vision task and checking the vision job on the list.
- Robot Path Definition: Users define the robot's work path by dragging CVNewObj and CVPoint nodes into the project editing page, selecting the conveyor number, and setting parameters like Time Out, Pass Path, Fail Path, and Get Point. The "Teach" function is used to set the steps for objects that pass the sensor on the conveyor.
- Looping for Continuous Tracking: The system supports creating an infinite loop to form a simple object tracking process, allowing continuous operation.
Maintenance Features
The manual emphasizes several aspects related to maintenance and safety:
- Warranty Limitations: Omron provides an exclusive warranty for twelve months from the date of sale, covering defects in materials and workmanship. However, Omron disclaims all other warranties, express or implied. Limitations include disclaimers of merchantability, fitness for a particular purpose, and non-infringement.
- Buyer Remedy: Omron's sole obligation under warranty is to repair or replace non-complying products. The buyer is responsible for labor charges for removal or replacement.
- Limitation of Liability: Omron Companies are not liable for special, indirect, incidental, or consequential damages, loss of profits, or production.
- Suitability of Use: Omron Companies are not responsible for conformity with any standards, codes, or regulations applicable to the product. The buyer is solely responsible for determining the appropriateness of the particular product for their application.
- Programmable Products: Omron Companies are not responsible for the user's programming of a programmable product or any consequence thereof.
- Data Presentation: Data presented in Omron Company websites, catalogs, and other materials is provided as a guide. Users must correlate it to actual application requirements.
- Change in Specifications: Product specifications and accessories may be changed at any time based on improvements and other reasons. Users should consult with their Omron representative to confirm actual specifications of purchased products.
- Errors and Omissions: Information presented by Omron Companies has been checked and is believed to be accurate; however, no responsibility is assumed for clerical, typographical, or proofreading errors or omissions.
- Safety Precautions: The manual includes warnings and cautions regarding potential hazards such as serious injury, death, or property damage. All personnel involved in installation, operation, teach, program, or maintenance must read the Hardware installation Manual, Software Manual, and Safety Manual.
- Risk Assessment: Risk assessment of the whole system is crucial. Adding other machines and additional risk reduction measures based on the results of the risk assessment is recommended.
- Software Safety Features: Using appropriate software safety features, ensuring the user will not modify any safety measures, ensuring all systems are correctly designed and installed, clearly labeling user instructions, clearly marked symbols for installation, and making accessible relevant documents are essential.
- Cybersecurity Threats: To maintain security and reliability, a robust cybersecurity defense program should be implemented, including anti-virus protection (installing the latest commercial-quality anti-virus software and scanning USB drives) and security measures to prevent unauthorized network access (installing physical controls, reducing connections to control systems, and implementing energy isolation).
- Data Input and Output Protection: Backup data and keep data up-to-date periodically. Validate backups and retention policies. Validate the scope of data protection. Check validity of backups by scheduling test restores. Implement safety design for emergency shutdown and fail-soft operations.
- Additional Recommendations: Connect to an unauthorized terminal such as a SCADA, HMI, or to an unauthorized server only if network security issues such as spoofing and tampering are prevented. Take sufficient measures such as restricting access to the terminal. Implement a secure function, and locking the installation area by yourself. Prevent network infrastructure, communication failure, and unauthorized network equipment. Take adequate measures, such as restricting physical access to network devices, by means such as locking the installation area. When using devices equipped with an SD Memory Card, ensure that a third party may not acquire, alter, or replace the files and data.
- Product Disposal: Dispose of the product in accordance with the relevant rules and regulations of the country or area where the product is used.
- Calibration: The manual provides detailed steps for calibrating the camera and workspace, including setting the X-axis with the conveyor direction and the board's Y-axis with the edge of the screen. It also covers calibrating the workspace by moving the robot above the calibration board and pressing the PLAY button for visual navigation.
- Save Result: After completing the steps, users should save the result and name the workspace.